CHAPTER 1
OVERVIEW
This overview of the capabilities of TK-WRITER will help you to understand how TK-WRITER works and what it can do for you.
Cursor Control
. Up, Down, Right and Left CursorScreen Control . Next Screen
. Tab
. Next Word/Sentence/Paragraph
. End Of Line
. Previous Screen
. First Screen Document Control
. Word Wrap ModeFormat Control
. Typing Templates
. Margin Change
. Tab Set/Clear
. Cut LineEditing Control
. Reformat Paragraph
. Right, Left and Center Justification
. Insert CharacterPrint Control
. Delete Character
. Insert Line
. Delete Line
. Insert Text
. Delete Text
. Erase to End Of Line
. Erase to End Of Paragraph
. Erase to End Of Document
. Copy Text
. Move Text
. Interchange Lines Up/Down
. Underline TextMiscellaneous
. Bold Text
. Font Selection
. Superscripts and Subscripts
. Pagination
. Automatic Footnote Insertion
. Right Justification
. Headers/Footers
. Multinational Character Sets
. Spelling Checker
. Dictionary Lookup
. Word and String Search
. Replace Every
. Word Count
. Find Page, End of Document
. Line Drawing
. Desktop Accessaries
. Macros & Macro Directories
CHAPTER 2
GETTING STARTED
This section provides the basic instruction for the beginner or infrequent user of the TK-WRITER Word Processing system. It assumes that the user is already familiar with the layout of the keyboard and has had some use of the CRT.
Function Keys
For the purposes of this manual, we will refer to keys by their assigned function such as LINE DELETE or MACRO KEY, rather than their physical name. The HELP screens provide a FUNCTION KEY MAP that may be of use if you have no idea what key is defined to what function.
If there is no provision for function keys, or if there are not enough keys to implement all of the functions of TK-WRITER, some of the functions may need to be invoked by control codes. A control code is performed by holding the CONTROL key down while pressing another key. For example, a CONTROL-W would be performed by pressing the W while holding the CONTROL down.
Starting TK-WRITER
D ^TKWP
NOTE: If your terminal has not been used for PG&A's Toolkit products before, you may be asked to identify the type of terminal you are using before starting. A list of the available types will be listed for you to use in making a selection. Enter the number next to the type of terminal you are using and press 'RETURN'. If the TK-WRITER menu appears but is not displayed properly, your terminal may be incorrectly identified. See Appendix A for more information.
Using The Menus
Using the menus in the word processor is easy. There are two methods of selecting an option on each menu:
1.) You can type the first letter of the option desired. Notice that this letter is displayed at the front of the option. On the menu shown above, either a E, C, D, P, S or Q could be entered.
NOTE: If your system is configured to require a 'RETURN' on the menus, you will have to press the 'RETURN' key to complete the selection after a letter has been entered. Otherwise, the letter alone will execute the selection. For our purposes we will assume that you are required to press the 'RETURN' throughout this manual.
2.) The desired option can also be selected using the line selector. This is the arrow to the left of one of the options. This arrow can be moved up or down with the 'CURSOR UP' and 'CURSOR DOWN' keys. (The 'SPACE' bar can also be used to advance the pointer). When the line selector points to the desired option, press the 'RETURN' key.
After the option is selected, you will be shown the first screen of the option chosen. In some cases, this will be another menu.
Use the QUIT option to return to the previous menu. If, for example, you have selected the Print options, and then want to get back to the Main menu, type 'Q' to quit. (You may also use the EXIT function key.)
Document Directories
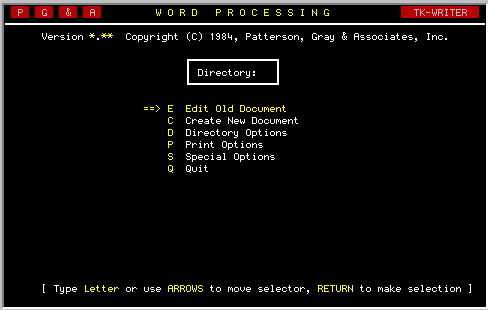
Before a new document can be created, the directory in which the document is to be stored must be selected. As shown in the illustration below, the Current Directory is displayed in a small box at the top of TK-WRITER's main menu. If the space is blank, then it indicates that no directory has been selected.

To select a directory, point to the Directory Options line on the main
menu
by moving the pointer or pressing
If you chose correctly, the screen illustrated below should appear on your
terminal.
For convenience in identifying and selecting directories, TK-WRITER
requires a single or double character designator be assigned to each.
This
is done when the directory is created, and can be composed of either upper
or lower case characters, or both. Enter a designator for this new
directory and press 'RETURN'.
After entering the letter, you will be given the opportunity to provide a
short description or title for this new directory. Enter the description
and press 'RETURN'. If a typographical error was made, use the cursor
keys to position the cursor on the error and 'RUBOUT' or 'DELETE'
to remove the character. Of course you can also type right over it as
well.
When the Description has been entered, the cursor will move to the
Password
field. Passwords are optional, so let's skip through it for now. Press
'RETURN'.
TK-WRITER automatically assigns the creation date when the directory is
created. Therefore, we can return to the Directory Options menu by
pressing 'RETURN'.
TK-WRITER will list all the directories that are currently available on
your system. Your new directory should also be listed among the others.
Move the highlighted arrow on the left with either the 'CURSOR UP' and
'CURSOR DOWN' keys, or the 'SPACE' bar, until it points to your new
directory. (Of course, if there is only one directory, this will be
unnecessary).
Press 'RETURN' to complete the selection of the directory being indicated
by the arrow. TK-WRITER will return you to its main menu. However, now
the directory which you have created and selected will be shown in the
small box at the top.
Start by selecting the CREATE A NEW DOCUMENT option from the main menu.
Notice that this screen is very similiar to the one used to create a new
directory. As you can see from the illustration below, you can provide
each document with a description, the author's name or initials, line
length as well as some other optional items.
With some practice and experimentation, you will be able to determine what
line length is best for your purposes. However, here are some hints. If
you will be printing on a standard sheet of paper with an inch border on
the left and right, then you have 6 1/2 inches to type on. At 10
characters-per-inch (CPI), that's 65 characters. At 12 CPI, there will be
enough room to type 76 characters.
For the purpose of this demonstration, create this document with a line
length of 65.
After pressing 'RETURN' (or the 'TAB' key), the screen will clear
momentarily and the top and bottom margin lines for the document will be
drawn. There will be 21 blank lines available for typing with the cursor
positioned on the first. This is the "TK-WRITER Editing Window".
To move above or below the current displayed portion of the document, you
can scroll up or down one screen at a time, or one line at a time.
Begin typing. There's no need to stop when you reach the end of the line,
because Word Wrap Mode is on. TK-WRITER will automatically move the last
word to the beginning of the next line. It is not necessary to press
'RETURN' at the end of each line within a paragraph.
There may be times when you want to turn the Word Wrap off. In order to
make a change you will need to press the 'SELECT' function key.
Now you may already know what key on your keyboard is the 'SELECT' key.
(Hopefully it is marked for you either on the key cap or on a template of
some sort.) But let us suppose that you don't know. How do you find out?
If you press the 'HELP' function key during the edit mode you will see the
following screen.
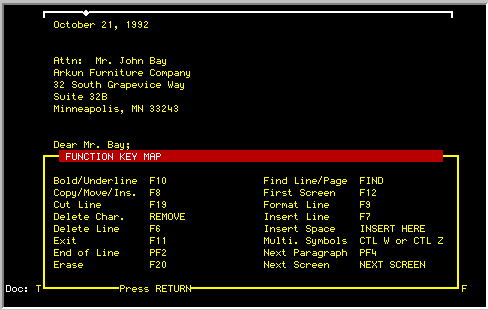
Move the cursor down to the Function Key Map and press 'RETURN'. You
will be given a listing similiar to the one shown below that will tell you
which keys do what on your particular terminal or PC. Look for the
'SELECT' key. (You will also see a listing of the default settings for
your particular terminal or PC in Appendix B.) Press the 'EXIT' key to
get out of the help screens.
If you type with Word Wrap OFF, the cursor will advance to the next line
when the last cursor position is reached, but the last word, or portion
thereof, will not be moved to the beginning of the next line.
Now switch the Word Wrap mode to HYP. In this mode, your typing will be
the same as Word Wrap ON, except when the last word on the line is over
six characters in length. It will then beep on each new character typed.
By moving the cursor left with the 'CURSOR LEFT' key you can point to the
position on the word where it is to be hyphenated. Press 'RETURN'.
TK-WRITER will break the word where selected, add a hyphen (unless you
point to a space) and bring the remainder of the word down to the next
line.
The 'NEXT SCREEN' and 'PREVIOUS SCREEN' functions are used to quickly move
from page to page within a document, while the 'FIRST SCREEN' function
will return you to the beginning of the document.
Did you make a mistake while you were typing? You may use the cursor keys
and move back into your text to correct it. You can either type over the
original, or use the INSERT CHARACTER or DELETE CHARACTER keys to insert
or delete characters from the line. You can then move down and do some
more typing.
When you need to go back and edit text already in your document, you may
be faced with several problems. Let's look briefly at some of the common
problems that occur while editing a document and a few ways to make that
make situations easier to resolve.
First, remember that we said that we could use the cursor keys to move
around on the screen. In practice, this method can sometimes be tedious.
Several functions have been included to speed up the process of moving
around in a document.
For example, the 'RETURN' key will bring the cursor back to the left with
one keystroke. Or, if the cursor is already on the left margin, using the
'CURSOR LEFT' will wrap the cursor to the right margin.
One function called 'ADVANCE TO NEXT WORD' can be used to advance from any
position to the beginning of the next word. Another such function is
'MOVE TO END OF LINE'. It can be used to quickly position the cursor at
the end of the current line, regardless of its length.
When doing columnar work, it is generally a good idea to set TAB stops in
order to be able to move from one column to the beginning of the next by
pressing the 'TAB' key.
Another common situation is having to insert a whole sentence in the
middle of an existing paragraph. We could move the cursor to the last
correct word and then retype the paragraph. Better yet, use the 'CUT
LINE'
function to break open the paragraph and insert the approximate number of
blank lines, type in your addition, and then use the 'REFORMAT PARAGRAPH'
function to close the paragraph back up.
This solution may sound a little complex, but it's not really so bad.
Let's break it down and look at it in more detail.
Add some text. Need more space? Use the 'INSERT LINE' function to add
another blank line, or as many new lines as you need. If you end up with
extra blank lines, you can remove them using the 'DELETE LINE' function.
Now that some text has been added to the middle of the paragraph, the
remainder of the paragraph needs to be brought back up and reformatted.
That's the job of the REFORMAT PARAGRAPH function.
The REFORMAT PARAGRAPH function is used frequently so it is important that
you feel comfortable using it. There are two things to remember. First,
the REFORMAT PARAGRAPH function will start its operation at the cursor
position and will continue until it encounters a blank line.
Second, the margins of the reformatted text will be the current template,
unless you override it by answering NO to the question it asks you. If
you do answer no, then you will be asked to enter the number of spaces
from the left and right that the text should be indented. A little
practice will make this process quick and efficient.
Another situation! Suppose there is a paragraph in your document that
would make more sense somewhere else. In such a situation, the 'COPY/
MOVE/ INSERT' function is useful.
When your text has been marked, press 'RETURN'. TK-WRITER will ask you
to assign a name to this marked text. Why? Because it does not know what
the destination is for the text, and will save the marked text under that
name so that it can be recalled at the proper time. Any name may be used,
so long as it is not already in use. However, TK-WRITER does not
distinguish between upper and lower case characters. Press 'RETURN'
when you have entered the name and you will be returned to Edit Mode.
The next step is to insert this text somewhere in the document. Move the
cursor to the line in the document where the text is to be inserted. It
can be on the current screen, some other screen or even another document.
For this example, use your current document. Press the
Although you will not see any immediate change when the 'RETURN' key is
pressed, the text will be moved into your document. But before you can
continue, TK-WRITER must know whether or not the text just inserted should
be deleted, or saved for another use. Press Y
for YES, DELETE IT,
unless you wish to save it. When completed, TK-WRITER will return to Edit
Mode with the now inserted text displayed on the screen.
There are many possible short cuts such as those described here. The more
you use TK-WRITER and experiment with its capabilities, the more
comfortable and efficient you will become with it. Good luck.
The process of printing a document begins by selecting Print Options from
the TK-WRITER Main Menu or if you are currently in the edit mode you can
select the Quick Print in the OTHER OPTIONS menu.
First, some background. TK-WRITER does all of it's printing offline
. That means that while your document is being printed, you can go on and
use the CRT for other purposes. To accomplish this, we need to supply the
TK-WRITER Printer with the name of the document(s) to be printed along
with other pertinent information. This information is then entered into a
Print Queue.
Unless you are British, or a computer aficionado, you may not understand a
queue. It is a list or a line with a particular order. You do not stand
in line at a bank in England -- you stand in a queue.
Just as people get in line at the end, documents are added to the end of
the queue. Each will be printed when it is first in the queue. There is
a different queue for each printer identified to TK-WRITER.
Now back to our example.
Select Print Document
from the Print Options menu. You will be
shown a list of the documents that are in the current document directory.
Find the document you just created and select it by pointing the arrow to
it and pressing 'RETURN'.
You will then be shown a screen for the printer selection. On this screen
you are asked to supply the device number of the printer to be used, the
number of copies of the document to be printed, and which pages to print.
For this quick example, just enter the number of the desired printer and
press 'TAB' to accept all of the remaining fields.
If you don't know the number assigned to your printer, ask your system
manager who maintains a list of these numbers. Also make sure that the
printer that you have selected is turned on.
When finished with the printer selection screen a brief message will be
displayed on the screen as a verification that the document has been
queued. If the printer you selected is not already printing a document,
it will begin printing yours.
If it requires loose sheets of paper to be hand-fed, then the printer will
beep at you twice each time it is ready to print a new page and wait for
you to insert a sheet and press the 'BREAK' key on the printer.
If a document is to be reused for another purpose, you may want to change
the name and description of the document. Use the Edit Document
Description option on the Special Options Menu for this.
There is a limit of 999 documents to a directory and a limit of 9999 lines
for each document. Other than this you need not concern yourself with
limits unless the system manager tells you that the disk drive where the
documents are stored is running out of room.
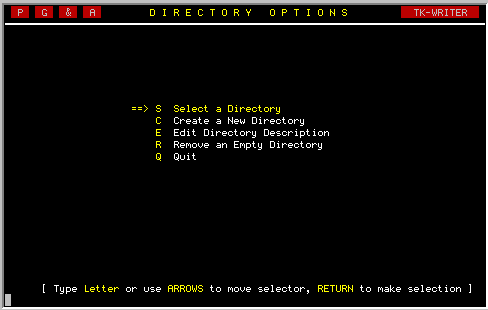
Creating A Directory
Since each user creates his or her own
directory,
it would be helpful for you to create one for yourself as part of this
exercise. Select the second option: Create a New Directory. 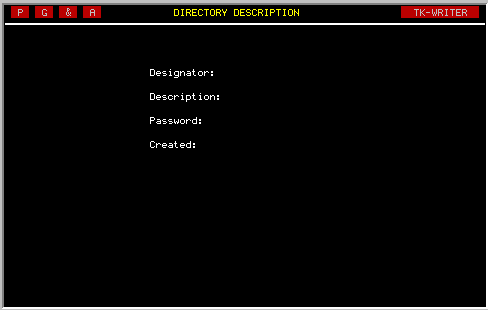
NOTE: Be careful to remember passwords assigned to directories
or documents. For security purposes, TK-WRITER is unable to provide
this information to you. (The system manager may call up an option to
provide you with forgotten passwords if necessary.)
Selecting a Directory
Now that the directory has been created, it can be
selected as the Current Directory. Choose the Select a Directory option
from the Directory Options menu.
Creating A New Document
To begin to familiarize you with the process of creating a
document, let's create and write a short note. 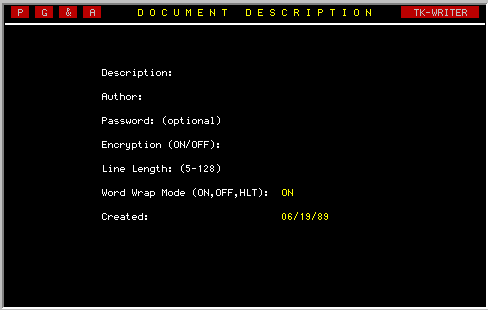
Document
Description
Proceed by entering the description of this new document. You could call
it "Sample" or perhaps something a little more imaginative. Press the
'RETURN' key when finished.
Author
Now, enter your name or initials as the author and press 'RETURN'. Password
If you specify a password, you will have to enter it before displaying or
printing the document any time from this point on.
Once again, proceed with caution. Should you forget the password, the
only
way to recover the document is by going to the system manager and have him
or her look up the password. Encryption
Although a password will
prevent anyone else from
accessing your document, encryption will make the internal format
unreadable also. It is only possible when a password is specified,
otherwise the cursor will skip down to the line length. Enter the word
"ON" to specify encryption. Note that the encryption/decryption may take
a
few seconds if the document is large. Line Length
The line length is the
maximum number of
characters allowable on each line. TK-WRITER will not permit typing
outside of this margin, although the line length can be changed at any
time. (See MARGIN CHANGE in the editing reference section.)
Word Wrap Mode
By default your editing environment will assume that TK-WRITER will
automatically have word wrap ON. There are three modes for word wrap as
follows:
ON
When you reach the end of the line, the last word of the line
will be automatically carried forward to the next line. Therefore you do
not need to press 'RETURN' at the end of each line. OFF
The words will not be wrapped at all when reaching the end of
the line. Instead a beep will be heard for every character that you try
to type in the right margin. HYP
Works similiar to the ON mode, but long word will beep and
allow you to point to the position to hyphenate the word. It will
automatically insertly while in the document the hyphen and bring the rest
of the word down. Insert Mode
The default setting for the INSERT mode is OFF. If you would prefer to
always have the INSERT mode ON when you enter this document, change it to
ON. Copy from
Document
When you are creating a new
document, it is often
desirable to have another document copied in before you begin. If this is
the case, enter the directory and the document number in this field and
TK-WRITER will do it for you. 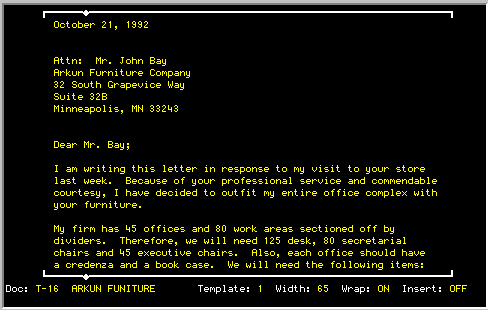
Editing Window
Look at the editing window
displayed above and
notice the various parts as are pointed out with the arrows. These items
will become very familiar to you since a good portion of the time will be
spent creating and editing documents.
Typing and Editing
The margin lines at the top and
bottom of the
screen define the typing area. Using the cursor keys you can move freely
within this area typing where you wish.
Help Screens
TK-WRITER contains over 70 help
screens that
provide you with most of the information that is found in this manual.
These screens are sensitive to what you are currently doing at the time
and will display help for that particular function. 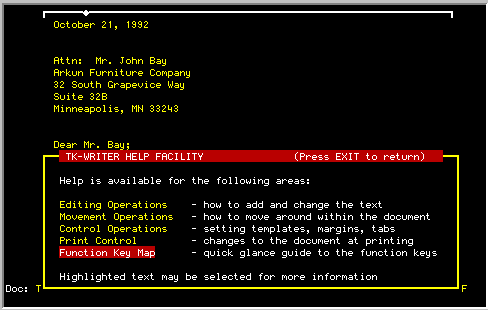
Word Wrap
Once you have found the 'SELECT' key on your terminal, press it. When
prompted for more information press 'W' for Word Wrap mode. Each time 'W'
is pressed, the Word Wrap mode is changed to the next value (e.g., ON,
OFF, and HYP). Press 'RETURN' to select one of these options. Other functions
You also may use the help screens to find out
specifics concerning each of the other functions. While in the document
editor, you have access to a wide variety of functions, many of which can
be used nowhere else in TK-WRITER. These functions are designed to assist
and enhance your efforts in the typing and editing of a document. Let us
cover a few of the basics.
Editing Shortcuts
Most users will want to quickly learn the shortcuts that make the job
faster and easier to complete. The paragraphs that follow will introduce
you to several such shortcuts. Cut Line
First, the 'CUT LINE' function. It's easier to demonstrate than explain.
Move the cursor up to the middle of a paragraph in your document and
position it at the beginning of a word. Now press the 'CUT LINE' function
key and watch. The program actually cut the line and put the remainder,
that portion to the right of the cursor, on a newly inserted line below.
Press it again; now a blank line has been added (you could also have used
the 'INSERT LINE' function after the line was cut). Now there is room to
enter additional text. Reformat Paragraph
Move the cursor to the first word of the paragraph and press 'REFORMAT
PARAGRAPH'. You will see a message at the bottom of the screen asking
whether or not you want to use the current template as the margins. Type
Y
for YES. You will notice that the Word Processor will now
reformat the paragraph so that the text fills the margins. It will not
break any words and it will stop when it encounters a blank line. Copy/Move/Insert
Move your cursor on the first word of the text to be moved. Press the
'COPY/MOVE/INSERT' function key and press M
for MOVE TEXT. The
current page of text will be displayed in low intensity video, and you
will be given the opportunity to mark the area to be moved. Use the 'UP'
and 'DOWN' keys to move vertically, use 'RIGHT' and 'LEFT' to move
horizontally. Try this on some of your text and see what happens. The
marked text will be highlighted.
Printing A Document
You have learned how to create, enter and modify a document. But, this is
of limited value unless it can be printed.
Managing Documents
Each document you create will be stored in its directory by TK-WRITER
until it is deleted. After printing all the desired copies of a document,
you may either delete it or save it for future use. Generally, it is a
good idea to methodically remove unnecessary documents to avoid filling up
directories and disks.