CHAPTER 6
REFERENCE - PRINTING
This section contains detailed information concerning the various operations that may be selected either from the Print Menu or the Quick Print option.
DEVICE PARAMETERS
Allows the system manager to define different printer types to the Word Processing system.
Printing
Select Setup Printer Parameters from System Manager's Options menu.
The Setup Printer Parameters allows the system manager to identify the printers that are used by the Word Processing system.
This option is used when a printer is added or deleted from the system, or whenever a change is made in the type of printer used.
The following parameters may be entered and/or edited by this option:
Device
Enter the MUMPS device name of the printer. This is the number or alphanumeric string which is used in the MUMPS OPEN and USE commands to access the printer. Pressing RETURN without a number will return control to the Print menu. After entering a device name, you should see the following screen -
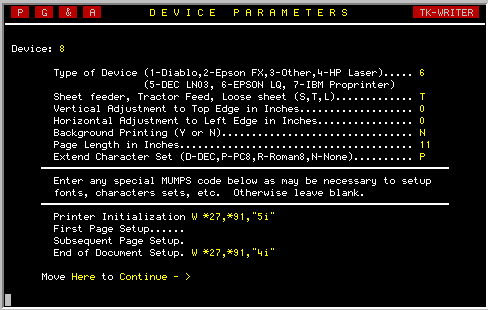
Type of Device
Enter a number from 1 to 7 that corresponds to the printer type that is being referenced. Use option 3 if it does not fit any of the other catagories.
Type of Paper Feed
Enter the type of paper handling system on the printer. If you enter a <L>, then the word processor will stop on each page and wait for a BREAK signal to be sent from the printer before it will start printing. The <T> tractor feed option is used when the printer is setup with a continuous paper supply. The <S> sheet feeder option is for loose sheet printers that supports multiple bins that may be selected via software.
Vertical Distance from Top
Enter the number of inches the paper needs to be moved to reach the first printable line on the paper. If the paper is already positioned past the first line, then enter a negative number indicating the number of inches past. On loose sheet devices, you can include the distance that the platen needs to move to feed the paper up to the starting position. (Fractions should be expressed as decimals.)
Horizontal Adjustment to Top
Enter the distance in inches (and decimal fractions of an inch) that the print head must be moved to reach the column 0 position of the paper. Enter a negative value if the movement is to the left. This adjustment is needed on some printers to insure that the left margin value entered by the user during printing is the same as is observed from the completed printout.
Background Printing
Enter Y if the printer is on its own communications port and the MUMPS system will support background MUMPS jobs. Single tasking MUMPS systems and printers that are attached as a slave printer to the CRT device will have to be run in the foreground. Enter N for these devices.
Page Length
Enter the length of the print area of the paper from top to bottom in inches. Although this value will default to 11 inches, many printers may be set to automatically skip the perforations and you may have to enter a value of 10.5 or so to accommodate the shorter paper length.
Extended Character Sets
TK-WRITER currently supports 3 different 8-bit symbol sets: DEC multi-national, PC-850, and Roman-8. Leave this blank if the printer does not support 8-bit mode or one of these sets.
Special Printer Escape Sequences
Although TK-WRITER will generally issue all of the initialization that is needed for any given printer type, you may add your own initialization code as a supplement. Note that you may either enter decimal values of the escape sequences (using the comma as a delimiter) or MUMPS code.The first line (Printer Initialization) is issued before TK-WRITER does any of it's own initialization. You may include any special open and use parameters, networking functions or other special setup here.
The next two lines are issued just before the first and subsequent pages are printed. Permanent sheet feeder instructions can be included in this area.
The final line (End of Document Setup) can be used to relinquish the network, reset the printer parameters, etc.
Other Printer Feature definition
If you selected printer type 3, then you will need to instruct TK-WRITER in what it takes to invoke bolding, underlining and other features that may be used during the printing process.

Enter the decimal values of the ASCII characters that will cause the listed special features of the printer to be activated. If the printer does not support the feature, leave it blank.
When all the necessary parameters are entered, move the cursor to the bottom of the screen and the data will be stored.
NOTE: The following table describes the order of execution of each of the user defined setup features for the printer. In some instances it is important that some procedures come before others, for an example it is important that the printer reset instruction come before any printer setup escape sequences that might get cleared with the reset command.
|
1 Printer Initialization (user defined) 2 (TK-WRITER's own printer initialization) 3 (SET or INCLUDE commands on first line of document) 4 First Page Setup (user defined) 5 Bin Selection (user defined) 6 Font Selection (user defined) 7 (first page of document) 8 Subsequent Page Setup (user defined) 9 Bin Selection (user defined) 10 (remainder of document - repeating 8-10 as needed) 11 (if list processing - go back to step 1 if more to print) 12 End of Document Setup (user defined) |
FONT SELECTION
Allows multiple fonts and other printer features to be selected at various points within the document.
Printing
SELECT function key and
"F" for font selection, then
point to desired selection, and
press <RETURN>
If your printer supports multiple typing fonts or other special printer features, references to these printer features can be made at any point within the document.
See SELECT FONTS in Section 3 for a description� of how to insert these references into your document.
See the SYSTEM MANAGER'S MENU for information on how to add and edit the entries in the font selection file.
LIST PROCESSING
Permits the user to combine a list of data to a particular document while printing.
Menu Item
Type <L> in the Print Options menu.
The List Processing facility allows you to print documents that have all or part of their text taken from another document within TK-WRITER or a file outside of the Word Processing system. This file may contain lists of names and addresses from a mailing list, lists of parts from an inventory system, lists of books from a library file or whatever lists the computer maintains.
TK-WRITER makes a distinction between lists that are found in another document and those that are found in a file outside of TK-WRITER. The first of these is commonly called "Mail Merge" and is the first option on the List Processing menu. The remaining options, if any, are lists that must first be defined by a programmer (see the Integration Notes Chapter on how to define these lists).
To run the List Processor you must first select one of the lists that is shown on the List Processing screen. If you select the "Mail Merge" option, then you will be prompted for both the source of the list and the document to print. Select each of these as you would in a normal document selection. (See Mail Merge description in the next section.)
If you select option 2 or higher, then you have selected a list that comes out of your database files and you are requested to enter the starting point. Just press RETURN to start at the beginning. Enter the name, number or other reference value (this is dependent upon the nature of your files) to start somewhere other than the beginning. Then select the document to be used with the list.
The remainder of the setup deals with the print parameters and are identical to queuing a document to print.
MAIL MERGE
Permits a list from one document to control the printing of a second document.
Menu Item
Type <L> in the Print Options menu.
TK-WRITER gives the user the capability of merging two different documents and printing the result. The one document contains a list of data items and is called the "Source of List" document". These data items are incorporated in the "Document to Print" at specific places and are printed on the selected printer. The document will be printed until the list is exhausted.
The data to be merged may be names, address, phrases, paragraphs, part numbers, prices or any other text that you would want to combine with a document. The exact number of items to be merged for each document may vary but each set of items is separated from the next with a "~" (tilde) character.
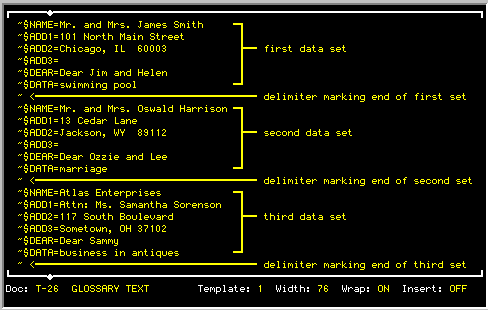
For an example, the data in the list may look like this:
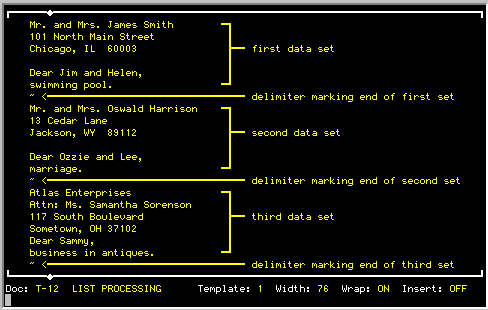
Notice the blank lines in the first and second data sets. They are place holders and are important. To understand how these lines are merged into the document, let us first look at the sample document on the next page.
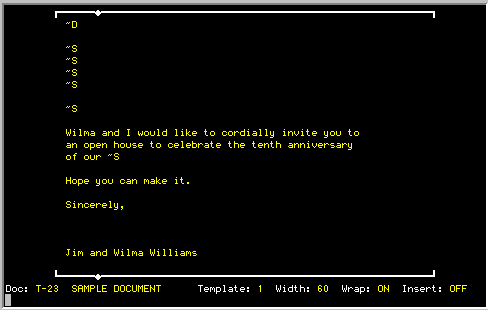
You will notice that there are six ~ S stops in the document. TK-WRITER loads each of these "stops" with one line from the data set until the data is exhausted. Any remaining "stops" will be left blank.
In the last screen, "Mr. and Mrs. James Smith" would replace the first ~ S, "101 North Main Street" would replace the second and so on.
If the data line is blank and the "stop" is the only thing on the line in the document, then the line will be ommitted when printed and the remaining lines will be moved up one line. This prevents blank lines in the printed document when the data set varies in length. Remember that you must still leave the blank line in the data set so that order is maintained.
You may also include glossary text in the data set which will then be merged with the document when it is printed. Glossary text is similiar to the "stops" except that it is not inserted in the document in any particular order, but rather it is inserted where the corresponding glossary reference is made in the document.
The example illustrated on the next page provides similiar results as the previous example but uses glossary text rather than "stops".
You can see that the data is similiar to the first example, but now each item is preceded by a "~$GLOSSARY_NAME=" to identify it. Although they are in the same order as before, the order is no longer important. The follow shows how the document would look to print this glossary data:
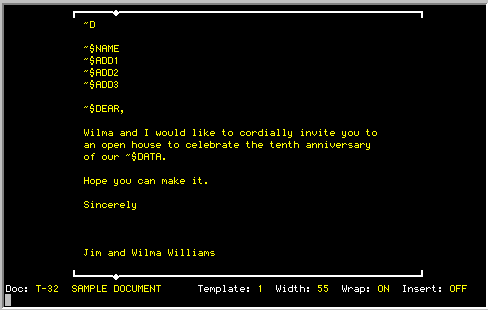
You may have noticed that on the "stop" data in the first example that the last two lines include punctuation and the glossary text did not. The reason for this is that "stop" data automatically replaces "~ S" and the remainder of the line, whereas the glossary text is inserted into the line with the remainder of the line preserved.
You may mix both the "stop" method and the glossary method in the same document. Although the "stop" method is easier to implement (particularly since the glossary name does not need to be typed over and over), the glossary method does give the "replace every" functionality that is often useful.
One way of combining the convenience of the "stop" method with the flexibility of the glossary is to create a glossary definition section at the beginning of the document that is defined with "stop" information. The beginning of the document would look something like this:
~$NAME=~Sthen the remainder of the document follows with the glossary names inserted where desired.
~$ADD1=~S
~$ADD2=~S
. . .
PRINTING ENVELOPES
Allows envelopes to be printed with documents.
Printing
Select on Print Parameters screen
You can print an envelope with TK-WRITER in one of three ways:
| 1. | By creating an individual document with the envelope information and the correct margins as would apply to an envelope. Load your printer with an envelope and print as you would normally. If you create a document with just 6 lines of ~ S stops, you will be asked to enter the envelope information everytime you print (forms mode). You can also link this document to either Mail Merge or List Processing to do multiple envelopes. |
| 2. | By having TK-WRITER carry the name and address information over
from the letter to the envelope and therefore printing the envelope along
with the letter. First, in your letter, precede the name and address with a ~ A. This will identify which lines will be carried over to the envelope. You document may look like this:
Next, as you print the document, make sure that you specify "Y" for envelopes in the PRINT FORMAT screen and also check for the correct envelope margins. TK-WRITER will then print the envelope information after it first prints the main document. It assumes that your system manager has properly defined the paper handling system of your printer and that the envelope will be loaded, either automatically or manually. |
| 3. | This method is the same as method 2, except that an alternate
printer is chosen from the printer selection screen. You still need to
type the letter the same way as in method 2, but you do not need to say
"Y" to envelope. Just enter the printer number that will print the
envelope in the Alternate Envelope Printer prompt. TK-WRITER will print
the envelope separately.
|
PRINTING FOOTNOTES
Enables automatic footnote insertion at the time of printing.
Printing
~ Fxx inserted in the document and FYY in the print parameters option table.
The footnote option allows you to enter your footnotes in a separate document without regard to the final placement at the time of printing. Text can be deleted, inserted, copied or moved from the original document without affecting the footnotes during printing.
To use the footnote option, you must follow three steps:
| 1. | Insert a ~F and the footnote number, without any spaces between, at the point where the footnote is referenced. When printed, it will show up only as a superscripted number. |
| 2. | Enter all of your footnotes as they should be printed in a separate document. Each footnote must be prefaced with a line containing a ~ and the footnote number (no spaces). The following line is the first line of the footnote and it should be entered as it is to be printed (indent if necessary). Separate each footnote with a blank line. They do not need to be entered in order. |
| 3. | When you are ready to print make sure the number of the document in which the footnotes were typed is included on the Print Parameters Option screen. You do this by typing <F> on line 13 (Special Formats) followed by the document number. If this reference is omitted, the footnotes will be omitted from printout. |
If you include the letter R along with the document number in the Print Parameters Option table (such as F23R) the footnote numbers will be renumbered on each page starting with one and counting by one for each footnote. If this is omitted, no renumbering will occur.
USING MARGINS
Enables positioning of the document on the paper during printing.
Printing
Options on the Print Parameters Option table.
There are four margins on every page of print: top, bottom, left and right. You can select the size of these margins as follows:
| Top | Option #4 allows you to enter the number of inches that should
be skipped from the top before printing starts. Option #9 allows you to specify a different top margin for all pages following the first. This lets you print the first page on letterhead, and following pages on blank continuation. |
| Bottom | Option #10 allows you to specify the space in inches for the bottom margin. If you leave this blank, printing will continue without page breaks. |
| Left | Option #3 allows you to specify the distance from the left margin. |
| Right | Option #8 allows you to indirectly select a right margin. The right margin is only used when printing a text that is right justified (see RIGHT JUSTIFICATION). All other text will be printed according to the length of the line and the characters per inch selected. |
MULTIPLE COPIES
Enables more than one copy of a document to be printed with one queuing.
Printing
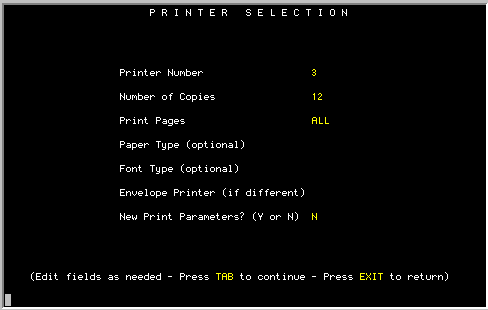
Option on the second Print Parameters screen.
The default number of copies is one. You may change this number to any number you like. The printer will then continue to print the document for the number of times specified. The count of the number printed is reported on the Monitor Print Queue report.
To cancel the printout, press "BREAK" on the printer, or remove the document from the print queue using the Remove Document from Print Queue option.
PAGE NUMBERS
Enables automatic page numbering during printing.
Printing
Option is specified on the Print Parameters Option table (#11).
If this option is selected, the printout will include page numbers automatically inserted in the document. The user may select a number of variations to the page numbering by including one or more of the following:
| # | This is the beginning page number. The default is one. If you want to start with a different number, enter the starting number. It must be the first character in this option. |
| A | Allows the position of the number to alternate from left to right so that you may print on both sides of the paper and still have the page numbers on the outside of the bound document. |
| B | Page number is to appear one half inch from the bottom of the paper (assuming eleven inch paper). |
| C | Page number to be centered on page. |
| L | Page number to appear on left side. |
| R | Page number to appear on the right side. |
| X | Page numbers to be printed in lower case Roman numerals. |
| T | Page number to appear at the bottom of page one and the top of each following page. |
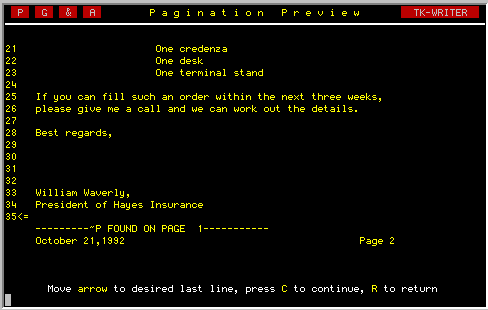
PAGINATION
Enables TK-WRITER to determine page breaks.
Printing
Option on the Print Parameters Option table.
Automatic pagination is performed by the Word Processor if you select the bottom margin on option #10 of the Print Parameters Option table.
The document will be broken to allow for the specified bottom margin and the text will continue on the next page. Orphan and Widow line processing will be conducted so that the document will not have a single line at the bottom or top of the document that belongs to the paragraph on the preceding or succeeding page.
If you want to control your own pagination or break a page before it would automatically, then you must type a ~ P in the text where you want a new page to start.
When you want to preview the page breaks before you actually print the document, use the Pagination Preview option under the Special Options menu.
PITCH
Permits the number of characters per inch to be selected.
Printing
Selection on Print Parameters Option table (#2)
You may specify the printing pitch by indicating the desired number of characters per inch. Enter a number between 5 and 20.
Generally elite text is printed at 12 char/inch, and pica text is printed at 10. If you find that the text is too wide, you may squeeze the text by increasing the character per inch. Conversely, you may expand the text by decreasing the characters per inch.
If the printer you are using will print with proportional spacing, the printer will vary the spacing for each letter. Enter "PS" instead of characters per inch to turn on the proportional spacing option. (If you are using a daisy wheel printer, be sure you have inserted a proportional spacing printwheel.)
On some printers the space between the words of proportional spaced text may be changed by using a number before the PS such as 10PS or 12PS. The larger the number, the smaller the spacing.
PRINT QUEUE
Allows the printing of the documents to be accomplished as a separate task.
Printing
Not applicable
The print queue is controlled through the use of the Print Document options. You may add a document to the queue (list), remove a document, or monitor the status of the print queue. Each document in the queue will be printed in the order that they are entered. Each printer has its own queue.
Use the Monitor Print Queue option to get a listing of the documents that are queued up to print. They are listed in order of priority by printer. The documents will be listed as being in one of the following states-
| (blank) | There are other documents that need to be printed before this document will be ready to print. |
| Printing | This document is currently being printed. |
| List Pro | A document that is being used by list processing is waiting for the availability of the printer. |
| Printing List |
This is a list processing document that is currently printing. If the list is long, this document may be in the queue for a long time. |
| Error | A printing error has occurred. This is usually caused by the interruption of the printing by pressing the BREAK key. This document will remain in the queue until it is removed by the Remove Document option. |
PRINT CONTROL CHARACTERS
Permits special functions to be performed at the time of printing.
Printing
~ followed by an A,C,CT,D,EC,F,I,P,PC,PE,PO,S,/ or \ ~C
The Printer Control characters are inserted in the text to cause a change in the printing of the document. Note that the Printer Control characters always start with the tilde character ~. The Printer Control characters are:
| ~ A | Allows for the insertion of variable data entry text to the right of the control character. This is used the same as a "~S" but will also save the variable data entry to be typed on the envelope if the envelope option is turned on. See Variable Data Entry. |
| ~C | Turns the right justification off for the current line. |
| ~CT | Centers the current line on the margins specified. This is generally used when you want to center proportional spaced text. Due to the nature of proportional spacing, just having the text centered on the screen during editing does not guarantee that it will be centered when printed. |
| ~D | Inserts the current date in the text. |
| ~EC | Allows escape to MUMPS code. The remainder of the line is interpreted as MUMPS code which will executed when printed. |
| ~Fxx | Used to indicate a footnote. Follow the F immediately with the footnote number. During printing, the number only will be printed and it will appear as a superscript. See Footnotes. |
| ~Ixx | Inserts xx number of blank lines in the text while printing. |
| ~P | Causes a page break to occur. |
| ~PC | Same as ~P except that this code is inserted by the Word Processor and is used by the Pagination Preview to override the automatic pagination. All of the "~PC" lines can be removed with Pagination Preview by answering "Yes" to the "Remove Previous Pagination" prompt. Then, every time the user alters the page break position during Pagination Preview, a "~PC" is automatically inserted in the text to force the page break. |
| ~PE | Breaks page either once or twice until an even number page is encountered. |
| ~PO | Breaks page either once or twice until an odd number page is encountered. |
| ~Pxx | Breaks the page if there is less than xx lines remaining on the current page. |
| ~S | Allows for Variable Data Entry. At the time of printing the user is requested to enter the text to be inserted in place of each occurrence of the "~S". If no data is entered, and the entire line is blank, it will not be printed and the next line will move up in its place. |
| ~/ | Moves the text down one half a line. |
| ~\ | Moves the text up one half of a line. |
| ~$xx | Glossary Insert. See list processing. |
~ <INCLUDE Y,X
Text Inclusion - All. Includes all of document X in directory Y at this point while printing.~ <INCLUDE Y,X,Z
Text Inclusion - Paragraph. Includes the paragraph in document X of directory Y that begins with Z.~ <SET TRANSPARENT ON
Turns off the print driver. The following text is printed as it is found in the document. Line counts are not updated, video attributes are ignored and pagination is turned off.~ <SET TRANSPARENT OFF
Turns the print driver on after the TRANSPARENT OFF command has turned it off.~ <START HEADER
Defines the beginning of header text and continues until a STOP command is found.~ <START FOOTER
Defines the beginning of footer text and continues until a STOP command is found.~ <STOP
Header or Footer text STOP code.
NOTE: Some printers may not be able to provide the functions called for by the Printer Control characters and the function will be ignored.
RIGHT JUSTIFICATION
Justifies the text to the right margin to provide a smooth block of text.
Printing
Option #8 on the Print Parameters Option table.
Turn the right justification on by entering the width of the text in inches in Option #8 of the Print Parameters Option table. The dimension entered is the measurement from the left to right margins. Enter inches to the nearest tenth of inch such as 6.5 or 4.2.
The printer will try to adjust the spacing between the words so that the text will fit the width you specified. In some cases space will be added between the letters so that the words will not be so far apart. If the text has to be stretched beyond what will look acceptable, then it will print it without any justification.
Use the ~C Print Control character to cancel the justification on lines that you want left as is. This would apply to tables, titles and other text that is not part of the paragraph.
Justification can be turned off altogether using the ~ER0 Printer Control character and turned on later in the document with a ~ERxxx where xxx is the width of the text in inches. You may also use this control to adjust the width of the document while printing.
Some printers do not support right justification. For these printers, the text will then be printed ragged right.
SUPER/SUBSCRIPTS
Enables text to be printed up a half line, or down a half line from the rest of a document.
Printing
Printer Control character <~> followed by
</>, <\> or <F>
Preceding any text with a ~ / will cause the remaining text on the line to be printed one half line down.
Preceding any text with a ~ \ will cause the text to be printed one half line up.
In order to print a subscript you will need to use a combination such as:
...sample text.~ /sub~ \ Following text...which would then print the word sub as a subscript.
The footnote symbol ~ F can also be used to print superscripts such as:
...sample text.~ F12 Following text...where the number 12 will be printed as a superscript.
NOTE: Some printers do not support printing of superscripts or subscripts. In these cases, TK-WRITER will print the raised or lowered text at the same level as the rest of the line.
THESIS FORMAT
Permits text to be printed double spaced, while indented material is single spaced.
Printing
Option #13 on Printer Parameter Option table.
If you add a <T> to line #13 on the Printer Parameter Option table, the document will be printed using a Thesis format.
The nature of the Thesis format is as follows:
| 1. | All lines that are flush to the left margin will be spaced down one line before printing. All other lines will be single spaced. |
| 2. | Footnotes that are inserted by the Footnote option will be printed single spaced. |
Text for a Thesis format should be typed single spaced with a blank line between the paragraphs. Indent the first word of each paragraph. Precede and follow all quotations with a blank line.
VARIABLE DATA
Permits additional data to be entered into the document at the time of printing.
Printing
Requires the use of the "~ S" or "~ A" in the the text.
Often it is desirable to change certain portions of a document each time it is printed, while other portions remain unchanged. A form letter in which the name and address change each time it is printed is a good example. The changing (or variable) portion of the document may be entered at the time of printing using the Variable Data Entry screen.
In order to prepare a document for variable data, it is necessary to insert ~ S at each place in the document where changes will need to be made.
When adding these stops to the document, it is possible to enter text to the immediate right of the stop, and edit the entry again at the time of printing.
When the document is queued to print, you will be asked to enter any variable data that is required. The Variable Data Entry screen will display each of the stops and leave room for you to add or edit the text to the right of them. Each new section of stops will be indicated by a "*" in the left margin.
The variable data entered will be stored in the print queue along with the document and will then be combined with the document when it is printed.
Use the ~ A control character to include the variable data on the envelope using the envelope option.
VERTICAL SPACING
Enables adjustment of the space between the lines.
Printing
Line #1 on the Print Parameters Option table.
The standard vertical spacing of text is six lines to the inch. You may adjust this by either increasing or decreasing this amount. Often the text can be compressed down to seven or eight lines per inch so that more can be printed on a single page.
Double spacing can be achieved by decreasing the lines per inch to three. (The thesis format may also be used if you need single spaced quotations.)
Some printers are not able to adjust the vertical spacing, and therefore the only values usable for these printers will be the three and the six. All other values will be ignored.