Making a
Journal Entry
(Single Currency)
From the GENERAL LEDGER menu, select Enter Transaction.
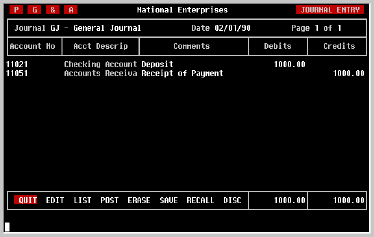
A journal entry is a set of transactions, each of which is composed of an account number, a transaction description and a debit amount or credit amount. For the entry to be posted, the sum of the debits must equal the sum of the credits.
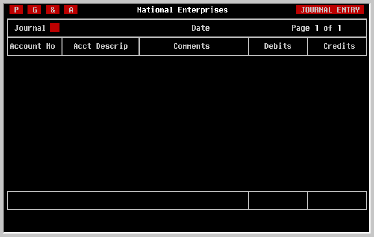
GJ - General Journal
AD - Balance Sheet Adjustments
Of course, others may have been created as well.
Entries posted to the Balance Sheet Adjustment journal are not handled in the same way as normal entries. This journal is used for adding data to the prior fiscal year's Balance Sheet without re-opening the prior year. This is accomplished by adjusting the balances brought forward of the affected accounts for the current fiscal year. Use care.
Entry dates which fall in a future period that has not yet been defined to the system through the Fiscal Year Maintenance screen will also be denied.
Enter the appropriate date and press [RETURN]. Remember that it is not necessary to enter the "/". However, it is necessary to enter six digits. For further details refer to the discussion regarding system conventions at the beginning of this manual.
Transactions
Notice in the upper right corner of the screen the phrase 'Page 1 of 1'. Since an entry can have many transactions but only fifteen can be displayed at a time, this screen will page forward and backward in the entry. And it will always tell you what page you are on and how many pages there are. If you are working with a large entry, use the NEXT SCREEN and PREV SCREEN keys to move back and forth. If you are unsure which keys these are on your terminal, press a [?] or refer to Appendix B in the back of this manual.
AAAAAA-DDDDD
where AAAAAA is the Ledger account number and DDDDD is the department code.
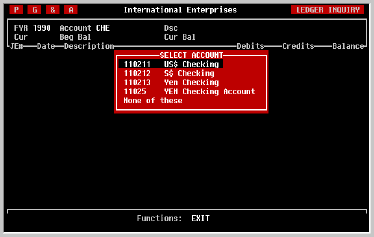
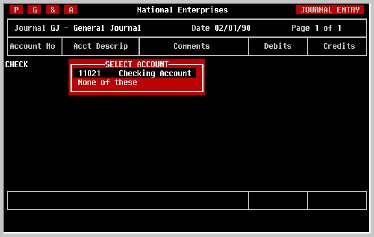
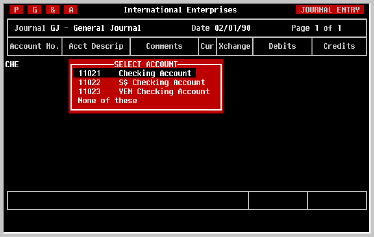
If you don't remember the exact account number, enter part or all of a word found in the account description and TK-LEDGER will display a list of accounts from which to choose as illustrated in the screen below. If none match, choose the last option in the window and try again.
If you select an income or expense account using this method and you are using the Departmental Accounting feature of TK-LEDGER, the window will be removed, the account number displayed and the cursor will move to the space immediately following the account number in which you can enter the appropriate department code.
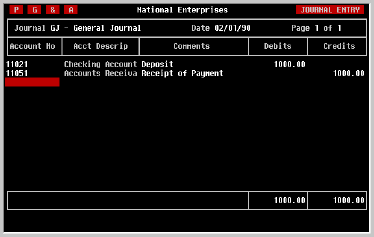
When you have entered a valid account number, a portion of the account description will be displayed next to it to allow you to verify its correctness and the cursor will move to the 'Comments' field. If it is not the account you intended, use the cursor [LEFT] key to move the cursor back to the 'Account No.' field and try again.
After comments have been entered for the first transaction, these comments will be replicated automatically in the 'Comments' field of subsequent transactions. If you want the comments to be different, simply enter a new comment.
Enter the amount of the debit. The following examples illustrate what needs to be typed.
Since a transaction can have only one amount, when you have entered an amount in the 'Debits' field, the cursor will automatically move to the beginning of the next transaction.
Entered Displayed 159 159.00 159.1 159.10 159.17 159.17
To remove an amount entered in the 'Debits' field by mistake, use the DEL CHAR key or the ERASE FIELD key either of which can be identified by pressing [?]. Or you can simply enter an amount of zero (0).
Press [RETURN] at the 'Account No.' field on an empty row or press the TAB or EXIT keys. A one-line menu of options will be displayed at the bottom of the screen, as shown in the following illustration.
To post the Entry, move the highlighted bar to the option 'POST' and press [RETURN]. If any data entry errors are detected at this point, they will be described to you. Simply fix the error using the 'EDIT' option and try posting the Entry again.
As with all of the one-line menus found in TK-LEDGER, there are two methods of moving the highlighted bar.
1) Use the [SPACE] or cursor [LEFT] and [RIGHT] keys to move the bar to the desired option; or
2) Type the first character of the option. For example, to select 'POST', press a [P]. It does not matter whether the character is in upper or lower case, TK-LEDGER will find and highlight the appropriate option.
Should it be necessary to exit the Journal Entry screen before completing an Entry, don't worry about losing what you have entered. The Entry will still be there in your work space when you return to the screen later.
Making a
Journal Entry
(Multi-Currency)
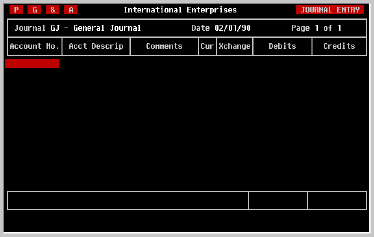
From the GENERAL LEDGER menu, select Enter Transaction.
A journal entry is a set of transactions, each of which is composed of an account number, a transaction description and a debit amount or credit amount. For the entry to be posted, the sum of the debits must equal the sum of the credits. These totals are shown in the base currency equivalents at the bottom right corner of the screen.
GJ - General Journal
AD - Balance Sheet Adjustments
Of course, others may have been created as well.
Entries posted to the Balance Sheet Adjustment journal are not handled in the same way as normal entries. This journal is used for adding data to the prior fiscal year's Balance Sheet without re-opening the prior year. This is accomplished by adjusting the balances brought forward of the affected accounts for the current fiscal year. Entries posted to this journal should be handled with care.
Entry dates which fall in a future period that has not yet been defined to the system through the Fiscal Year Maintenance screen will also be denied.
Enter the appropriate date and press [RETURN]. Remember that it is not necessary to enter the "/". However, it is necessary to enter six digits. For further details refer to the discussion regarding system conventions at the beginning of this manual.
Notice in the upper right corner of the screen the phrase 'Page 1 of 1'. Since an entry can have many transactions but only fifteen can be displayed at a time, this screen will page forward and backward in the entry. And it will always tell you what page you are on and how many pages there are. If you are working with a large entry, use the NEXT SCREEN and PREV SCREEN keys to move back and forth. If you are unsure which keys these are on your terminal, press a [?] or refer to Appendix B in the back of this manual.
where AAAAAA is the Ledger account number and DDDDD is the department code.AAAAAA-DDDDD
If you don't remember the exact account number, enter part or all of a word found in the account description and TK-LEDGER will display a list of accounts from which to choose as illustrated in the screen below. If none match, choose the last option in the window and try again.
If you select an income or expense account using this method and you are using the Departmental Accounting feature of TK-LEDGER, the window will be removed, the account number displayed and the cursor will move to the space immediately following the account number in which you can enter the appropriate department code.
When you have entered a valid account number, a portion of the account description will be displayed next to it to allow you to verify its correctness and the cursor will move to the 'Comments' field. If it is not the account you intended, use the cursor [LEFT] key to move the cursor back to the 'Account No.' field and try again.
After comments have been entered for the first transaction, these comments will be replicated automatically in the 'Comments' field of subsequent transactions. If you want the comments to be different, simply enter a new comment.
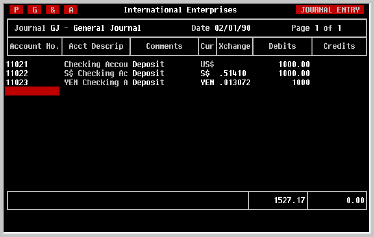
If the account is a foreign currency account, the currency and its default exchange rate (maintained in the Exchange Rate Maintenance screen) will be displayed in high intensity. Note that the exchange rate selected as the default will depend on the transaction date entered earlier. TK-LEDGER keeps track of all exchange rate changes and the periods of time each was active. So if you enter a transaction date for two months ago, the default exchange rate shown will be the one that was active on that date.
For foreign currency accounts, TK-LEDGER allows amounts to be entered in either the foreign currency or base currency. The simplest way to switch to base currency or back is to press the [SPACE] bar. It works as a toggle... press it once and it changes to base currency. Press it again and it changes back to foreign currency. You can also enter the desired currency by typing it in.
As discussed earlier, TK-LEDGER will display the most accurate exchange rate it has in its table for the currency. In most cases this rate can be accepted as it is. However, if it is necessary to change the rate, simply enter the new one and press [RETURN].
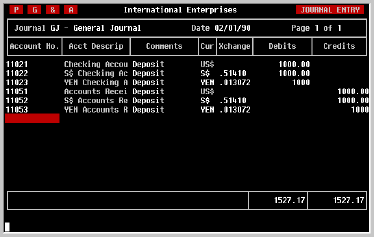
Enter the amount of the debit in the currency you selected. Notice that the number of decimal places displayed when you have pressed [RETURN] is currency-sensitive. The examples shown here include Japanese yen which have no fractional quantities. As a result, yen are displayed as an integer value.
Also note that the sum of the debits shown at the bottom of the 'Debits' column is expressed in base currency. The base currency debits must equal the base currency debits in order for the Entry to be posted.
The following examples illustrate how the amounts can be entered.
Since a transaction can have only one amount, when you have entered an amount in the 'Debits' field, the cursor will automatically move to the beginning of the next transaction.
Entered Displayed 159 159.00 159.1 159.10 159.17 159.17
To remove an amount entered in the 'Debits' field by mistake, use the DEL CHAR key or the ERASE FIELD key either of which can be identified by pressing [?]. Or you can simply enter an amount of zero (0).

To post the Entry, move the highlighted bar to the option 'POST' and press [RETURN]. If any data entry errors are detected at this point, they will be described to you. Simply fix the error using the 'EDIT' option and try posting the Entry again.
As with all of the one-line menus found in TK-LEDGER, there are two methods of moving the highlighted bar.
1) Use the [SPACE] or cursor [LEFT] and [RIGHT] keys to move the bar to the desired option; or
2) Type the first character of the option. For example, to select 'POST', press a [P]. It does not matter whether the character is in upper or lower case, TK-LEDGER will find and highlight the appropriate option.
Should it be necessary to exit the Journal Entry screen before completing an Entry, don't worry about losing what you have entered. The Entry will still be there in your work space when you return to the screen later.
Printing A
Journal Entry
Use the TAB or EXIT key to bring up the menu at the bottom of the screen and select 'LIST'. As the example below illustrates, you can select the output device just as you would for any of TK-LEDGER's reports. A sample of the listing for multi-currency organization is shown on the next page.

When printing has finished, you will be returned to the menu at the bottom of the screen from which you can exit the screen, or continue editing.
"INCLUDE DA,2
Saving and
Recalling
Standard
Entries
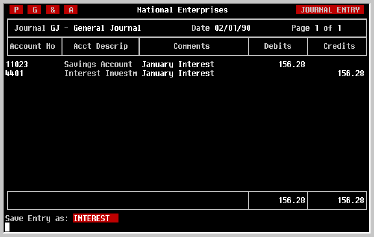
Enter a name for the entry which you will be able to remember later, such as 'INTEREST' for a monthly Interest Entry, and press [RETURN]. The Journal Entry you have entered is now saved and can quickly be recalled using the name you provided it.
If the Journal Entry screen is empty when you entered, it will first be necessary to enter the appropriate 'Journal' and Entry 'Date' as you normally would to make an Entry. Then press the EXIT or TAB key to jump to the one-line menu at the bottom of the screen.
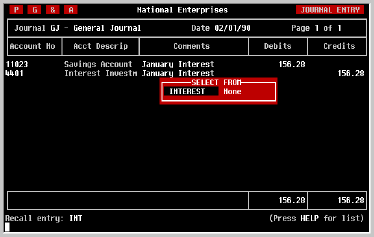
When you have selected the 'RECALL' option, the screen will ask for the name of the Entry which was saved earlier as shown in the screen below.
At this point, there are three methods for finding the Entry you want to recall.
1) If you remember the name, type it in and press [RETURN]. If the Entry is there, the screen will load it and display the transactions on the screen where they can be edited first, or posted as they are.
2) If you remember the first character or two of the name, enter them and press [RETURN]. A window will be displayed listing all of the SAVED Entries which match the characters you typed in. You can select the desired one by moving the cursor to it and pressing [RETURN]. As in the first option, the Entry will be loaded and displayed on the screen.
3) If you are unsure what the Entry was named, simply press the HELP key. A list of all SAVED Entries will be displayed from which you can choose. (Remember the HELP key. If you are unsure which key it is, refer to APPENDIX B at the back of this manual.)
Regardless of which method you use, the Entry you chose will be loaded and displayed. If at that point there are changes to be made, as there often are, select the 'EDIT' option from the one-line menu at the bottom of the screen and you will be given the opportunity to make them before posting the Entry.
You will be asked for the name of the Entry to be discarded, just as you would be to recall an entry, as shown below.

Enter the name of the Entry to be removed and press [RETURN]. The Entry will be removed immediately and you will be returned to the menu at the bottom of the screen from which you can choose to 'QUIT' or continue as appropriate.
Balance Sheet
Adjustments
TK-LEDGER provides an alternative approach by enabling Journal Entries to be made to a special journal called...
AD - Balance Sheet AdjustmentsThe adjusting Journal Entry is prepared in the normal way with one restriction: only Balance Sheet accounts may be posted to in this journal. This is because Income and Expense account balances are not carried forward from fiscal year to fiscal year, while Balance Sheet accounts are. When a transaction is posted to the Balance Sheet Adjustment journal, only the Balance Carried Forward is adjusted, not the period balance, regardless of the date given the transaction. Let's take a closer look at the income tax example. If the prior fiscal year were re-opened and the tax entered, the Journal Entry's transactions might look like this:
| Journal: | GJ - General Journal | Date: 12/31/89 | |
| Accnt | Account Description | Debits | Credits |
| 5501 | Federal Income Tax Expense | 1500.00 | |
| 11021 | Checking Account | 1500.00 |
In the example, the Expense account for Federal Income Tax is debited the amount of the tax paid, and the Balance Sheet account which maintains the balance of the checkbook is credited the amount of the tax.
However, the transaction shown above could not be made to the Balance Sheet Adjustment journal because account number 5501 is not a Balance Sheet account.
Since all Income and Expense transactions affect the balance of the Current Year Earnings account, and the Current Year Earnings account is closed to Net Earnings, Prior Years when each fiscal year is closed, then the ultimate destination of the $1500 debit is Net Earnings, Prior Years which is a Balance Sheet account. Therefore, the same transaction using the Balance Sheet Adjustment journal would look like this:
| Journal: | BA - Balance Sheet Adjust | Date: 03/15/90 | |
| Accnt | Account Description | Debits | Credits |
| 321 | Net Earnings, Prior Years | 1500.00 | |
| 11021 | Checking Account | 1500.00 |
Note that the transaction dates in the two examples are different. In the first example, the transaction was dated December 31, 1989 so that the transaction would be posted to the end of the last accounting period in 1989, even though the check was not written until March 15, 1990.
In the second example, using the Balance Sheet Adjustment journal, the transaction date is March 15, when the check was actually issued.
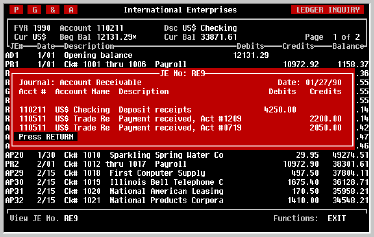
What are the other implications? 1) Since Balance Sheet Adjustment transactions affect the Balances Brought Forward in the current year and not the prior year's books, the final financial statements for the prior year remain unaffected.
2) Because the transaction is dated with the actual date of issue, the audit trail through the Journal Report, Account Detail Report and Account Inquiry is more accurate than it might have been.
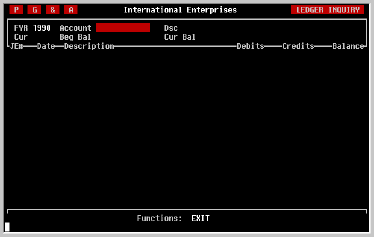
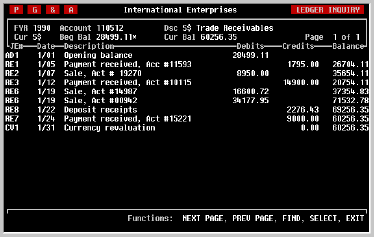
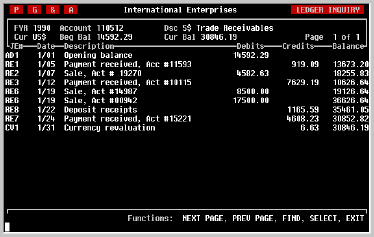
3) The Account Inquiry screen which is described in detail later in this manual displays the transaction and indicates clearly that it was a Balance Sheet Adjustment transaction, as shown in the following example.
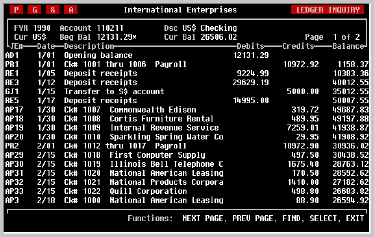
Notice that the Beginning Balance of the account is flagged with an asterisk (*), and that the first transaction (JE# AD1) shows no affect on the account balance. Actually it did affect the balance, but only the Balance Brought Forward or the 'Beg Bal' as shown. Also note that the transaction is clearly shown to have been posted to the Balance Sheet Adjustment journal; the journal entry number is 'AD1' indicating the journal ('AD') and the first entry posted to that journal in fiscal 1990.