Getting Started
>DO ^TKGU
Once you have reached the MASTER MENU, select the TK-Accounting option. The TK-ACCOUNTING menu will be replaced by the menu shown below.

Each of the following activities are discussed in the sequence in which they should be performed when adding a new organization. If you should terminate the process of adding an organization before finishing, it can be restarted in the same way as before and all the information previously entered will have been saved.
Maintenance
From the SYSTEM MAINTENANCE menu, select Printer Maintenance.
Printer definitions can be readily changed to reflect changes in your system configuration. The sample illustrated below will acquaint you with the screen and the discussion following will describe the information needed to define a printer.
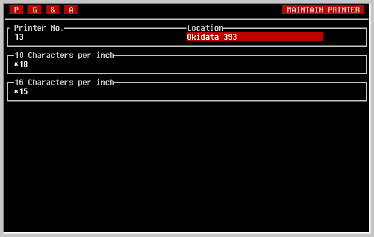
Enter the decimal values of the control code required to change the printer to 10 cpi preceded by an asterisk (*) and separated by commas, as illustrated in the example above.
If you prefer using wide paper (usually 17 by 11 inches) and want the printer to print all reports at 10 cpi, enter "" . However, note that the system's report writer is capable of producing reports greater than 132 columns. These reports can only be printed on wide paper with the print compressed.
Defining an
Organization
Organization Maintenance
Fiscal Period Maintenance
Chart of Accounts Maintenance
Transaction Journal Maintenance
G/L Parameters Maintenance
Division/Department Maintenance
If you elect to enable multi-currency capabilities for the organization, the following screens will also be used.
Currency Maintenance
Exchange Rate Maintenance
In the following pages, these screens will be discussed in the sequence they will be presented. It will be helpful to read through the section before proceeding in order to be assemble the information which will be required. The screens are also readily accessible from the menu system once the organization has been added. However, each screen should be completed in its entirety before proceeding to the next in the sequence; information entered on one screen is often used by subsequent screens.
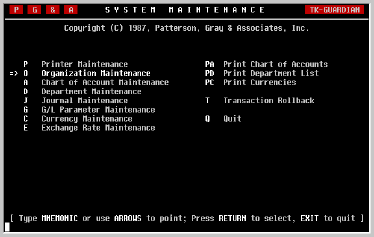
From the TK-ACCOUNTING menu, select System Maintenance. The following menu will be displayed.
Organization
Maintenance.
This screen is provided to enable the creation of a new organization or the modification of information associated with an existing organization. When first selected, you will be given an opportunity to select the organization you wish to work on.
If making changes to the data from an existing organization, enter the first two or three characters of its name and press [RETURN]. A list of organizations whose names begin with the letters you entered will be displayed. As illustrated in the screen shown below, you can also press an asterisk [*] to view the list of all organizations.
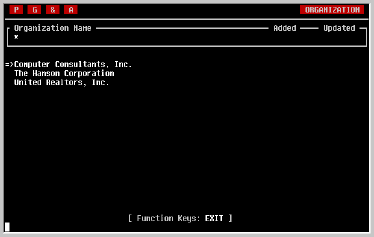
Any of the organizations shown on the screen can be selected by moving the pointer to the desired name and pressing [RETURN]. As in the menu system, the pointer can be moved by pressing either the [SPACE] key or the cursor [UP] and cursor [DOWN] keys.
If the organization does not appear on the list, it may be that the list is too long to display in one screen. You can tell if there is more to be seen by looking at the Function Keys displayed at the bottom; if NEXT PAGE or PREV PAGE is shown, the subsequent or previous pages of the list can be displayed by pressing the NEXT SCREEN or PREV SCREEN function keys.
If you are still unable to find the desired organization, press EXIT to search again.
Organization
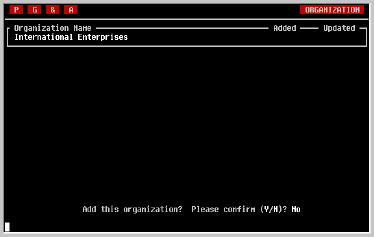
After pressing [RETURN] you will be asked to confirm the addition of this new organization. Press [Y] and [RETURN] to confirm the addition as shown in the example below. Remember however that once added, organizations cannot be removed.
Once the data entry screen has been displayed, as shown in the following example, you can move the cursor to any field on the screen using the cursor [UP] and cursor [DOWN] keys. Any field can be changed including the organization's name. However, the organization cannot be removed from the system by erasing its name in this screen.
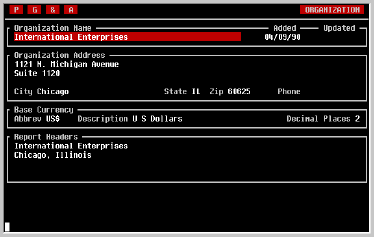
The name of the currency should also be acceptable when printed on a check, as is that shown in the example above.
TK-LEDGER will only account for currency fractions in decimal form. Enter the number of decimal places the currency uses as shown above.
The screen is terminated by pressing [RETURN] at the last field, or by pressing the EXIT key at any field.
Fiscal Period
Maintenance
From the FISCAL PERIOD MAINTENANCE menu, select Fiscal Year Maintenance.
If adding a new organization, this will be the second screen to be displayed. In it you will define the organization's opening fiscal year. Later you will use the same screen to define each subsequent fiscal year.
NOTE: When the first fiscal year has been defined for an organization, TK-LEDGER will not permit any earlier fiscal years to be defined. When defining a new organization, enter the earliest fiscal year for which data will be entered.
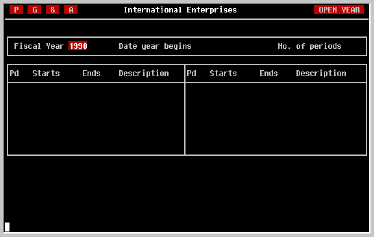
When defining a new organization, enter the actual start date of the fiscal year and the full number of periods as discussed below. Do not define a short fiscal year. Doing so will cause reporting problems later on.
NOTE: The date the fiscal year begins may not be changed after posting to that fiscal year has taken place. Be sure it is correct before proceeding.
Periods
NOTE: The number of periods in a fiscal year may not be changed after posting to that fiscal year has taken place. Be certain of your answer before proceeding.
If you indicated above that your fiscal year begins on January 1 and has twelve periods, TK-LEDGER will assume that you are on a calendar fiscal year and fill out the rest of the screen for you. If this assumption is not valid, simply modify the appropriate period end dates as described below.
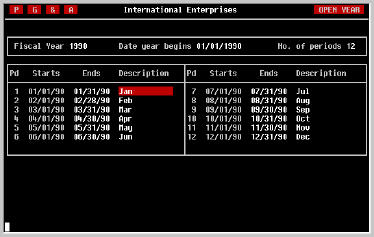
Enter the full date of the last day of the period. Entering the century is no longer necessary.
Description
The period description (or name) will be used to identify specific time frames on financial reports and should therefore not be left blank.
After entering the period description, the beginning date of the next period will be computed and displayed in the 'Starts' column and the cursor will move the 'Ends' column to allow you to enter its ending date and description. The same process will continue until all of the dates have been entered.
If TK-LEDGER encounters errors when saving this information to the file, it will notify you of possible errors. It is your responsibility to return to the screen and correct these errors prior to posting data to the fiscal year being defined.
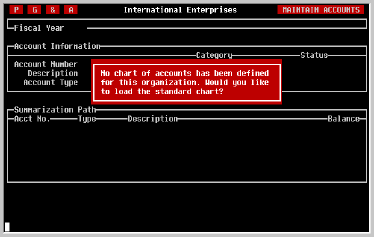
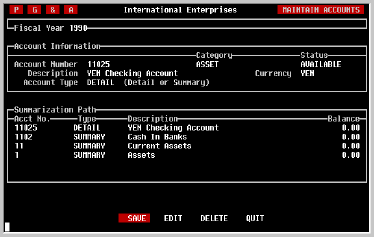
Chart of Accounts
Maintenance.
If adding a new organization, this will be the third screen to be displayed, and a small window will appear which asks whether the standard chart of accounts should be loaded. If so, press [Y] and [RETURN]. When completed, the screen will be redisplayed as illustrated below.
If the organization being added will be using TK-LEDGER's multi-currency characteristics, you will not be able to define foreign currency accounts until you have defined currencies in a later step.
Whether you choose to load the standard chart of accounts or design your own, it will be necessary to understand how TK-LEDGER expects the chart of accounts to be organized.
Asset and Liability detail accounts may be assigned any currency which has been defined in the Currency Maintenance screen. All other accounts, both detail and summary are automatically assigned base currency.
The net change to the balance of a detail account is also posted to the balance of the summary accounts above it in the hierarchy. Consider for example, a journal entry which is made at the time of a cash deposit. Using the default chart of accounts, the journal entry might look like this.
| ACCNT | ACCOUNT DESCRIPTION | DEBITS | CREDITS
|
| 11021 | Checking Account | 1000.00 | |
| 11051 | Current Accounts Receivable | 1000.00 |
Each of these accounts is a Detail account and when the transaction is posted, its balance will be updated accordingly. In addition, the balances of the appropriate Summary accounts will be updated as well. Thus, each of the accounts
will receive a debit of $1000 as well, and
1102 Cash In Banks 11 Current Assets 1 Assets
1105 Accounts Receivable 11 Current Assets 1 Assets
will receive a credit of $1000.
In this way, TK-LEDGER is able to maintain and report the status of Cash In Banks, Accounts Receivable, Current Assets, and Assets. This will prove to be very valuable at the time of producing financial statements, graphs, and customized financial reports.
Note that in multi-currency situations, only the base currency equivalent of a transaction amount is rolled up to summary accounts. This is because financial statements can only be generated in base currency.
A summary account with a single digit account number must be created for each of the types listed below:
Balance Sheet
1 - Assets
2 - Liabilities
3 - Stockholder's EquityIncome Statement
4 - Revenue
5 - Expenses
Division and/or Department codes, if used, may be up to five digits in length but are defined in another screen. Do not attempt to define them here.
As a result, it is important to keep in mind that income and expense accounts must not be zeroed out at the end of each period by posting the net change to an earnings account as may be necessary in other systems.
Since TK-LEDGER accounts for changes in earnings automatically, two detail accounts must be defined as Balance Sheet accounts whose account numbers begin with a 3. In the standard chart of accounts, they are...
The Retained Earnings, Prior Years account is a normal Detail account, and may have journal entries posted to it as would be necessary to account for distribution of dividends, etc. However, the standard chart of accounts provides another account from which such distributions of equity can be made. Both accounts are summarized into an account called Retained Earnings as illustrated in the following example.
321 Retained Earnings, Prior Years 33 Current Year Earnings
The Current Year Earnings account is for internal purposes only. No journal entries may be made to this account for any reason; its balance is maintained entirely by TK-LEDGER, and is transferred to Retained Earnings, Prior Years when each fiscal year is closed.
32 Retained Earnings 321 Retained Earnings, Prior Years 322 Dividends and Distributions
We recommend that before you decide to design your own chart of accounts, you create a test organization using the standard chart of accounts, enter some test transactions and see for yourself the impact the chart's structure has on TK-LEDGER's reporting, graphing and inquiry capabilities.
If you do decide to design your own chart of accounts, it will be helpful to start with an outline like the one following which will help show how rollups will occur during posting.
CHART OF ACCOUNTS OUTLINE1 Assets
11 Current Assets2 Liabilities
12 Fixed Assets
13 Deferred Assets
14 Other Assets21 Short Term Liability3 Stockholders Equity
22 Long Term Liability
23 Deferred Liability31 Capital Stock4 Revenues
32 Retained Earnings
33 Current Year Earnings41 Sales5 Expenses
42 Sales Returns
43 Shipping
44 Financial Income
45 Other Revenues51 Cost of Goods Sold
52 General & Administrative Expenses
53 Financial Expenses
54 Other Expenses
55 Income Tax
The Screen
Therefore, significant changes to the chart of accounts can be made each fiscal year. Income and Expense accounts are the easiest to change in this way because their balances are not forwarded from year to year.
However, Balance Sheet account balances are transferred to the new fiscal year when the old fiscal year is closed. If an account has a balance in the closing year, then the same account must exist in the subsequent year for its balance to be properly transferred.
It is also a good idea to keep in mind that the trend reporting capabilities provided in TK-LEDGER depend on consistency in the chart of accounts from year to year. Never renumber accounts from year to year if you will want to show year-to-year comparative or trend data for those accounts.
Select the fiscal year for which you would like to enter or modify the chart of accounts.
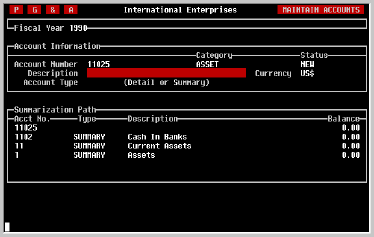
Notice also that the accounts which will receive rollups from this account are displayed in the box labeled 'Summarization Path' along with their balances, if any.
Move the highlight box to the desired action and press [RETURN].
Enter the number of the account to be deleted and press [RETURN]. With the cursor in the description field, press [TAB]. This will take you to the one-line action menu at the bottom of the screen. If the account can be deleted, a DELETE option will be displayed. Move the highlight to the option and press [RETURN].
Journal
Maintenance
If adding a new organization, this will be the fourth screen displayed.
TK-LEDGER keeps a record of all transactions in one or more transaction journals whether entered manually through the Transaction Entry screen or posted automatically from other modules. Each journal is assigned a two-character code, such as 'AP' for Accounts Payable, and 'GJ' for General Journal.
Whenever a fiscal period is closed, a Journal Report should be printed which will document all transactions which have been posted during the period in each of the journals.
When this screen is displayed for the first time for an organization, an initialization occurs in which five default journals are automatically created as shown in the screen below. These journals are displayed 'Locked' and cannot be removed.

Five of these journals can be used only by TK-LEDGER and other accounting modules which have been interfaced to TK-LEDGER: 'AD', 'AP', 'AR', 'CV' and 'PA'. For example, only the Accounts Payable module can post transactions to the AP journal. Attempts to enter data into the journal from the Transaction Entry screen will be not be allowed.
GJ, the General Journal is the default journal for manually entered journal transactions. Additional journals may be created to separate manually entered transactions into desired categories.
Journal
Enter the name of the journal and press [RETURN].
Journal
You will know whether a journal can be deleted by whether or not it is "LOCKED". Locked journals have had transactions posted to them and cannot be removed.
G/L Parameter
Maintenance.From the
SYSTEM MAINTENANCE menu, select G/L Parameter Maintenance
If adding a new organization, this will be the fifth screen displayed.
In order for TK-LEDGER to operate properly, there are two sets of
parameters which must be entered and maintained.
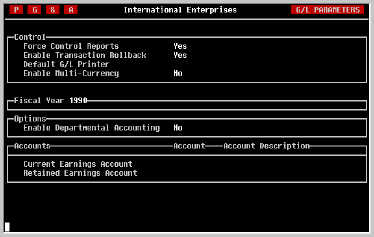
Control The first set of parameters 'Control'
certain system-wide functions. Changing them affects the entire system,
not just the current fiscal year.
Force Control
Reports TK-LEDGER provides
four reports considered necessary for auditability. They are...
Journal Report
Account Detail Report
Balance Sheet
Income Statement
Because TK-LEDGER is able to produce these reports at any time for any
fiscal period and year, it is no longer absolutely necessary to print them
at the time a period is closed. However, many organizations will want
these reports printed, particularly when data entry is decentralized.
If this parameter is set to YES by pressing [Y] and [RETURN], TK-LEDGER
will require each of these reports to be printed prior to closing a fiscal
period.
If the parameter is set to NO by pressing [N] and [RETURN], TK-LEDGER will
inform the user of the status of each report. But it will not require them
to be printed before allowing the period to be closed.
Enable
Transaction Rollback Some
implementations of MUMPS have difficulty with the Transaction Rollback
feature in TK-LEDGER. This parameter should be set to YES unless such
difficulties occur and can be determined to be related to the Transaction
Rollback feature.
Default
G/L Printer Each module of the
TK-Accounting series allows one printer to be selected as the default
printer for financial reports. Defining a default printer is only a
convenience and not absolutely necessary. It can be changed at any time.
To identify a default printer for General Ledger reports, it must first
have been defined as a system printer using the Printer Maintenance
screen. Enter the number of that device in this field.
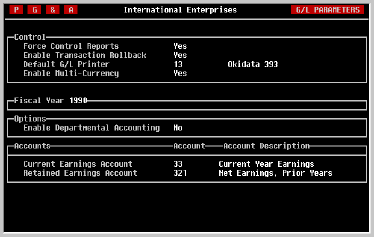
Enable
Multi-Currency If the organization
being defined will be using TK-LEDGER's multi currency capabilities,
answer [Y] and press [RETURN]. Note that it is possible for the
organization to be initially defined for single currency and changed to
multi-currency when the need arises. However it is not possible to change
from multi-currency back to single currency.
Your response to this question will show itself in both data entry screens
and reports, each of which become more complex. It is therefore desirable
to not enable multi-currency unless the organization actually intends to
make use of the extended functionality it provides.
Fiscal Year
Parameters The remainder of
the screen is used to define information, on an annual basis, which
TK-LEDGER requires in order to be able to post transactions for each
fiscal year.
Each time a new fiscal year is defined, TK-LEDGER will copy these
parameters for the new year. If they will not change from one year to the
next, no further action will be necessary.
If, however, changes will be made to the chart of accounts which affect the
Retained Earnings accounts, or the Departmental Accounting Parameter will
change, these changes must be made after the new year has been
defined, but before any posting to it has taken place.
Enable
Departmental
Accounting If you
will need separate Income Statements for multiple operating entities within
your organization, select YES by pressing [Y] and [RETURN].
There are several things about departmental accounting to remember. First,
departmental accounting may only be enabled at the beginning of a fiscal
year, prior to posting any transactions. It can not be selected mid-year.
Second, once departmental accounting is selected, all income and expense
account numbers entered when posting transactions will require the
department code to be entered. The format required for transaction entry
will be
AAAAAA-DDDDD
where AAAAAA
is a valid G/L detail account number of up to six digits in length, and
DDDDD is a valid department code of up to five digits in
length, each separated by a hyphen (minus sign).
Current Earnings
Account Enter the account
number of the account which will be used to collect earnings during the
year. The account must already have been defined in the chart of
accounts and the account number must begin with a 3 indicating that
it is a Stockholder's Equity account.
Retained Earnings
Account Enter the
account number of the account which will be used to accumulate prior year's
earnings. It may not be the same account as the Current Earnings
account, but like it, the account number must begin with a 3.
Exiting The Screen When finished defining the
G/L Parameters, press the EXIT key.
Division/
Department Maintenance
From the SYSTEM MAINTENANCE menu, select Department
Maintenance.
If adding a new organization and
Departmental Accounting was enabled
in the G/L Parameters screen, this will be the sixth screen
displayed. If Departmental Accounting was not enabled, this screen will
not appear.
TK-LEDGER provides the ability to maintain and produce Departmental as well
as Divisional Income Statements while maintaining a single organization
with a single Balance Sheet. The departments and optional divisions are
defined in this screen.
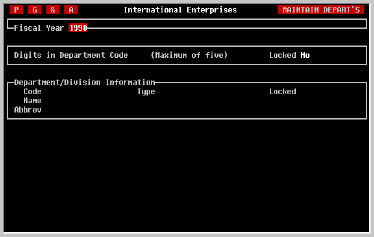
Fiscal Year As shown in the example above,
the first field requests the fiscal year for which you want to define
departments.
NOTE: As discussed earlier in this manual with regard to the G/L
Parameters screen, departmental accounting cannot be enabled or
disabled for a fiscal year after transactions have been posted. It
is, however, possible to add new departments and/or divisions mid-year.
Select the desired fiscal year, if different than the default provided.
Then press [RETURN].
Maximum Digits TK-LEDGER supports department
codes from one to five digits in length. The number desired must be
entered in this field. However, before making your selection it may be
helpful to understand how TK-LEDGER handles departments and divisions.
First, several rules:
1) No department or division code may begin with a zero. Codes beginning
with a zero are reserved for use by TK-LEDGER.
2) Department codes must always have the maximum number of digits
specified on this screen, while division codes must have fewer digits. In
this way TK-LEDGER can distinguish between departments and divisions.
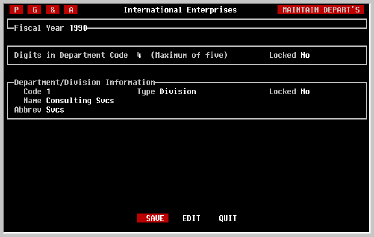
3) Use of divisions is completely optional. In the examples shown here,
International Enterprises' business is divided into two primary types:
consulting and products. However, in addition to an Income Statement for
the division, managers at the company also want to be able to follow the
profitability of individual consulting projects. Therefore, its
organization as defined to TK-LEDGER would look like this.
CODE DIVISION
DEPARTMENT
1
1001
1002
...
2000
Consulting
Consulting
Consulting
Products
Project 1-001
Project 1-002
4) No transactions can be posted to a division; only to a department.
However, all transactions posted will be rolled up to the appropriate
division(s), if any.
Notice that in National Enterprises, no Products division was defined.
This is because there is only one department; a division report would be
redundant.
It is possible to add further hierarchy to the organization. For example,
by defining a division with a code of 10, it is possible to create
sub-divisions, each of which is a summary of a number of departments and
which then further rolls up to the division.
CODE DIVISION
DEPARTMENT
1
10
1001
1002
11
1101
...
Consulting
Consulting, Design
Consulting, Design
Consulting, Design
Consulting, Coding
Consulting, Coding
Project 1-001
Project 1-002
Project
1-101
In the sample structure shown above the departments whose codes begin with
10 such as Project 1-001 roll up first to Sub-Division 10
(Consulting, Design). Because these codes share a first digit with
Division 1 (Consulting) transactions posted to them also roll up to it.
Based on this structure, it would be possible to produce Income Statements
for Departments (having four digit codes), Sub-Divisions (having two digit
codes) and Divisions (having single digit codes).
The rule for rollups is that the department code must contain the
sub-division code and/or the division code in order for rollup to occur.
Adding A
Department or
Division Enter
the desired 'Code'; either department, sub-division or division. TK-LEDGER
will display the code's 'Type' (based on the number of digits) and
whether it is 'Locked'. Locked departments have had transactions posted to
them and may not be deleted until the next fiscal year.
If the entity already exists, its name and abbreviation will be displayed.
These may be edited.
Using the [TAB] key or pressing [RETURN] in the 'Abbrev' field will take
you to the one-line menu at the bottom of the screen. Move the highlight
bar to the SAVE option and press [RETURN].
Deleting A
Department or
Division
Enter the code of the department or division and press [RETURN]. If the
entity is not locked, it can be deleted by pressing [TAB] to proceed to
the one-line menu at the bottom of the screen, moving the highlighted bar
to the DELETE option, and pressing [RETURN].
Exiting The Screen When finished, press the
EXIT key. Depending on where you are on the screen, this may take you to
the 'Code' field. If so, press EXIT once more.
Currency
Maintenance
From the
TK-ACCOUNTING menu, select System Maintenance.
From the SYSTEM MAINTENANCE menu, select Currency
Maintenance.
If adding a new organization, this will be the seventh and final screen
displayed.
Whether the organization will use one currency or multiple currencies, this
screen is important because in addition to defining currencies, it also
defines default G/L accounts which can significantly reduce the time and
error rate of data entry.
Note that the base currency defined in the Organization Maintenance
screen has already been put in the currency table for you.
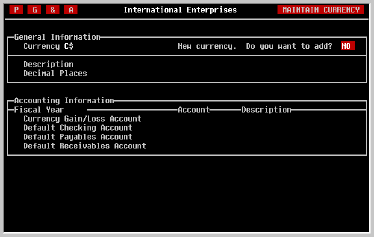
Abbreviation As the screen above illustrates,
the first field is the currency abbreviation, a one to three character
mnemonic which describes the currency. The screen also shows that when
an unrecognized abbreviation is entered, you will be asked if you want to
add this currency to the table.
As discussed earlier regarding definition of base currency, this
abbreviation will be used by TK-PAYABLES in check printing. So be sure
that the abbreviation you select will be understood by your bank and
others.
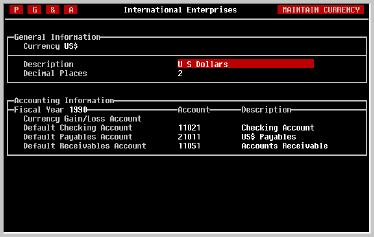
Description The currency description is
simply the currency name spelled out. It will be used for currency
selection during data entry and will also be printed on checks by
TK-PAYABLES.
Decimal Places TK-LEDGER will only account
for currency fractions in decimal form. Thus, enter here the number of
decimal places which transactions in this currency can have.
Fiscal Year Because TK-LEDGER permits changes
in the chart of accounts from year to year, it also enables the account
parameters associated with a currency to be changed. Select the fiscal
year for which you will be defining account parameters.
Note that these parameters will be copied to each new fiscal year for you
when the fiscal year is opened. Unless changes are made to the chart of
accounts which affect these accounts, no further action will be necessary.
Currency
Gain/Loss As a result of
fluctuations in the exchange rate between currencies, gains and losses
occur relative to your base currency. For example, if your base currency
is U. S. Dollars and you maintain a checking account in Japanese Yen, the
following might occur.
The balance of your Yen account is 100,000 Yen. On Monday, the exchange
rate is .013107 Dollars to the Yen. Therefore the base currency equivalent
of your Yen account is US$ 1310.70 (100,000 times .013107).
On the following Thursday, the value of the dollar has dropped resulting in
an exchange rate of .012187 Dollars to the Yen. If the balance of the
account remained 100,000 Yen, its base currency equivalent would be US$
1218.70 (100,000 times .012187). This loss of US$ 92.00 is due to changes
in the relative values of the two currencies and must be included in the
organization's financial statements.
To accomplish this, TK-LEDGER requires each currency to have a gain (or
loss) account defined. This account can be either an income account
(beginning with a 4) or an expense account (beginning with a 5). You may
have one such account which all the currencies use collectively, or you may
define a unique account for each currency.
Enter the G/L account number of the Currency Gain/Loss account in this
field. It is required for all but base currency.
Default
Checking Account For each currency
in which you maintain a checking account, enter the G/L account number
here. It must be an asset account and be assigned this currency. It
will be used as the default account when printing checks in this
currency. If you do not maintain a checking account in this currency you
may leave it blank.
Default
Payables Account For each currency
in which you accept liabilities (receive bills) enter the default payables
account number here. If entered, the account number must be for a
liability account and be assigned this currency. You may leave it blank
if you do not accept liabilities in this currency.
Default
Receivables Account For each
currency in which you send invoices, enter the default accounts receivable
account number here. If entered, the account number must be for an asset
account and be assigned this currency. You may leave it blank if you do
not send invoices in this currency.
Exiting The Screen To exit the screen, press
[RETURN] from the last field, or EXIT from any field.
Exchange Rate
Maintenance
From the TK-ACCOUNTING menu, select System Maintenance.
From the SYSTEM MAINTENANCE menu, select Exchange Rate
Maintenance.
This screen will not appear during the creation of a new organization.
However, it is very important that it be used to define the initial
exchange rates of each foreign currency prior to beginning data entry.
The screen is used to define the default exchange rate values which will be
displayed during data entry in each of the TK-Accounting systems.

As the screen shown above suggests, each of the currencies defined for the
organization are displayed with the current default exchange rate and the
date last updated.
Move the cursor to the desired currency using the cursor [UP] and cursor
[DOWN] keys and enter the date on which the new exchange rate is to become
effective.
When the effective date has been entered, you will be asked for the new
default exchange rate. The rate is the reciprocal of the number of units
of foreign currency which equal one unit of base currency. For example, if
there are now 1.275 Canadian Dollars for every U. S. Dollar, the rate is
expressed as 1 US$ divided by 1.275 C$ or .784314.
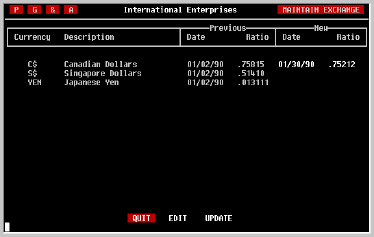
The field allows up to seven digits, or six digits and one decimal point.
It is not necessary to change all currencies at one time. When you have
entered the desired changes, press the EXIT key. The one line menu shown
in the example will appear at the bottom of the screen. At this time you
can Update the default exchange rates with the indicated new values, or
simply Quit.
Transaction
Rollback
From the TK-ACCOUNTING menu, select System Maintenance.
From the SYSTEM MAINTENANCE menu, select Transaction
Rollback.
One of the very important features of the TK-Accounting software, is its
ability to undo or 'roll back' any transaction. This is of particular
value when the posting process has been interrupted, regardless of the
cause, leaving one or more accounts in a state of imbalance.
When an error occurs, whether by unexpected interruption, or simply by the
erroneous posting of an imbalanced transaction, TK-LEDGER immediately locks
the system to prevent any further posting. Attempts to post when this
occurs will result in a message informing the user of the error and that
Transaction Rollback must be used to 'undo' the problem. This feature
prevents a simple and correctable problem from being ignored and
subsequently compounded.
How It Works Each time a entry is posted from
one of the TK-Accounting modules, a record is kept of what the database
looked like prior to posting. This record is maintained for thirty days
and then purged.
As a result, any erroneous entry can be rolled back and the system restored
to the way it was before the entry, even if the posting process was
interrupted. However, since these rollback records are only maintained for
thirty days, the decision to roll one or more transactions back must be
made before the thirty days are up.
Using This Screen As illustrated above, the
rollback screen will be displayed with as many of the most recent
transactions as can be displayed on one screen. Notice that the
transactions are displayed from the most recent to the oldest. In
addition, any transaction(s) in which the posting process was interrupted
will show the word 'Incompl'ete in the time column. Because of this, you
can easily determine which entry, if any, was interrupted.
Selecting The
Entry to Roll Back If a
transaction is to be rolled back, it is necessary to select the
appropriate transaction. This is accomplished using the cursor [DOWN]
and/or cursor [UP] keys. You can also use the NEXT SCREEN and PREV
SCREEN keys if there are more transactions than can be displayed on one
screen.
As shown in the example below, the screen will highlight each transaction
as you move the pointer down the list. This is because the rollback
process cannot roll one transaction back from the middle of the list; every
subsequent transaction must also be rolled back in order for the system's
files to be restored properly. As a result, every highlighted entry will
be rolled back if you proceed.
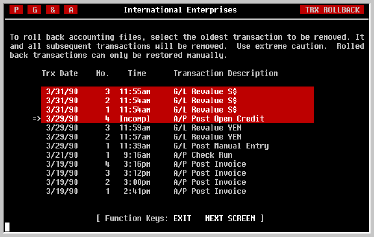
Beginning Rollback When you have identified
and pointed to the entry which you would like rolled back, press [RETURN].
You will be asked to confirm that this entry and those posted after it,
if any, should be rolled back as shown below.
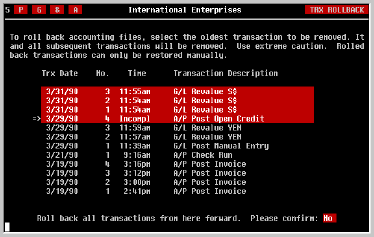
To abort the rollback at this time answer by typing [N] and [RETURN] or
simply press the EXIT key.
To activate rollback, enter a [Y] and press [RETURN]. Rollback will begin,
and when completed you will be returned to the menu system.
NOTE: When the entry or entries have been rolled back and the
system restored to its prior condition, it will be necessary to re-enter
and repost each transaction that was rolled back. It is recommended that
all appropriate documentation be assembled for each entry prior to
rollback. Once rollback is complete, the system will have no record of
their existence to aid in the re-entry task.
If adding a new organization, this will be the fifth screen displayed.
In order for TK-LEDGER to operate properly, there are two sets of parameters which must be entered and maintained.
Reports
Journal Report
Account Detail Report
Balance Sheet
Income Statement
Because TK-LEDGER is able to produce these reports at any time for any fiscal period and year, it is no longer absolutely necessary to print them at the time a period is closed. However, many organizations will want these reports printed, particularly when data entry is decentralized.
If this parameter is set to YES by pressing [Y] and [RETURN], TK-LEDGER will require each of these reports to be printed prior to closing a fiscal period.
If the parameter is set to NO by pressing [N] and [RETURN], TK-LEDGER will inform the user of the status of each report. But it will not require them to be printed before allowing the period to be closed.
Transaction Rollback
G/L Printer
To identify a default printer for General Ledger reports, it must first have been defined as a system printer using the Printer Maintenance screen. Enter the number of that device in this field.
Multi-Currency
Your response to this question will show itself in both data entry screens and reports, each of which become more complex. It is therefore desirable to not enable multi-currency unless the organization actually intends to make use of the extended functionality it provides.
Parameters
Each time a new fiscal year is defined, TK-LEDGER will copy these parameters for the new year. If they will not change from one year to the next, no further action will be necessary.
If, however, changes will be made to the chart of accounts which affect the Retained Earnings accounts, or the Departmental Accounting Parameter will change, these changes must be made after the new year has been defined, but before any posting to it has taken place.
Departmental
Accounting
There are several things about departmental accounting to remember. First, departmental accounting may only be enabled at the beginning of a fiscal year, prior to posting any transactions. It can not be selected mid-year.
Second, once departmental accounting is selected, all income and expense account numbers entered when posting transactions will require the department code to be entered. The format required for transaction entry will be
AAAAAA-DDDDDwhere AAAAAA is a valid G/L detail account number of up to six digits in length, and DDDDD is a valid department code of up to five digits in length, each separated by a hyphen (minus sign).
Account
Account
Division/
Department Maintenance
From the SYSTEM MAINTENANCE menu, select Department
Maintenance.
If adding a new organization and
Departmental Accounting was enabled
in the G/L Parameters screen, this will be the sixth screen
displayed. If Departmental Accounting was not enabled, this screen will
not appear.
TK-LEDGER provides the ability to maintain and produce Departmental as well
as Divisional Income Statements while maintaining a single organization
with a single Balance Sheet. The departments and optional divisions are
defined in this screen.
Fiscal Year As shown in the example above,
the first field requests the fiscal year for which you want to define
departments.
NOTE: As discussed earlier in this manual with regard to the G/L
Parameters screen, departmental accounting cannot be enabled or
disabled for a fiscal year after transactions have been posted. It
is, however, possible to add new departments and/or divisions mid-year.
Select the desired fiscal year, if different than the default provided.
Then press [RETURN].
Maximum Digits TK-LEDGER supports department
codes from one to five digits in length. The number desired must be
entered in this field. However, before making your selection it may be
helpful to understand how TK-LEDGER handles departments and divisions.
First, several rules:
1) No department or division code may begin with a zero. Codes beginning
with a zero are reserved for use by TK-LEDGER.
2) Department codes must always have the maximum number of digits
specified on this screen, while division codes must have fewer digits. In
this way TK-LEDGER can distinguish between departments and divisions.
3) Use of divisions is completely optional. In the examples shown here,
International Enterprises' business is divided into two primary types:
consulting and products. However, in addition to an Income Statement for
the division, managers at the company also want to be able to follow the
profitability of individual consulting projects. Therefore, its
organization as defined to TK-LEDGER would look like this.
CODE DIVISION
DEPARTMENT
1
1001
1002
...
2000
Consulting
Consulting
Consulting
Products
Project 1-001
Project 1-002
4) No transactions can be posted to a division; only to a department.
However, all transactions posted will be rolled up to the appropriate
division(s), if any.
Notice that in National Enterprises, no Products division was defined.
This is because there is only one department; a division report would be
redundant.
It is possible to add further hierarchy to the organization. For example,
by defining a division with a code of 10, it is possible to create
sub-divisions, each of which is a summary of a number of departments and
which then further rolls up to the division.
CODE DIVISION
DEPARTMENT
1
10
1001
1002
11
1101
...
Consulting
Consulting, Design
Consulting, Design
Consulting, Design
Consulting, Coding
Consulting, Coding
Project 1-001
Project 1-002
Project
1-101
In the sample structure shown above the departments whose codes begin with
10 such as Project 1-001 roll up first to Sub-Division 10
(Consulting, Design). Because these codes share a first digit with
Division 1 (Consulting) transactions posted to them also roll up to it.
Based on this structure, it would be possible to produce Income Statements
for Departments (having four digit codes), Sub-Divisions (having two digit
codes) and Divisions (having single digit codes).
The rule for rollups is that the department code must contain the
sub-division code and/or the division code in order for rollup to occur.
Adding A
Department or
Division Enter
the desired 'Code'; either department, sub-division or division. TK-LEDGER
will display the code's 'Type' (based on the number of digits) and
whether it is 'Locked'. Locked departments have had transactions posted to
them and may not be deleted until the next fiscal year.
If the entity already exists, its name and abbreviation will be displayed.
These may be edited.
Using the [TAB] key or pressing [RETURN] in the 'Abbrev' field will take
you to the one-line menu at the bottom of the screen. Move the highlight
bar to the SAVE option and press [RETURN].
Deleting A
Department or
Division
Enter the code of the department or division and press [RETURN]. If the
entity is not locked, it can be deleted by pressing [TAB] to proceed to
the one-line menu at the bottom of the screen, moving the highlighted bar
to the DELETE option, and pressing [RETURN].
Exiting The Screen When finished, press the
EXIT key. Depending on where you are on the screen, this may take you to
the 'Code' field. If so, press EXIT once more.
Currency
Maintenance
From the
TK-ACCOUNTING menu, select System Maintenance.
From the SYSTEM MAINTENANCE menu, select Currency
Maintenance.
If adding a new organization, this will be the seventh and final screen
displayed.
Whether the organization will use one currency or multiple currencies, this
screen is important because in addition to defining currencies, it also
defines default G/L accounts which can significantly reduce the time and
error rate of data entry.
Note that the base currency defined in the Organization Maintenance
screen has already been put in the currency table for you.
Abbreviation As the screen above illustrates,
the first field is the currency abbreviation, a one to three character
mnemonic which describes the currency. The screen also shows that when
an unrecognized abbreviation is entered, you will be asked if you want to
add this currency to the table.
As discussed earlier regarding definition of base currency, this
abbreviation will be used by TK-PAYABLES in check printing. So be sure
that the abbreviation you select will be understood by your bank and
others.
Description The currency description is
simply the currency name spelled out. It will be used for currency
selection during data entry and will also be printed on checks by
TK-PAYABLES.
Decimal Places TK-LEDGER will only account
for currency fractions in decimal form. Thus, enter here the number of
decimal places which transactions in this currency can have.
Fiscal Year Because TK-LEDGER permits changes
in the chart of accounts from year to year, it also enables the account
parameters associated with a currency to be changed. Select the fiscal
year for which you will be defining account parameters.
Note that these parameters will be copied to each new fiscal year for you
when the fiscal year is opened. Unless changes are made to the chart of
accounts which affect these accounts, no further action will be necessary.
Currency
Gain/Loss As a result of
fluctuations in the exchange rate between currencies, gains and losses
occur relative to your base currency. For example, if your base currency
is U. S. Dollars and you maintain a checking account in Japanese Yen, the
following might occur.
The balance of your Yen account is 100,000 Yen. On Monday, the exchange
rate is .013107 Dollars to the Yen. Therefore the base currency equivalent
of your Yen account is US$ 1310.70 (100,000 times .013107).
On the following Thursday, the value of the dollar has dropped resulting in
an exchange rate of .012187 Dollars to the Yen. If the balance of the
account remained 100,000 Yen, its base currency equivalent would be US$
1218.70 (100,000 times .012187). This loss of US$ 92.00 is due to changes
in the relative values of the two currencies and must be included in the
organization's financial statements.
To accomplish this, TK-LEDGER requires each currency to have a gain (or
loss) account defined. This account can be either an income account
(beginning with a 4) or an expense account (beginning with a 5). You may
have one such account which all the currencies use collectively, or you may
define a unique account for each currency.
Enter the G/L account number of the Currency Gain/Loss account in this
field. It is required for all but base currency.
Default
Checking Account For each currency
in which you maintain a checking account, enter the G/L account number
here. It must be an asset account and be assigned this currency. It
will be used as the default account when printing checks in this
currency. If you do not maintain a checking account in this currency you
may leave it blank.
Default
Payables Account For each currency
in which you accept liabilities (receive bills) enter the default payables
account number here. If entered, the account number must be for a
liability account and be assigned this currency. You may leave it blank
if you do not accept liabilities in this currency.
Default
Receivables Account For each
currency in which you send invoices, enter the default accounts receivable
account number here. If entered, the account number must be for an asset
account and be assigned this currency. You may leave it blank if you do
not send invoices in this currency.
Exiting The Screen To exit the screen, press
[RETURN] from the last field, or EXIT from any field.
Exchange Rate
Maintenance
From the TK-ACCOUNTING menu, select System Maintenance.
From the SYSTEM MAINTENANCE menu, select Exchange Rate
Maintenance.
This screen will not appear during the creation of a new organization.
However, it is very important that it be used to define the initial
exchange rates of each foreign currency prior to beginning data entry.
The screen is used to define the default exchange rate values which will be
displayed during data entry in each of the TK-Accounting systems.
As the screen shown above suggests, each of the currencies defined for the
organization are displayed with the current default exchange rate and the
date last updated.
Move the cursor to the desired currency using the cursor [UP] and cursor
[DOWN] keys and enter the date on which the new exchange rate is to become
effective.
When the effective date has been entered, you will be asked for the new
default exchange rate. The rate is the reciprocal of the number of units
of foreign currency which equal one unit of base currency. For example, if
there are now 1.275 Canadian Dollars for every U. S. Dollar, the rate is
expressed as 1 US$ divided by 1.275 C$ or .784314.
The field allows up to seven digits, or six digits and one decimal point.
It is not necessary to change all currencies at one time. When you have
entered the desired changes, press the EXIT key. The one line menu shown
in the example will appear at the bottom of the screen. At this time you
can Update the default exchange rates with the indicated new values, or
simply Quit.
Transaction
Rollback
From the TK-ACCOUNTING menu, select System Maintenance.
From the SYSTEM MAINTENANCE menu, select Transaction
Rollback.
One of the very important features of the TK-Accounting software, is its
ability to undo or 'roll back' any transaction. This is of particular
value when the posting process has been interrupted, regardless of the
cause, leaving one or more accounts in a state of imbalance.
When an error occurs, whether by unexpected interruption, or simply by the
erroneous posting of an imbalanced transaction, TK-LEDGER immediately locks
the system to prevent any further posting. Attempts to post when this
occurs will result in a message informing the user of the error and that
Transaction Rollback must be used to 'undo' the problem. This feature
prevents a simple and correctable problem from being ignored and
subsequently compounded.
How It Works Each time a entry is posted from
one of the TK-Accounting modules, a record is kept of what the database
looked like prior to posting. This record is maintained for thirty days
and then purged.
As a result, any erroneous entry can be rolled back and the system restored
to the way it was before the entry, even if the posting process was
interrupted. However, since these rollback records are only maintained for
thirty days, the decision to roll one or more transactions back must be
made before the thirty days are up.
Using This Screen As illustrated above, the
rollback screen will be displayed with as many of the most recent
transactions as can be displayed on one screen. Notice that the
transactions are displayed from the most recent to the oldest. In
addition, any transaction(s) in which the posting process was interrupted
will show the word 'Incompl'ete in the time column. Because of this, you
can easily determine which entry, if any, was interrupted.
Selecting The
Entry to Roll Back If a
transaction is to be rolled back, it is necessary to select the
appropriate transaction. This is accomplished using the cursor [DOWN]
and/or cursor [UP] keys. You can also use the NEXT SCREEN and PREV
SCREEN keys if there are more transactions than can be displayed on one
screen.
As shown in the example below, the screen will highlight each transaction
as you move the pointer down the list. This is because the rollback
process cannot roll one transaction back from the middle of the list; every
subsequent transaction must also be rolled back in order for the system's
files to be restored properly. As a result, every highlighted entry will
be rolled back if you proceed.
Beginning Rollback When you have identified
and pointed to the entry which you would like rolled back, press [RETURN].
You will be asked to confirm that this entry and those posted after it,
if any, should be rolled back as shown below.
To abort the rollback at this time answer by typing [N] and [RETURN] or
simply press the EXIT key.
To activate rollback, enter a [Y] and press [RETURN]. Rollback will begin,
and when completed you will be returned to the menu system.
NOTE: When the entry or entries have been rolled back and the
system restored to its prior condition, it will be necessary to re-enter
and repost each transaction that was rolled back. It is recommended that
all appropriate documentation be assembled for each entry prior to
rollback. Once rollback is complete, the system will have no record of
their existence to aid in the re-entry task.
If adding a new organization and Departmental Accounting was enabled in the G/L Parameters screen, this will be the sixth screen displayed. If Departmental Accounting was not enabled, this screen will not appear.
TK-LEDGER provides the ability to maintain and produce Departmental as well as Divisional Income Statements while maintaining a single organization with a single Balance Sheet. The departments and optional divisions are defined in this screen.
NOTE: As discussed earlier in this manual with regard to the G/L Parameters screen, departmental accounting cannot be enabled or disabled for a fiscal year after transactions have been posted. It is, however, possible to add new departments and/or divisions mid-year.
Select the desired fiscal year, if different than the default provided. Then press [RETURN].
1) No department or division code may begin with a zero. Codes beginning with a zero are reserved for use by TK-LEDGER.
2) Department codes must always have the maximum number of digits specified on this screen, while division codes must have fewer digits. In this way TK-LEDGER can distinguish between departments and divisions.
3) Use of divisions is completely optional. In the examples shown here, International Enterprises' business is divided into two primary types: consulting and products. However, in addition to an Income Statement for the division, managers at the company also want to be able to follow the profitability of individual consulting projects. Therefore, its organization as defined to TK-LEDGER would look like this.
| CODE | DIVISION | DEPARTMENT | |
| 1 1001 1002 ... 2000 |
Consulting Consulting Consulting Products |
Project 1-001 Project 1-002 |
Notice that in National Enterprises, no Products division was defined. This is because there is only one department; a division report would be redundant.
It is possible to add further hierarchy to the organization. For example, by defining a division with a code of 10, it is possible to create sub-divisions, each of which is a summary of a number of departments and which then further rolls up to the division.
| CODE | DIVISION | DEPARTMENT | |
| 1 10 1001 1002 11 1101 ... |
Consulting Consulting, Design Consulting, Design Consulting, Design Consulting, Coding Consulting, Coding |
Project 1-001 Project 1-002 Project 1-101 |
Based on this structure, it would be possible to produce Income Statements for Departments (having four digit codes), Sub-Divisions (having two digit codes) and Divisions (having single digit codes).
The rule for rollups is that the department code must contain the sub-division code and/or the division code in order for rollup to occur.
Department or
Division
If the entity already exists, its name and abbreviation will be displayed. These may be edited.
Using the [TAB] key or pressing [RETURN] in the 'Abbrev' field will take you to the one-line menu at the bottom of the screen. Move the highlight bar to the SAVE option and press [RETURN].
Department or
Division
Currency
Maintenance
From the SYSTEM MAINTENANCE menu, select Currency Maintenance.
If adding a new organization, this will be the seventh and final screen displayed.
Whether the organization will use one currency or multiple currencies, this screen is important because in addition to defining currencies, it also defines default G/L accounts which can significantly reduce the time and error rate of data entry.
Note that the base currency defined in the Organization Maintenance screen has already been put in the currency table for you.
As discussed earlier regarding definition of base currency, this abbreviation will be used by TK-PAYABLES in check printing. So be sure that the abbreviation you select will be understood by your bank and others.
Note that these parameters will be copied to each new fiscal year for you when the fiscal year is opened. Unless changes are made to the chart of accounts which affect these accounts, no further action will be necessary.
Gain/Loss
The balance of your Yen account is 100,000 Yen. On Monday, the exchange rate is .013107 Dollars to the Yen. Therefore the base currency equivalent of your Yen account is US$ 1310.70 (100,000 times .013107).
On the following Thursday, the value of the dollar has dropped resulting in an exchange rate of .012187 Dollars to the Yen. If the balance of the account remained 100,000 Yen, its base currency equivalent would be US$ 1218.70 (100,000 times .012187). This loss of US$ 92.00 is due to changes in the relative values of the two currencies and must be included in the organization's financial statements.
To accomplish this, TK-LEDGER requires each currency to have a gain (or loss) account defined. This account can be either an income account (beginning with a 4) or an expense account (beginning with a 5). You may have one such account which all the currencies use collectively, or you may define a unique account for each currency.
Enter the G/L account number of the Currency Gain/Loss account in this field. It is required for all but base currency.
Checking Account
Payables Account
Receivables Account
Exchange Rate
Maintenance
From the SYSTEM MAINTENANCE menu, select Exchange Rate Maintenance.
This screen will not appear during the creation of a new organization. However, it is very important that it be used to define the initial exchange rates of each foreign currency prior to beginning data entry.
The screen is used to define the default exchange rate values which will be displayed during data entry in each of the TK-Accounting systems.
As the screen shown above suggests, each of the currencies defined for the organization are displayed with the current default exchange rate and the date last updated.
Move the cursor to the desired currency using the cursor [UP] and cursor [DOWN] keys and enter the date on which the new exchange rate is to become effective.
When the effective date has been entered, you will be asked for the new default exchange rate. The rate is the reciprocal of the number of units of foreign currency which equal one unit of base currency. For example, if there are now 1.275 Canadian Dollars for every U. S. Dollar, the rate is expressed as 1 US$ divided by 1.275 C$ or .784314.
The field allows up to seven digits, or six digits and one decimal point.
It is not necessary to change all currencies at one time. When you have entered the desired changes, press the EXIT key. The one line menu shown in the example will appear at the bottom of the screen. At this time you can Update the default exchange rates with the indicated new values, or simply Quit.
Transaction
Rollback
From the SYSTEM MAINTENANCE menu, select Transaction Rollback.
One of the very important features of the TK-Accounting software, is its ability to undo or 'roll back' any transaction. This is of particular value when the posting process has been interrupted, regardless of the cause, leaving one or more accounts in a state of imbalance.
When an error occurs, whether by unexpected interruption, or simply by the erroneous posting of an imbalanced transaction, TK-LEDGER immediately locks the system to prevent any further posting. Attempts to post when this occurs will result in a message informing the user of the error and that Transaction Rollback must be used to 'undo' the problem. This feature prevents a simple and correctable problem from being ignored and subsequently compounded.
As a result, any erroneous entry can be rolled back and the system restored to the way it was before the entry, even if the posting process was interrupted. However, since these rollback records are only maintained for thirty days, the decision to roll one or more transactions back must be made before the thirty days are up.
Entry to Roll Back
As shown in the example below, the screen will highlight each transaction as you move the pointer down the list. This is because the rollback process cannot roll one transaction back from the middle of the list; every subsequent transaction must also be rolled back in order for the system's files to be restored properly. As a result, every highlighted entry will be rolled back if you proceed.
To abort the rollback at this time answer by typing [N] and [RETURN] or simply press the EXIT key.
To activate rollback, enter a [Y] and press [RETURN]. Rollback will begin, and when completed you will be returned to the menu system.
NOTE: When the entry or entries have been rolled back and the system restored to its prior condition, it will be necessary to re-enter and repost each transaction that was rolled back. It is recommended that all appropriate documentation be assembled for each entry prior to rollback. Once rollback is complete, the system will have no record of their existence to aid in the re-entry task.