TK-Fax Manual

TK-FAX MANUAL
table of contents

(main)


CHAPTER 1


SENDING A FAX

The actual process of sending a fax from TK-FAX is really quite easy. In this section we are going to walk you through a sample session step by step. Please forgive the details; most of you only look at the pictures anyway.

Step 1The TK-FAX Send Menu

Before we get started, it should be mentioned that there is more than one way to use TK-FAX in your system. Perhaps the most common way is through either TK-WRITER or TK-MAIL. Built into these PG&A products is a direct link to TK-FAX and it only takes two or three keystrokes to start the fax processing going.

TK-WRITER In TK-WRITER first call up the OTHER OPTIONS menu from within the document that you want to send as a fax. Select the TK-FAX option.

TK-MAIL Select the WRITE MAIL option, followed by the FAX option to call up TK-FAX. You will then be allowed to point to the memorandum to fax.

Other applications TK-FAX may be called directly from other applications. Since the actual implementation of this interface to TK-FAX is left up to the system integrater, it is outside of the scope of this manual. But other than the actual method of calling TK-FAX, all other aspects of TK-FAX should be identical.

(If you would like, you may want to use the space below to jot some notes to yourself on how you can get to TK-FAX from your application.)

Step 2 Selecting the TK-FAX Dialog box

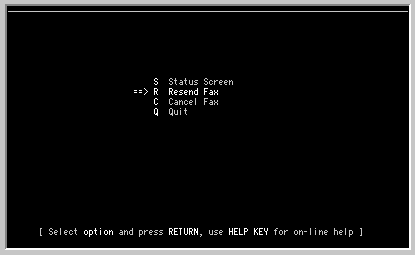
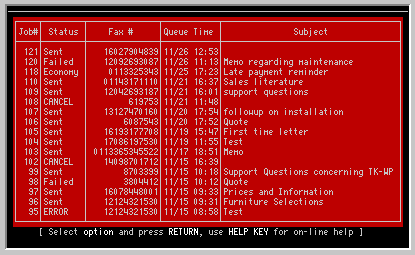
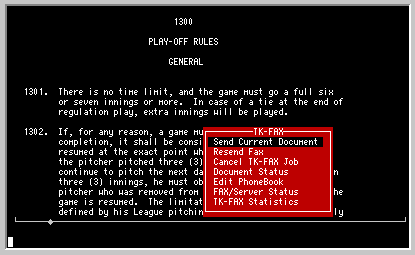
Once you have called TK-FAX from any of the above applications you will be shown a TK-FAX Send Menu that looks like this:

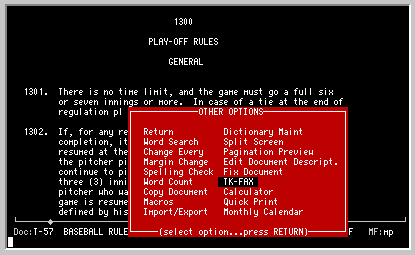
Now before we continue, we'd better make sure that you understand what keys to use on your keyboard for the various functions within TK-FAX. If you have other PG&A products you are probably already familiar with these keys and you can skip on to the next paragraph. But, if you are a first time user, we would like to remind you that the function keys listed below are active and have special meanings to TK-FAX. If your terminal does not have these identified in some way, you will have to look in the back at the end of Appendix B and see how these functions keys are defined for your terminal type. The active keys used in this product are:

EXIT This will abort the current activity and return to the previous activity.
cursor keys Moves left, right, up and down.
TABJumps to the next logical section in the SEND FAX DIALOG box.
PAGE keysNEXT and PREVIOUS PAGE keys will scroll forward and backward through the status, statistics, and Phonebook displays.
HELP keyProvides context sensitive help information where appropriate. Used to call up the Phonebook when in the TO and TO FAX fields.
SELECT keyUsed to call up a selection menu while in the status and statistics screen and used to select more than one entry while in the Phonebook.
CHAR INSERTOn data fields, this will insert a single space at the cursor position.
CHAR DELETEOn data fields, this will delete a character at the cursor position.
ERASE keyErases from the cursor position to the end of the field.

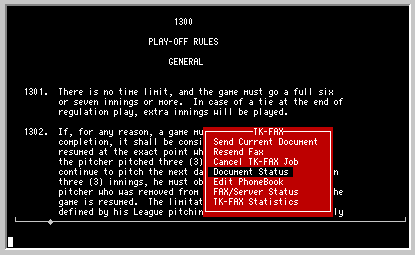
Select SEND CURRENT DOCUMENT by moving the menu selector (it should already be on this menu item unless you have moved it) and then press RETURN.

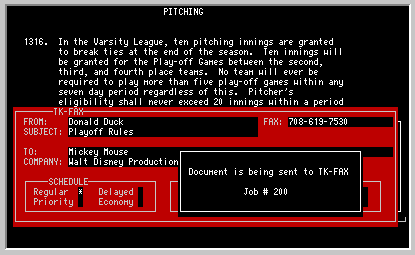
The TK-FAX Send Dialog box similar to the one shown in the following figure should be displayed on your screen:

Step 3FROM box

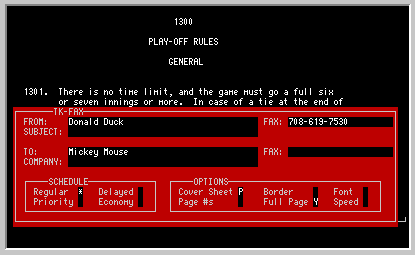
Enter your name in the FROM box. This will appear on the Cover Page. Press RETURN.

Step 4FROM FAX box

The cursor will jump to the FROM FAX box. This item should already be filled in and you may press RETURN.

NOTE: This FROM FAX number is defined during installation. It will appear next to your name on the Cover Page and will also be sent to the remote fax machine for reporting purposes. If you want another fax number to be listed you may override this value by typing over the existing number.

Step 5TO box Next is the TO box. Enter the name of the addressee. This is generally an individual's name but may also be a company name and is the primary way for the fax to be distributed when it reaches the remote location.

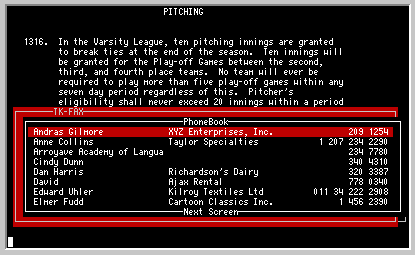
SHORTCUT: Using TK-FAX Phonebook

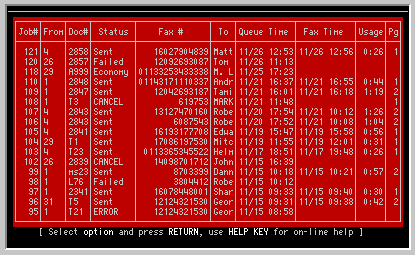
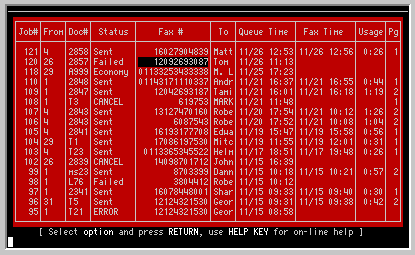
TK-FAX keeps track of all your addressees (along with their fax number and default settings) and you may browse through this list to recall this information when you send another fax to them. To call up this Phonebook, press the HELP function key on your terminal when the cursor is either on the TO or TO FAX boxes. You will be allowed to page through the entire list and select one or more entries (see SENDING MULTIPLE FAXES in chapter 2). You may narrow your range of choices in the Phonebook by entering in two or three of the first letters of the Addressee before pressing the HELP key.

Step 6TO FAX box

Enter the TO FAX number. If you didn't use the TK-FAX Phonebook, you will need to enter the FAX number of the addressee. This is the number that will be dialed by the fax/modem so it must contain any appropriate area codes, country codes etc. If your phone system requires a 8 or 9 to connect to outside phone services, you will need to enter this number also. Press RETURN after entering the number.

NOTE: Don't forget your long distance codes. If TK-FAX senses that you have only entered 10 digits, it may ask you if you want to insert a 1 or 011 before the area code. (Other combinations may be selected in the system configuration.)

Step 7SUBJECT box

This is an optional item that allows you to indicate the purpose of the fax. It will be displayed on the Cover Page and it will also be displayed in the Subject Listing of the Status screens. Press RETURN when completed.

You have now completed the main items on the Send Dialog box. The remainder of the items all have defaults that have been either defined in the System Configuration screens or have been recalled from the Phonebook for an individual addressee. If you are happy with the rest of the items in the dialog box, press TAB twice and jump on to page 16.

Step 8SCHEDULE box

There are four possible ways to schedule the sending of the fax. You can only select one for each fax. The four options that you have are as follows:
REGULAR This is the normal scheduling method. Your fax will be placed in line behind any other regular faxes that may be waiting to be sent. It is a first in, first out queue. If the fax/modem is idle, you will be the first in line and the document should go out as soon as it is converted to an fax image (conversion can take anywhere from a couple of seconds to four or five minutes, depending upon the speed of your computer and the length of the fax).
PRIORITY This fax is given preferential treatment. It will be converted and sent before any REGULAR faxes. It will be placed in line behind any other Priority faxes that may already be waiting to be sent. If the fax/modem is idle, the fax will go out the same as if it where scheduled REGULAR.
DELAYED Not all faxes need to goimmediately. If you want your fax to be sent at a particular time in the future you may enter the date and time when you want the fax to be sent. (The conversion to the fax image is still performed as if it where scheduled REGULAR).

The biggest use of the DELAYED fax is to take advantage of lower phone rates. You may want to schedule overseas faxes during the evening or early morning to save line costs.

ECONOMY This method takes advantage of the fact that it is cheaper to dial a fax number once and send two faxes rather than dial the number twice and send one fax at a time. There are a few seconds of handshaking and training time that is performed at the beginning of each connection and some long distance carriers round all fractional minutes to the next whole minute or have a minimum charge for each call.

By selecting the ECONOMY mode, TK-FAX will wait and see if it can "piggy-back" one or more faxes to any other fax being sent to that same fax number before the the expiration time you specified. If nothing else is sent, then the ECONOMY fax will be sent when the time is expired.

The ECONOMY mode is particularly important to heavy users who send multiple faxes to the same site throughout the day. Not only does this method save line costs, but it also enables the fax/modem to send more faxes in a limited time since it is takes less time.

Step 9OTHER OPTIONS box

From time to time you may find it useful to change some of the default values in the Options section. These values were predefined in the Configuration options to select the most used settings, but in certain cases you may want to override these settings to provide a different level of service.

You will want to keep in mind that whenever you change the Other Option settings, these values will be stored in the TK-FAX Phonebook under the addressee. The next time you lookup the addressee using the Phonebook facilities, you will notice that the Options will be set to the values defined the last time anyone sent a fax to that addressee.

These options are defined as follows:
COVER
SHEET
An optional cover sheet can be inserted at the beginning of the fax with the TO, FROM and SUBJECT information that is entered in the TK-FAX Send Dialog box.

Y - YES. Cover sheet is included and will be the entire first page. The body of the fax will start on page 2.

P - PARTIAL. The cover sheet will be printed at the top of the first page and the text of the fax will start immediately after the last line of the fax routine block and will continue until the end of the page.

N - NO. No cover sheet or graphic will be sent. The first line of the fax will consist of the body of the fax that is either sent from another PG&A product or an integrated application. In this case, it is up to the user to create some type of cover sheet information for routine purposes.

Blank = NO

PAGE
NUMBERS
Optional page numbering can be included at the bottom of the fax page.

Y - YES. TK-FAX will provide the page numbers of each page sent at the bottom of each page.

N - NO. Page numbering will be ignored. The cover sheet will still report the total number of pages in the document.

Blank = NO

BORDER (This specifier is used to select a line drawing around your fax transmission; as Version 1.30, this field has not yet been implemented. If the BORDER function is one that might be useful, please mention to us that this feature would be a worthwhile addition to a future update of TK-FAX.)
FULL PAGE The paper for a typical fax machine is either supplied in loose sheets or a roll. With the roll, a fax can be as short as two or three inches and as long as many feet.

Y - YES. The pages will be cut at even page lengths. (The actual page length is specified in the Configuration screen.) You will always get a full page on the loose sheet fax machines regardless of this setting.

N - NO. By specifying NO to the Full Page option you are allowing TK-FAX to cut partial pages off before the full page size is reached. Therefore a short fax may only take two or three inches of paper.

Generally you will answer this option with a YES since it is much easier for the addressee to handle full length pages.

FONT TK-FAX permits the use of variable fonts with your fax transmissions. As of Version 1.30, five different fonts may be used: A, B, C, D and K (see Appendix C for font characteristics).

Simply enter the letter of the appropriate font you choose to use with your TK-FAX transmissions.

SPEED Fax transmissions are sent over regular dialup telephone networks at a number of different speeds. During the first few seconds of the fax transmission, there is a rapid dialog going on between the two fax machines with regard to the capabilities of each of the machines. After this preliminary exchange, the two machines decide on a starting transmission rate. A short test is conducted to see if this rate is error free and if not, the two fax machines will drop down to a slower rate and then will try again. Eventually they decide on a rate that will be best suited for the line conditions at that given moment.

Obviously, since telephone line charges are based on length of connection time, it is usually best to send the fax at as high of a rate as possible. But at the same time, since the testing and dropping of the exchange rates also takes a few seconds each, it may be advantageous to specify a lower speed at the outset and prevent the costly time for each fax to do their thing before they finally decide on the lower rate anyway.

9 - High speed fax transmission. This is the normal 9600 baud transmission used by most current fax machinery.

7 - Medium speed fax transmission. Some fax machines support a 7200 baud transmission.

4 - Low speed fax transmission. This is the lowest setting available with TK-FAX and will send faxes at 4800 baud.

Job Numbers and
Fax Status
Once you finish designating the addressee and how you are going to send the fax, TK-FAX takes over and does the rest. First TK-FAX will make a copy of the data that you are sending. This means that you can immediately change it and send another fax without affecting the first fax.

Then you will notice that a job number will be displayed on your screen like this:

This job number is a unique number assigned to each individual fax. This same number will be printed in small numbers at the bottom left corner of the fax when it reaches the remote fax machine and is one means of referring to a particular fax.

At the same time your fax request has been added to the fax status screen. An individual fax will go through a number of different phases before it finally reaches its final resting state called "SENT". It is then history.

First you need to learn how to call up the status screen so that you can see the progress of our fax that you just sent. There are two ways that you can get to TK-FAX status information:

Method 1 - From the application

If you are still working in TK-WRITER, TK-MAIL, TK-SCRIPT or your own integrated application, you need to call up the TK-FAX control menu as you did when you first sent the fax. You will notice that the fourth option is DOCUMENT STATUS. Select this option by typing a "D" and press RETURN.

Method 2 - From the TK-FAX program.

From the TK-FAX menu (type DO ^TKFAX in programmer mode) select DOCUMENT CONTROL and press RETURN. A second menu will be displayed as follows:

Select the first option by just pressing RETURN.

Since we are going to go into more detail about the various status screens in a later chapter, we will not go into all of the uses and meanings of these screens. For now we are just going to concern ourselves with the fourth column marked "status". Your status screen should look something like this:

Notice the fourth column. This column will contain one word status conditions and you might see your fax go through each step in this progression:

Regular > Convert > Regular > Dialing > Page-1 > Sent

Since the status screen only refreshes itself every 10 seconds, you may not see every one of these steps. Also, if you have chosen another scheduling method or if you encounter problems in communications you may see different words. Here is a listing and a short description of these status conditions:
BUSY he remote fax line was busy.
COM-ERR There was no response from the local fax/modem. This is either because the modem is not powered on or because of a communication problem.
CANCEL This job has been cancelled by the CANCEL FAX option. It may be restarted with the RESEND option.
CONVERT The ASCII text is being converted to Modified Huffman Encoded data which is the data format of most fax machines.
DELAYED This job is waiting for the time and date specified before it will dial.
DIALING The fax/modem is in the process of dialing the remote fax machine and then performing a 5 to 20 second handshaking maneuver that determines fax capabilities at both ends, line quality and final fax settings.
ECONOMY This fax is waiting for either another fax to be sent to this same fax number (not necessarily the same person) or the expiration time and date, whichever occurs first.
ERROR A software error has occurred. The ERROR status display can be used to list the actual error report.
FAX-ERR TK-FAX lost communication with the local fax/modem during the transmission of the fax.
FAIL-NOA Fax failed after retry with NO ANSWER at the remote end.
FAIL-BSY Fax failed after retry with a BUSY signal at the remote end.
NO-ANSWR The remote fax machine either continues to ring without answering, or else the line was answered without the usual fax signal.
NO-DIAL There was no dial tone during the dialing step. Check to see if the fax/modem is connected properly.
PAGE-X TK-FAX displays the page number as each page is sent.
PRIORITY This fax will be converted and sent before other regular faxes.
READY A DELAYED fax has reached its scheduled time and is waiting in the queue to be sent.
REGULAR Indicates that the REGULAR fax scheduling is in effect and it will go out as soon as any PRIORITY faxes have been sent.
RESEND This fax has been reinserted into the send queue by the RESEND FAX function.
SENT The fax has been transmitted successfully. This is the final resting state for all good faxes.
SENT-X If a fax has been sent again using the RESEND FAX function, the number of times sent is indicated.
XMT-ERR A transmission error occurred during the sending.

Multiple Transmissions So far we have shown how you can send one fax and then check the status. Let us suppose that you want to send the same document to more than one addressee. The only difference between each fax would be cover sheet information.

An obvious method of sending multiple faxes is to repeat the steps listed in the beginning of this section for each of the different addressees. Although this method is perfectly acceptable, there are two short cuts that should make this easier.

Multiple selections from the Phonebook.

The first method is to select more than one entry while in the Phonebook. Press the SELECT key to select an individual addressee. You will notice that it will change in color or intensity. You are then able to move to another addressee and select that item also. If you select someone by mistake, press the SELECT key a second time to deselect that item. Then press RETURN when finished.

Once you have done this you will notice that TK-FAX will pass you each name selected and allow you to make changes to the Send Fax Dialog box before going on to the next selection.

Multiple selections using the NEXT PAGE key.

Another shortcut that can be used to send to multiple addressees is to press the NEXT PAGE function key at the end of the Send Fax Dialog box rather than the normal TAB or RETURN key.


CHAPTER 2


FAX DOCUMENT CONTROL

A document that has been sent from an application is really only added to a queue (a list) at the time the user is finished entering the fax information. As was mentioned in the last section, the fax job actually goes through a number of different steps before being considered sent.

In this section we will discuss how we can make a couple of changes to this queue as well as how to interpret the information that is found in the status screens.

Fax Quality
Considerations
Successful fax transmission is dependent upon the quality of the phone lines and the correct operation of the fax equipment. The fax image is constructed of hundreds of scan lines which are each transmitted individually. If there is noise in the circuit or a momentary interruption in phone service one or more of these lines may be missing. A missed scan line here and there will not normally render the fax unreadable, but consecutively missed scan lines may take out entire lines of text.

TK-FAX performs what checking it can to insure that your faxes arrive at the remote fax machine successfully. Todays fax standards do provide for error detection and correction, but very few fax machines support these new capabilities.

In lieu of these tight controls most fax machines provide a limited error detection scheme which measures the relative transmission error rate and requests a retransmission if it exceeds a preset threshold. In this case TK-FAX will resend the page. The number of pages that are resent are listed on the LOCAL FAX INFORMATION status screen.

Resending a Fax There may be times when you will need to resend a fax due to either poor quality transmission or some other problem at the receiving end. Resending a fax is easy and can be done by two methods.

Method 1 - From the application

If you are still working in TK-WRITER, TK-MAIL, TK-SCRIPT or your own integrated application, you need to call up the TK-FAX control menu as you did when you first sent the fax. You will notice that the second option is RESEND FAX. Select this option by typing an "R" and press RETURN.

Method 2 - From the TK-FAX program.

From the TK-FAX menu (type DO ^TKFAX in programmer mode) select DOCUMENT CONTROL and press RETURN. A second menu will be displayed as follows:

Select RESEND FAX and press RETURN.

Selecting the Fax to Resend.

The TK-FAX Fax Status screen will be displayed for you and looks similiar to this:

The cursor will move from entry to entry, reversing the highlight of the field to be selected. Once you position the cursor above the fax you wish to resend, press RETURN and that fax queue will be selected for resend. A pop-up box will then appear asking the user to verify the fax number. If you wish to use the same number, press RETURN. If you wish to change the number, simply re-key the new number and press RETURN. This is an excellent place to resend a transmission to another number without having to recompile. Also, if your original fax did not transmit because the receiving fax machine did not answer, you may transmit to another number and the TK-FAX DOCUMENT STATUS screen will not be littered with NO-ANSWER and ERROR messages.

NOTE: You will notice that if you call the Fax Status screen from an application such as TK-WRITER, it will only list the faxes sent from your terminal. If you had called this from the TK-FAX program, you would notice that all of the faxes from all users are listed. In order to change this listing you can press the Select function key (F8 on PCs, SELECT key on VT220s) and you will be able to toggle this from either an individual listing or a complete listing.

You will see the cursor on the screen is highlighting the first fax number (this is the most recent). In order to select the fax to resend you need to move this cursor until it highlights the correct fax job. The following function keys are operational while you are in the status screens:

CURSOR UP
CURSOR DOWN
NEXT PAGE (PAGE DOWN)
PREVIOUS PAGE (PAGE UP)
SELECT
RETURN
HELP
EXIT
By using a combination of NEXT PAGE, PREVIOUS PAGE and the cursor keys you should be able to locate your fax and point to it with a cursor. Press RETURN to start the RESEND.

NOTE: TK-FAX will keep the status information, source document and the fax image for a certain number of days depending upon the way that it is configured at your site. Each of these types of information can be kept a different number of days. If the status information has been purged, then you will not be able to resend this document. The same is true if both the source and fax images are purged. But if one or both of these are still available then the fax can still be resent. A message will be displayed if the files are not present.

Cancel
Fax Command
If you queue up a fax for transmission and it has not yet been sent, you may cancel the transmission as long as it has not reached the dialing status. Cancelling a fax is easy and is almost identical to RESENDING a fax. The only difference is that you pick the CANCEL FAX option rather than the RESEND FAX option.

First select the CANCEL FAX option on either the TK-FAX Send Menu or from the DOCUMENT STATUS menu in the TK-FAX program. (If you are not sure how to get to either of these menus, see the explanation listed above under RESEND FAX).

As in RESEND FAX, you will be shown the STATUS screen. You will see the cursor on the screen is highlighting the first and most recent fax number. In order to select the fax to cancel you need to move this cursor until it highlights the correct fax job. Press RETURN to cancel job.

Suspend/Resume
Option
Sometimes you may find it necessary to dedicate your fax/modem to other tasks and turn off the TK-FAX transmission capabilities. To do this, we have provided a Suspend/Resume Option at the main menu of TK-FAX. Selecting this option will hold TK-FAX transmissions and free your fax/modem for other tasks. All queued facsimiles during this time will be converted and given READY status. When the Suspend/Recume Option is deselected, the fax/modem will resume transmitting all converted faxes as is no interruption occurred.
Using the TK-FAX
Status Screens
The STATUS screens provide a wealth of information that will help you in both checking on the status of an individual fax job as well as monitoring the overall operations of the fax server. We will look at the various types of information that are available and how this information can be used.

First we must call up the status screen. Once again, there are two methods by which we can get there:

Method 1 - From the application

If you are still working in TK-WRITER, TK-MAIL, TK-SCRIPT or your own integrated application, you need to call up the TK-FAX control menu as you did when you first sent the fax. You will notice that the fourth option is DOCUMENT STATUS. Select this option by typing a "D" and press RETURN.

Method 2 - From the TK-FAX program.

From the TK-FAX menu (type DO ^TKFAX in programmer mode) select DOCUMENT CONTROL and press RETURN. A second menu will be displayed as follows:

Select STATUS SCREEN and press RETURN.

Once you are into the status screens, you will see that it is easy to move among five different types of status screens with two levels of detail. If you press the SELECT function key while on any status screen you will be presented with these seven options:

First let us look at the two levels of detail since they are common to all screens.

You will notice that if you call the Fax Status screen from an application such as TK-WRITER, it will only list the faxes sent from your terminal. In this way you are not bothered by all of the other fax activity on this system and you see your own work exclusively. (There is one exception to this: if you define your TK software with an INCONSISTENT $I status in the initialization, then TK-FAX will show you all jobs.) If you had called this from the TK-FAX program you will notice that all of the faxes from all users are listed.

If you select the first status option - you will be given the entire listing of faxes sent from TK-FAX. Note that they are always listed from the most recent to the oldest. Eventually each of these faxes will be purged from this listing since part of the TK-FAX configuration is to define the number of days that this information will stay around.

By using this COMPLETE listing you can see all of the activity on the fax server.

If you select the second option - you will be given the listing of all the faxes that have been sent from your particular terminal. (This may not be valid in a network setup where you are assigned a different value everytime you logon.) Unless you are the only one sending faxes, this will be a smaller list.

You can toggle between these two options on any status screen to either hone in on your particular screens or to zoom out and see the entire listing.

Now let us explain the five different types of status screens. Although there are some similarities between them, they each have a different purpose.

Normal Status Screen

This screen provides information that you need in the normal daily operations. It provides you with the important details about whether the fax was sent, when it was queued, when it was finally sent, and how long it took.

Subject Display

Local Fax Information

This is a system managers screen. Besides the usual information such as the fax number, status, etc., it provides information concerning the time in seconds that it took to convert each fax job, how many total lines were converted, and how many times it took to actually get the fax sent without error.

The conversion times gauge the overall performance of TK-FAX on this particular system in converting the ASCII text to fax image. Although there is no particular race that is being run, an average page of text should convert anywhere from 1 second to 300 seconds. Obviously, if it is taking 300 seconds to convert each page of fax before it can be sent, then this MUMPS system is only capable of sending 12 pages per hour. If there seems to be a fairly large backlog of faxes in the queue that have not been sent, then maybe these times should be analyzed.

The retry count is another interesting number to watch. Since this keeps track of how many times the number was dialed to send out each fax, you may find that you will need to adjust your retry counts for certain destinations since they tend to always be busy.

Remote Fax Information

This screen provides information concerning the receiving fax machine. First it provides you with the fax identification string that the remote fax sent back to the sending fax/modem when they first made connection.

Secondly it displays the fax capabilities frame that was finally decided upon before the actual transmission started. You will notice that there are 8 digits listed each separated with a comma. The interpretation of this string is as follows:

Piece DescriptionMeaning of each value
1 Vertical Resolution

0 = Normal, 98 dpi
1 = Fine, 196 dpi
2 Transmission Bit Rate


0 = 2400 (not supported)
1 = 4800
2 = 7200
3 = 9600
3 Page Width


0 = 215mm (standard)
1 = 255mm
2 = 303mm
3 = 151mm
4 = 107mm
4 Page Length


0 = A4, 297mm
1 = B4, 364mm
2 = unlimited
5 Data Format


0 = 1-D Modified Huffman
1 = 2-D Modified Read
2 = 2-D uncompressed
6 Error Correction


0 = disabled
1 = enabled - 64 byte frame
2 = enabled - 256 byte frame
7 Binary File

0 = disable
1 = enable
8 Scan Time


0 = 0 (milliseconds)
1 = 5
2 = 10
3 = 10
4 = 20
5 = 20 6 = 40
7 = 40

The last column displays the actual result codes sent back to TK-FAX at the end of each page. The possible codes and their definition are as follows:

1 - result ok with good quality
2 - result poor - retrain and resend
3 - result ok - retrain and resend
(Retraining is the testing and handshaking that the two fax devices do just prior to the transmission of the fax image.)
Error Status Screen

This screen provides MUMPS programming information concerning software errors that occur during the sending of a fax. And although we trust that this screen is blank on your system, we also know that we have been humbled by an occasional bug or two that pops up once in a while. If you see some entries in this screen, you may want to give us a call and report them to us.