ROUTINE UTILITIES
CONVENTIONS |
A number of helpful
conventions are employed
throughout the TK-WORKS utilities which, if understood, can significantly
enhance their use.
| |||||||||||||||||||||||||||||||||||||||||||||||||||||||||||||||||||||||||||||||||||||||||||||||||||||||||||||||||||||||||||||||||||||||||||||||||||||
| Routine Selection | All routine selection in the TK-WORKS' utilities operate in the same manner. Once you have become familiar with the steps involved, you will find the process to be both powerful and easy-to-use. | |||||||||||||||||||||||||||||||||||||||||||||||||||||||||||||||||||||||||||||||||||||||||||||||||||||||||||||||||||||||||||||||||||||||||||||||||||||
| Step 1 |
Identify the source of the routines.
There are
four possible sources of routines for use by the utilities: the
programmer's workspace, the common workfile, the routine
archive and routine releases
. For example, when printing a
listing you can (1) list the routine currently in your workspace, (2) list
the current versions of a selected set of routines in the workfile, (3)
list the most current versions of routines from the routine archive, or
(4) list the versions of routines from the archive which have been linked
to a particular release of a package. When the Routine Listings utility is used, the first question asked will be the source of the routines as shown in the following illustration.
Note that some utilities are limited to certain sources. Because of this, not all the sources shown above will be available for each utility. The process of selection, however, remains the same. Type the first character of the desired source, or use the cursor movement keys to move the selector to highlight it and press [RETURN]. If you select workspace as the source, routine selection is complete since the workspace can contain only one routine. If the selected source is a release, proceed to Step 3.
| |||||||||||||||||||||||||||||||||||||||||||||||||||||||||||||||||||||||||||||||||||||||||||||||||||||||||||||||||||||||||||||||||||||||||||||||||||||
| Step 2 |
Identify the routines from workfile or archive.
If either workfile
or archive are selected as the routine source, you will be prompted to
interactively build a list of routines from that source by
selecting and/or deselecting specific routines. Such a prompt is
illustrated below from the Routine Listing utility.
~"SCREEN TKWORKS,CONVEN,2,1.4,B
The simplest way to select a routine is to enter the routines name and press [RETURN]. Conversely, to deselect a routine, enter a hyphen "-" followed by the name of the routine to be deselected. As additions and subtractions are made, the updated list will be displayed as shown in the next illustration. Notice that the number of routines selected and the total of the routine sizes is shown on the top row of the screen. In addition, the size, date last modified and description of each of the selected routines are shown to the right of each routine name. If the number of selected routines exceeds the available space on the screen, the NEXT SCREEN and PREV SCREEN keys can be used to page forward and back through the list for examination. Complete the selection process by pressing [RETURN] at an empty 'routine: ' prompt, or abort the process at any time by pressing the EXIT key.
Wildcards. TK-WORKS supports several wildcards to shorten the process of building a list of routines.
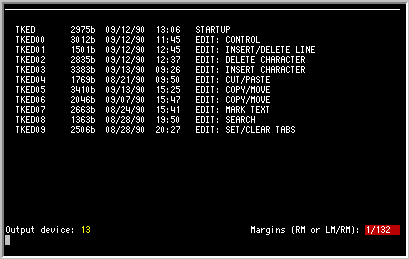
Device Selection |
Selecting the device for printing listings and
reports is the same for all output programs, and is quite straight
forward.
As depicted in the sample screen below, you will be asked for the device
and the margins to use. To make it easier, TK-WORKS remembers the device
you last used. It also remembers the last margin parameters you used for
that specific device. Both are presented as defaults and can be accepted
by simply pressing [RETURN] for each field. |
Step 1 |
Output Device.
Enter the device number of the
desired printer and press [RETURN]. TK-WORKS does not maintain a device
table with printer definitions and such. As a result, TK-WORKS will not
be able to determine whether you have selected correctly. It is up to you
to ensure that the device number you enter is correct. |
Step 2 |
Margins.
Enter the Left and Right margins
TK-WORKS should use for the listing or report separated by a slash "/" and
followed by a [RETURN]. TK-WORKS does not attempt to control pitch; it is
necessary for you to prepare the printer prior to beginning to print. | If you do not enter a Left Margin, TK-WORKS will assume value of 1, and if you do not specify a Right Margin, TK-WORKS will assume a value of 80.
PRINT ROUTINE LISTINGS
This utility enables the printing of the source code of one or more
routines. The routines can be selected from one of three sources: |
Step 1 |
From the Functions menu, select Utilities. | From the Utilities menu, select Routine. From the Routine Utilities menu, select List.
Step 2 |
Select the routines to be listed. Additional
information regarding selection of source and routines is covered at the
beginning of this section under Conventions. |
Step 3 |
Select the output device, and its left and right margins. Additional
information regarding selection of output device and margins is provided
at the beginning of this section under Conventions. |
Step 4 |
If you selected more than one routine, you will be asked whether you would
like a Routine Directory printed. If you respond [Y], a directory will be
printed for the routines you selected. See Print Routine Directory
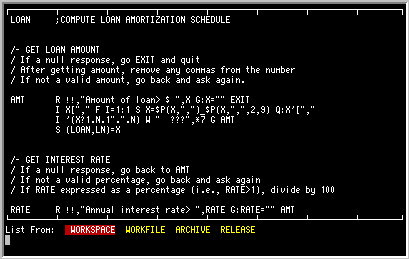
for more information. | A sample listing is provided on the next page. Notice the lines as the beginning of logical sections which contain a title centered in a line of hyphens. This a feature of the listing routine which can be very helpful in visually separating logical sections of a routine. The titles are actually a special form of internal comment which look like this in the code...
/- GET LOAN AMOUNTIn order for this capability to be operative, the line must begin with a slash followed by any punctuation character, followed by a space, followed by the title. Any punctuation character can be used in place of the hyphen in the above example and will be replicated as shown in the sample listing on the next page. ~"INCLUDE DR,101 Search Routines |
This utility enables programmers to search selected routines for
occurrences of a specified string. A header line is
printed for each routine which is found to contain the string, as well as
each line in the routine which contains the string. For each line, you
are provided with the offset from the beginning of the routine in addition
to the linetag, if any. | Routines can be searched from any of three sources:
Step 1 |
From the Functions menu, select Utilities. | From the Utilities menu, select Routine. From the Routine Utilities menu, select Search (SRCH). Step 2 |
In response to the prompt 'Search for string: ', enter the string to be
searched for. |
Step 3 |
Select the routines to be searched. Additional
information regarding selection of source and routines is covered at the
beginning of this section under Conventions. |
Step 4 |
Select the output device, and its left and right
margins. Additional information regarding selection of output device and
margins is provided at the beginning of this section under
Conventions. | A sample listing is provided on the next page. ~"INCLUDE DR,102 SEARCH ROUTINES AND REPLACE
This utility enables programmers to search
selected routines for occurrences of a specified string, and replace those
occurrences with a second string. | A header line is printed for each routine which is found to contain the string, as well as the old and new versions of each line in the routine which was modified. For each line, you are provided with the offset from the beginning of the routine in addition to the linetag, if any. It is important, however, to understand what happens to the modified routine. Regardless of the source of routines you selected, modified routines are saved to the workfile just as if they had been loaded into a workspace to make the changes and saved it from there. This enables recovery from unanticipated and undesired>changes. Routines can be searched from any of three sources:
Step 1 |
From the Functions menu, select Utilities. | From the Utilities menu, select Routine. From the Routine Utilities menu, select Replace (REPL).
Step 2 |
In response to the prompt 'Replace string: ',
enter the string to be found and replaced. Pressing EXIT will abort the
process. |
Step 3 |
In response to the prompt 'With string: ', enter
the string to be inserted in place of the string entered in Step 2. |
Step 4 |
Select the routines to be searched. Additional
information regarding selection of source and routines is covered at the
beginning of this section under Conventions. |
Step 5 |
Select the output device, and its left and right
margins. Additional information regarding selection of output device and
margins is provided at the beginning of this section under
Conventions. | A sample listing is provided on the next page. ~"INCLUDE DR,103 PRINT ROUTINE DIRECTORY
This utility enables the printing of all or a
subset of a routine directory
from one of the
following three sources:
|
Step 1 |
From the Functions menu, select Utilities. | From the Utilities menu, select Routine. From the Routine Utilities menu, select Directory (DIR). Step 2 |
Select the routines to be included. Additional
information regarding selection of source and routines is covered at the
beginning of this section under Conventions.
| Step 3 |
Select the output device, and its left and right
margins. Additional information regarding selection of output device and
margins is provided at the beginning of this section under
Conventions. | A sample directory is provided on the next page. Notice that one line is printed for each routine which, in addition to the name of the routine contains the number of lines in the routine, the approximate size of the routine, the routine description, and the date and time the routine was last modified. ~"INCLUDE DR,104 COMPILE ROUTINES
This utility provides the ability to compile a
group of routines at the same time. This is particularly beneficial when
testing software modules. Note that pre- and final releases can only be
compiled through the Release Management options. |
Step 1 |
From the Functions menu, select Utilities. | From the Utilities menu, select Routine. From the Routine Utilities menu, select Compile (COMP).
Step 2 |
Select the routines to be compiled. Additional
information regarding selection of source and routines is covered at the
beginning of this section under Conventions. | Compilation will begin immediately following selection of routines. ARCHIVE ROUTINES
This utility provides the ability to move a
group of routines from the workfile to the routine archive. During the
process, the current workfile version is copied to the archive, and it and
all backup copies are removed from the workfile. | Archiving a routine creates a new archive version of that routine only if it is the first time the routine has been archived, or if the previously archived version of the routine has been locked through the Freeze option in the Release Management utility. For further information refer to the section in GETTING STARTED titled Approach to routines. Also refer to section covering Release Management.
Step 1 |
From the Functions menu, select Utilities. | From the Ututilities menu, select Routine. (ARCH).
Step 2 |
Select the routines to be archived. Additional
information regarding selection of routines is covered at the beginning of
this section under Conventions
. Note that unlike other utilities,
the source of the routines is preselected for you (the workfile
).
As a result, you will not be asked for the source before routine
selection.
| Step 3 |
In response to the prompt 'Archive selected
routines? Please confirm: ' type [Y] and [RETURN] to proceed. The
default response is NO. | Archival will begin immediately and proceed until completed.
PURGE ROUTINES
This utility provides the ability to remove a group of routines from the
workfile. During the process, each selected routine and its backups is
removed from the workfile.
| Step 1 |
From the Functions menu, select Utilities. | From the Utilities menu, select Routine. From the Routine Utilities menu, select Purge (PURG). Step 2 |
Select the routines to be purged. Additional
information regarding selection of routines is covered at the beginning of
this section under Conventions
. Note that unlike other utilities,
the source of the routines is preselected for you (the workfile
).
As a result, you will not be asked for the source before routine
selection.
| Step 3 |
In response to the prompt 'Purge selected routines from WORKFILE? Please
confirm: ' type [Y] and [RETURN] to proceed. The default response is NO.
| Purging will begin immediately and proceed until completed.
RELEASE MANAGEMENT
TK-WORKS provides the ability to define
packages and their versions. For each version
a list of archived routines to be included in the release is defined.
These routines can be compiled, tested, modified and re-archived, compiled
again and so on, until the release is considered finished. It is then
frozen to prevent further changes to any of the routines that belong to
it. | One unique advantage to TK-WORKS' design is that commonly used routines can be part of an unlimited number of packages. This promotes the development and use of routines which perform common tasks, a technique sometimes referred to as modular programming. When a package is frozen through the release process, as described in the following pages, the routines that belong to it also become frozen. Frozen routines can still be loaded, edited, saved and archived, but a new archive version is created and the earlier frozen version is no longer changed. As a result, earlier versions of any package can quickly be retrieved for any purpose, including recompilation, with complete confidence that they will perform exactly the way they did when they were first released.
From the Function menu, select Utility.
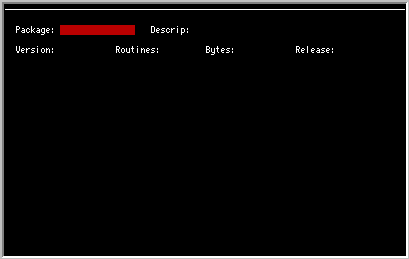
Package |
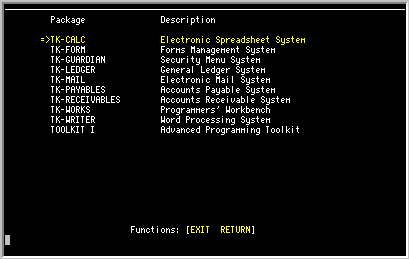
When performing any of the Release Management
functions, the first task is to identify the package you will be working
with. Enter the name of the package. | To select the package from a list of currently defined packages, enter a [?] or the first character or two of the package name followed by a [?] and press [RETURN]. A list of defined packages will be displayed, such as the one shown below.
To select a package from the list, move the pointer to the desired item and press [RETURN]. If you do not find the package, press EXIT to look again. If the package has not yet been defined to the system, be sure to enter the full package name and press [RETURN]. You will be asked to confirm addition of this package. Answer by typing a [Y] to add, or [N] to look again, and press [RETURN].
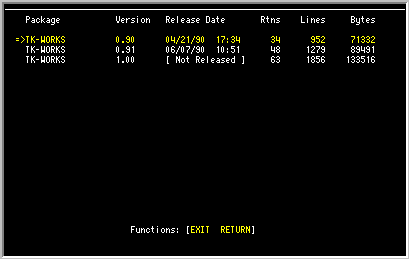
Version |
Next identify the version you will be working
with. As before, you can use a question mark "?" to see the list of
currently defined versions from which one can be selected in the same
manner as before. A typical version list will look like the one shown
below. | If the version number entered has not yet been defined to the system, you will be asked to confirm addition of this version. Answer by typing a [Y] to add, or [N] to look again, and press [RETURN].
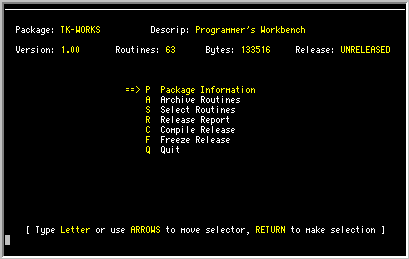
I following screen will be displayed showing the number of routines belonging to the release, the apporoximate total size of the release, and the release date (if the release has been frozen). A menu will also be displayed showing the release activity options.
Package Information |
The first option on the Release Management menu
enables definition of release specific information. The following sample
screen shows the information which can be entered or edited here. |
Description. In this field you can enter or edit the package description. This description is stored only once for the package. As a result, changing it here will change it for all prior and future releases of the package. Routines. This field displays the number of routines currently belonging to this release and is maintained by the Select Routines option on the Release Management menu as the list of routines is updated. Bytes. This field displays the approximate size of the release in bytes. It is also maintained by the Select Routines option. Release. This field displays the date this version of the package was released, which is accomplished with the Freeze Release option on the Release Management menu. If the version has not yet been frozen, the field shows "UNRELEASED". Copyright Lines. While the general copyright legend entered in the Initialization is used for routines in progress, each version of each package must have its own copyright message defined. You can create/edit up to four lines of 80 characters each, which will be inserted at the beginning of each routine compiled, printed or exported.
Archive Routines |
Identical to the Archive function on the Routine
Utilities menu, this function allows you to move routines from the
workfile to the archive
in preparation for selection as part of
a release. For details, refer to the pages covering archiving routines. |
Select Routines |
The second step in creating a release is to select
the routines which will be included in the release. Since the number of
routines may change during release testing, this function can be used as
often as necessary until the release is frozen. | The process of selecting routines is identical to selecting routines for other utilities except that if you are releasing a second version of a package, the prior version's list is loaded for you as a starting point. From there, routines may be added or removed in the same manner as with other utilities.
Release Report |
The Release Report provides a summary of the
routines belonging to a release which is very similar in form to the
Routine Directory available from the Routine Utilities menu. It is an
essential part of release management documentation. | As the sample report on the next page illustrates, the Release Report provides the following information for each routine.
Compile Release |
This function enables the compilation of all the
routines belonging to the release. It can be done as often as necessary,
both before and after the release has been frozen. It is, in fact, wise
to
compile and test each release prior to freezing to ensure that no routines
have been inadvertently left out. | Note that the version number inserted into the first line of the routine (as defined by the Initialization screen) will have a "p" appended to it when it is compiled prior to freezing the release. For example, if the version being compiled is 1.15, then the version number inserted during compilation will be 1.15p. The "p" is the abbreviation for pre-release and is intended to make it possible to distinguish routines compiled before and after freezing.
Freeze Release |
Freezing is the function which 'freezes' a version
to prevent further modification or enhancement. Once a release is frozen,
the only way to make changes is to begin a new version. | When this option is selected, you will be asked to confirm the freeze. Type a [Y] followed by [RETURN] to commence freezing. Once begun, this process should not be interrupted.
|