|
|
|
The COPY function is used to copy text from one location to another. The
source of the text can be the current routine, or another routine. Text
can even be copied from routines outside of TK-WORKS, provided their
source code is available.
|
| Step 1 |
If you will be copying from the current routine, move the cursor to the
beginning of the text to be copied and press the COPY/MOVE key twice.
Proceed to Step 2.
Press the COPY/MOVE function key and type [C] or select COPY from the
COPY/MOVE menu. You will be asked for the name of the routine from which
the text should be copied. If you are copying from the current routine,
press the return to accept the default.
If you wish to copy from another routine, enter the name of the routine
and press [RETURN]. You may use the "?" wildcard to search the routine
index if you are unsure of the name.
When you have entered the name of the routine, you will be given a menu of
the locations in which the routine can be found. This list can include
WORKFILE, ARCHIVE, and MUMPS. Select the desired source and press
[RETURN]. The routine will be displayed to enable you to find and select
the text to be copied, as illustrated below.
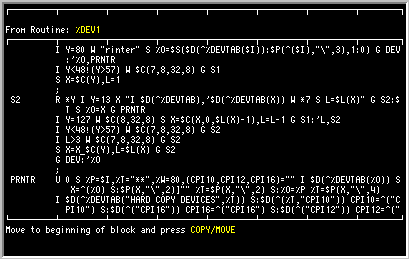
Move the cursor to the first character of the text to be copied. You may
use all of the cursor movement keys to search the routine for the desired
text. If you are unable to find the text, press the EXIT key to
abort the copy operation and try again. As the instructions at the bottom
of the screen indicate, place the cursor at the beginning of the text and
press the COPY/MOVE key.
|
| Step 2 |
You may press EXIT to abort at this time.
Using your cursor movement keys, highlight the text to be copied. When
completely highlighted (shown by reversing the intensity of the selected
text), press the COPY/MOVE key once more. If you copied from another
routine, the display will be refreshed with the current routine.
|
| Step 3 |
You may press EXIT to abort at this time.
Now move the cursor to the location at which the selected text is to be
inserted, using the cursor movement keys as before. Press the COPY/MOVE
key to insert the selected text. The screen will be refreshed, showing
the newly inserted text and you will be returned to normal edit mode.
|
|
TK-WORKS enables a line to be easily broken into two lines using the CUT
LINE function key. Use caution, there is no "undo" function. However,
lines which have been broken can be rejoined using the JOIN LINE function.
When the CUT LINE key is pressed, all characters from the cursor to the
end of the line are removed from the current line and inserted as a new
line immediately below.
|
| Step 1 |
Move the cursor to the point where you want the
line to be broken and press CUT LINE. The remainder of the line will be
immediately removed and inserted as a new line in the routine and you
returned to edit mode.
|
|
TK-WORKS enables the rapid removal of entire lines of text through the use
of the DELETE LINE function key. Use caution, there is no "undo"
function, and the only source for retrieving the line is from the routine
backup, if any, or routine archive.
When the DELETE LINE key is pressed, the row which the cursor is on is
removed and all following lines moved up one row.
|
| Step 1 |
Move cursor to the row to be deleted and press DELETE LINE. The line will
be removed immediately and you will be returned to edit mode.
|
|
Text can be deleted using either the BACKSPACE (sometimes called RUBOUT)
key or the DELETE CHARACTER key. Unlike word processing applications,
these keys work exactly the same, highlighting the text to be deleted in a
forward direction. There is one exception: when at the end of a line, the
BACKSPACE key removes the previous character and moves the cursor back one
space.
|
| Step 1 |
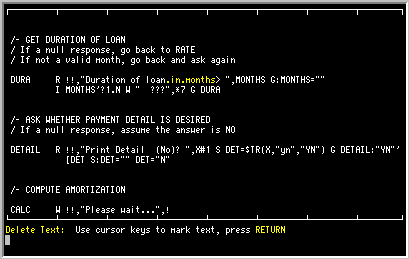
Move the cursor to the first character of the text to be deleted and press
either the BACKSPACE or DELETE CHARACTER key. The character will be
highlighted and instructions displayed at the bottom of the screen as
shown in the example below. Notice that spaces become a period "." when
highlighted, enabling them to be seen.
Continue to press either key until the entire text to be deleted has been
highlighted. You may also use the cursor LEFT key to undo or deselect one
or more characters.
|
| Step 2 |
You may press EXIT to abort the deletion altogether at this time.
Press [RETURN] to complete the deletion. The screen will be refreshed and
you will be returned to edit mode.
|
|
The discard text option is provided to remove text from the TK-WORKS code
library. To learn more about the code library, refer to Save Text
and Recall Text in this section.
|
| Step 1 |
Press the COPY/MOVE function key.
|
| Step 2 |
You may abort the operation at this time by pressing the EXIT key.
Select DISCARD from the COPY/MOVE menu.
|
| Step 3 |
You may abort the operation at this time by pressing the EXIT key, or
pressing [RETURN] with an empty field.
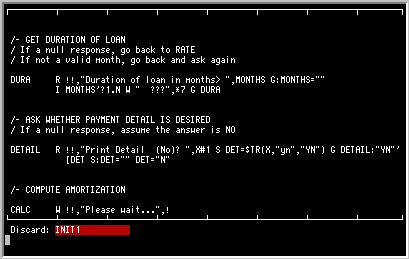
As illustrated below, enter the name of the text to be removed from the
TK-WORKS code library and press [RETURN]. The code will be removed and
you will be returned to edit mode.
|
|
The Erase To EOL function enables you to quickly remove all characters
from the cursor position to the end of the routine line.
|
| Step 1 |
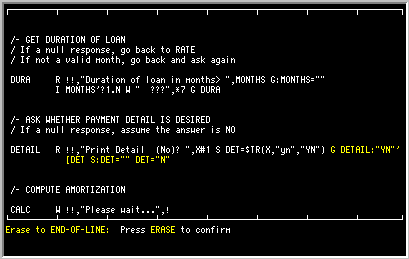
Move the cursor to the first character to be erased and press the ERASE TO
END-OF-LINE key. All of the text to be erased will be highlighted to
provide an opportunity for you to review it. To abort the erasure at this
time, press the EXIT key.
|
| Step 2 |
To complete the erasure, press the ERASE TO END-OF-LINE key a second time.
The text will be removed, the screen refreshed, and you will be returned
to edit mode.
|
|
To exit the Routine Editor, press the EXIT key. If you are unsure of
which key to press, press the HELP key for your terminal. Both keys can
be found for a variety of terminal types in Appendix B. However, several
common terminal types are listed below:
                   HELP       EXIT

    VT1xx          PF1        PF4
    VT2xx          HELP       F11
    VT3xx          HELP       F11
    Most PCs       F1         F10
When the EXIT key is pressed, control is passed to the TK-WORKS function
menu, from which you can return to MUMPS or select any of the available
functions.
|
|
The Find and Replace String function provides the ability to change
multiple occurrences of a string in the current routine. A verify option
enables the function to process all occurrences without interruption, or
request verification of each.
|
| Step 1 |
Press the FIND function key. A menu of FIND options will be displayed;
select REPLACE, or press EXIT to abort.
|
| Step 2 |
When asked 'Replace String: ', enter the string to
be searched for and replaced followed by a [RETURN]. You may also press
EXIT to abort.
|
| Step 3 |
When asked 'With String: ', enter the string to
use as a replacement, followed by a [RETURN]. A null value, or empty
string, is a valid response. You may also press EXIT to abort at this
time.
|
| Step 4 |
You will be asked if you want to 'Verify each
replacement? '. You may abort at this time by pressing EXIT.
If you answer YES by typing a [Y] and [RETURN], TK-WORKS will begin its
search for the first string at the beginning line of the routine and will
search each line, displaying the line as it goes. Each time the first
string is found, you will either be asked to verify the change. Answer
[Y][RETURN] to replace this occurrence with the second string, or
[N][RETURN] to leave it as it is. Changes are shown temporarily on the
screen in reverse video.
If you answer NO by typing [N] and [RETURN], TK-WORKS will replace all
occurrences of the first string with the second string from the beginning
to the end of the routine.
When the last line of the routine has been searched, the screen will be
refreshed and you will be returned to edit mode.
|
|
This function assists the programmer by finding the end of the
current routine and quickly jumping to it. It is of particular value when
editing long routines, or routines with many internal comments because it
does not require use of the NEXT SCREEN key.
|
| Step 1 |
Press the FIND function key. A menu of FIND options will be displayed.
|
| Step 2 |
Select END, or press EXIT to abort. The end of
the routine will be found and displayed without further action, and you
will be left in edit mode.
|
|
This function assists the programmer by finding a particular line and
jumping to the portion of the routine in which the
line is found. The requested line is placed in the middle of the editing
window, with the cursor on the line.
|
| Step 1 |
Press the FIND function key. A menu of FIND options will be displayed.
|
| Step 2 |
Select LINE, or press EXIT to abort.
|
| Step 3 |
When asked 'Find Line: ', enter the desired linetag, or linetag+offset, or
offset from the beginning of the routine and press [RETURN]. Note that
when offsets are used, blank and internal comment lines are not counted.
Only those lines which would remain in the compiled routine are included.
The desired line will be found (if it exists) and displayed in the middle
of the editing window. The cursor will be placed at the beginning of the
requested line and you will be left in edit mode.
|
|
There are three modes of the Find String function which can be used by
programmers to identify the occurrences of a specified string in a
routine.
|
| Interactive Mode |
The Interactive Mode causes all occurrences of the
specified string on the currently displayed page of the routine to be
highlighted, while you remain in edit mode. The function remains active
as you move through the routine until you either exit the Routine Editor,
or use the Find Function to find another string.
Note that this mode is unable to detect occurrences of any string which
does not appear wholly on one line of the screen. In addition, as you
edit lines with highlighted occurrences of a string, the highlighting may
temporarily disappear. However, the highlighting will reappear if the
line is scrolled off the screen and then back on.
|
| Context Mode |
When a '/C' (upper or lower case) added to at the end of string the entire
routine is scrolled through the editing window, highlighting all
occurrences of the requested string as it does. This is most useful when
looking at the context in which a string is found and is not limited by
the weaknesses of Interactive Mode.
When the entire routine has been searched, the total number of occurrences
of the string is displayed in the lower left corner of the screen and you
are returned to edit mode.
|
|
When a '/L' (upper or lower case) is added to the
end of string, only those lines which are found to contain the requested
string are scrolled through the editing window. This is most useful when
context is not important or when scanning a routine to determine if the
string occurs anywhere in the routine. It is not limited by the
weaknesses of Interactive Mode and also displays the number of occurrences
of the string in the lower left corner of the the screen when the entire
routine has been scanned.
|
| Step 1 |
Press the FIND function key and select STRING from the menu of FIND
options displayed.
|
| Step 2 |
Enter the string to be found and press [RETURN]. You may also press EXIT
to abort. Note that pressing EXIT not only aborts, but also clears the
current Find String function, if any exists.
|
|
The Insert Line function enables the insertion
of new blank lines into a routine which can be left blank, used for
internal comments or additional lines of code. The only restriction is
that lines may not be inserted between continuation lines of a single line
of MUMPS code.
|
| Step 1 |
Position the cursor on the row at which you want to insert a line.
|
| Step 2 |
Press the INSERT LINE function key.
|
|
When using the TYPEOVER Editmode (see Programmer Options in the section
entitled GETTING STARTED) the Insert Text function enables the insertion
of one or more characters of additional text any point within an existing
line of text. The function is not required to add text to the end of a
line and does not permit insertion of new lines of text. Use the Insert
Line function to insert additional lines.
When inserting text in a line, the cursor is moved to the position at
which the new text is to begin and the INSERT CHARACTER key causes the
remainder of the line to be moved to the following row to allow the entry
of text. When finished, pressing EXIT aborts the insertion, and pressing
[RETURN] completes it.
|
| Step 1 |
Move the cursor to the location at which text is
to be inserted and press the INSERT CHARACTER key. Any remaining
characters on the current row will be moved to the next row to provide
space to enter the new text.
|
| Step 2 |
Enter the new text. Should the cursor reach the end of the current row, a
new blank row will be inserted and the cursor wrapped to the new row
automatically. In addition, you can use the BACKSPACE or RUBOUT key to
correct inserted characters without leaving insert mode.
If you change your mind about the insertion, you may abort at any time by
pressing the EXIT key. The original line will be reassembled, the screen
refreshed and you will be returned to edit mode.
|
| Step 3 |
When the desired text has been entered, press the [RETURN] key to
reassemble the current line. The screen will be refreshed and you will be
returned to edit mode.
|
|
The Join Lines function enables two consecutive lines to be joined
together into a single line of text or code. When used, the line
immediately following the current line is moved up and joined to
the end of the current line. Note that the "current line" is the line the
cursor is on when the Join Line function is invoked.
|
| Step 1 |
Position the cursor anywhere on the first of the two lines to be joined
and press the JOIN LINE function key. The second of
the two lines will be immediately joined to the end of the first and you
will be returned to edit mode.
|
|
This key cause the cursor to move the first cursor position of the
current row. If the cursor is on a row which is a continuation from the
previous row, the first cursor position will be two characters to the
right of the first TAB stop. Otherwise, the cursor will jump to the
leftmost column.
|
| Step 1 |
While editing, press the function key assigned to this function. (Press
HELP to determine which key it is on your terminal). You may continue
editing immediately.
|
|
This key cause the cursor to move the first cursor position past the end
of the text on the current row. If the cursor is on a row which has no
text th cursor will move to the column 2.
|
| Step 1 |
While editing, press the function key assigned to this function. (Press
HELP to determine which key it is on your terminal). You may continue
editing immediately.
|
|
The Move Text function is very similar to the
Copy Text function except that it removes the text from the original
location before inserting it at the new location. Text to be moved can
consist of any number of characters or lines.
The only restriction is that text may only be moved within the current
routine. It cannot be moved from one routine to another. Such an
operation can only be done using the Copy function to copy the desired
text
from a second routine, then loading the second routine and deleting the
copied text using the DELETE CHARACTER or DELETE LINE keys.
|
| Step 1 |
Move the cursor to the first character of the text
to be moved.
|
| Step 2 |
Press the COPY/MOVE function key and select MOVE.
You may also press EXIT at this time to return to edit mode.
|
| Step 3 |
Using the cursor movement keys, highlight the text
to be moved. The selected text may be entirely within one line and may
also span multiple lines.
|
| Step 4 |
Complete the selection of text to be moved by
pressing the COPY/MOVE key again. Note that the text to be moved is
removed immediately upon completing the selection and it is no longer
possible to abort the move operation.
|
| Step 5 |
Move the cursor to the position to which the
selected text is to be moved and complete the move operation by pressing
the COPY/MOVE function key once more. The selected text will be inserted
at the indicated position, the screen refreshed and you will be returned
to edit mode.
|
|
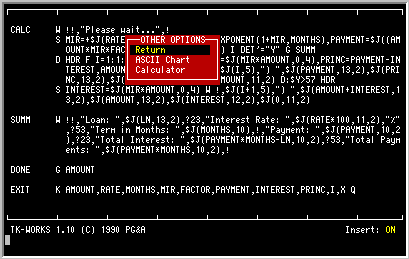
The Other Options function provides a window
with several additional tools often needed during programming. Currently,
these include an ASCII reference chart and a pocket calculator, as
illustrated below.
|
| Step 1 |
Select either using the cursor UP and cursor DOWN
keys to position the bar and press [RETURN]. You can also position the
bar by typing the first character of the desired option. For example,
pressing [C] would position the bar on Calculator. Then the calculator
could be brought up by pressing [RETURN].
|
| ASCII Chart |
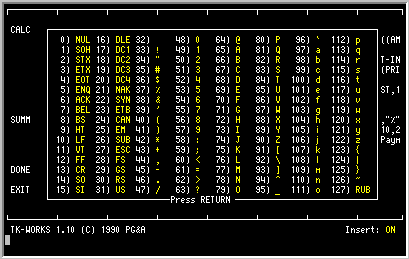
The ASCII Chart, also shown below, is available
for quick reference while programming. When finished, simply press
[RETURN] or EXIT to refresh the screen and resume editing.
|
| Calculator |
An online Calculator is also available from the Other Options menu. Move
the bar to the word "Calculator" and press [RETURN].
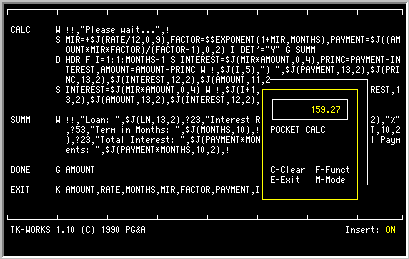
When the calculator has been displayed, you can use it like you would any
pocket calculator. Enter a number, an operator, a number and an equal
sign for a simple calculation, or chain calculations together using the
equal sign at the end. A list of operators and their key assignments is
included below.
|
| Operators |
         Add            [+],[RETURN]
         Subtract       [-]
         Multiply       [*],[X]
         Divide         [/]
         Equal          [=]
         Percent        [%]
|
| Functions |
To use the advanced functions, enter the desired number and press [F]. A
list of available functions will be displayed.
Use the cursor UP and cursor DOWN keys to move the pointer to the desired
function. As the pointer moves, the result of the function will be
displayed in the display area. Press EXIT to return to the entry window,
or [RETURN] to carry the result back to the entry window. The available
functions include:
          SQRT          Square Root
          N.LOG         Natural Logrithm
          EXP           Exponent
          SIN           Sine
          COS           Cosine
          DEG to RAD    Degrees to Radians
          RAD to DEG    Radians to Degrees
|
| Exit |
To exit the calculator and return to the Routine
Editor, press [E] or EXIT. The screen will be refreshed and you will be
returned to your routine.
|
|
The Recall Text function is provided to enable text to be recalled from
the TK-WORKS code library and inserted at a specified location in the
current routine. Note that text is added to the code library using the
Save Text function.
|
| Step 1 |
Press the COPY/MOVE function key and select RECALL
from the COPY/MOVE menu.
|
| Step 2 |
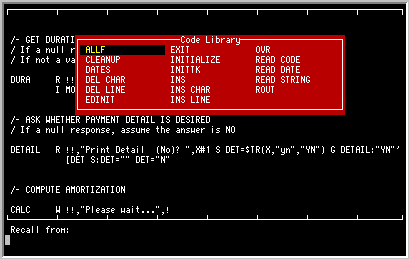
When asked 'Recall From:', enter the name given
the desired text when it was saved to the code library. If you press the
HELP key, a window will appear containing names currently defined, as
illustrated below. If the name you enter is not found in the code library
the same window will appear showing all the names in the code library
which begin with the characters you entered. Find and select the desired
name or press EXIT to look again.
~"SCREEN TKWORKS,RECALL,1,1.4,B
|
| Step 3 |
Move the cursor to the location in the current routine at which the
recalled text should be inserted. Of course you may abort the recall
operation at this time by pressing the EXIT key. Otherwise, press the
COPY/MOVE key once more to complete the operation.
The recalled text will be inserted at the indicated location, the screen
refreshed, and you will be returned to edit mode.
|
|
The Save Text function is used to add portions of text to the TK-WORKS
code library. At the time it is saved, each portion of text is provided a
name with which it can be recalled later for insertion into other routines
using the Recall Text function. The name is also used to subsequently
remove the text from the code library using the
Discard Text Function.
|
| Step 1 |
Position cursor at the beginning of the text to be saved and press the
COPY/MOVE key.
|
| Step 2 |
Select SAVE from the COPY/MOVE menu, and using the
cursor movement keys, highlight all of the text to be saved. To abort the
save, press EXIT.
|
| Step 3 |
Press COPY/MOVE a second time to mark the end of
the text to be saved. When asked 'Save to: ', enter a name for the text
which will be easy to identify later. The name may be up to 15 characters
long and is not case sensitive, so the name 'INIT' will not be the same as
the name 'init'.
Complete the operation by pressing [RETURN]. The screen will be refreshed
and you will be returned to edit mode.
|
|
The Swapline function switches the sequence of two lines. The Swapline Up
function swaps the current line (i.e., the line
the cursor is currently on) with the line above it. After the switch is
completed, the cursor remains with the line it was on originally. In this
way, a line can be moved up the routine by repetitively pressing the
SWAPLINE UP key.
|
| Step 1 |
Place the cursor on the lower of the two lines to
be switched and press the SWAPLINE UP key. Note that the cursor can be on
any part of the line, including continuation lines. The two lines will be
immediately reversed and you will be placed back in edit mode.
|
|
The Swapline function switches the sequence of
two lines. The Swapline Down function swaps the current line (i.e., the
line the cursor is currently on) with the line below it. After the switch
is completed, the cursor remains with the line it was on originally. In
this way, a line can be moved down the routine by repetitively pressing
the SWAPLINE DOWN key.
|
| Step 1 |
Place the cursor on the upper of the two lines to
be switched and press the SWAPLINE DOWN key. Note that the cursor can be
on any part of the line, including continuation lines. The two lines will
be immediately reversed and you will be placed back in edit mode.
|