TK-GUARDIAN MAINTENANCE FUNCTIONS

If this parameter is set to NO , logon will not be required by TK-GUARDIAN, no screening of menu options based on identity will be performed, and access to the menu system will be immediate.
When the parameter is set to YES , users will be required to identify themselves at the logon screen prior to gaining access to the menu system.
Device-oriented security will be unaffected by the status of user security.
However, many sites have already become familiar with a two step approach in which users identify themselves first, then enter a password which must match the password assigned to them. If this is the preferred approach to logon security, then you should enter YES in this field.
If security provisions have disabled direct mode (or programming mode) for this device, the screen will clear after timeout has occurred, a terminating message will be displayed, and the job halted. If direct mode is enabled when timeout occurs, TKGUARDIAN will quit, but not halt the job. Control will be passed to MUMPS.
NOTE: Some MUMPS environments allow a job's status to be changed from "tied" to "free" during a session. Others do not. If you encounter problems with this feature, please call us. We will gladly provide more specific information.
When this parameter is set to NO , no screening of menu options will be done based on the location of the device and logon will not be denied.
When set to YES , screening of menu selections will be performed based on the location of the device on which the user is attempting to log on. The specifics of the security at any location are maintained in the Device Maintenance screens which will be covered later in this manual.
If this parameter is set to YES , all menu options will be displayed whether or not they can be accessed by the user at the time.
If set to NO , only those menu options which can be accessed by the user will be displayed.
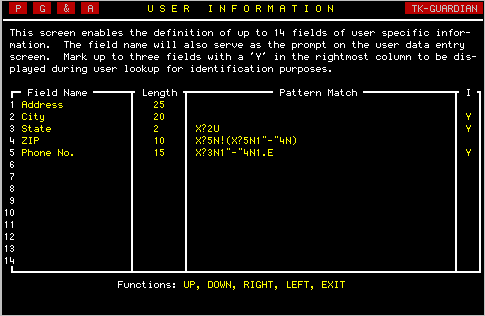
The user information screen provides the ability to define the contents of your system's user database. Each field defined on this screen will become part of the user data entry screen discussed later.
NOTE: The row on which the field appears determines where the user data will be stored in the user database. Therefore, it is important to fill in and adjust this screen to your liking prior to entering any user information. The row on which the field appears cannot be changed later.
There is no method for making the entry of information into the field mandatory. And, if no data is entered, the validation code will not be executed.
All of the fields may be modified after user data has been entered. Only the row on which the field definition data was entered may not be changed later.
If you press EXIT once too often and find yourself back in direct mode, fear not. Simply, enter...
DO ^TKGUwhich is the startup program for TK-GUARDIAN. Hint: don't forget your password.
This editor provides the ability to design your own logon screen. The resulting screen is then used by all terminals requiring user logon.
Use [SPACE] to erase unwanted characters or drawings.
| Indicator | Video Mode |
| H | High Intensity |
| U | Underline Mode |
| R | Reverse Video Mode |
If a mode indicator is not entered, the reverse mode becomes active. For example, if in high intensity mode and [R] is entered, the resulting mode will be low intensity reverse video because [H] was not entered.
Pressing [RETURN] after entering no indicators will result in low intensity, normal video with underlining off.
Try it. You will quickly get the feel for it. When you have finished your line drawing, press [TAB] again to return to text mode.
NOTE:From time to time the editor does not put the desired line drawing character where you wanted it. You can force other line drawing characters from text mode by moving the cursor to the position you want changed and pressing [CTRL][A]. Each time you press [CTRL][A], another line drawing character will be displayed. When satisfied, just move the cursor away from the position.
On the logon screen provided with TK-GUARDIAN, you will notice a bright @P . This indicates the current location of the cursor during password entry. This is true whether single or two-stage logon has been selected in Basic Parameters. The location can be easily moved by placing the cursor in the desired position and pressing [CTRL][P].
If you have selected two-stage logon in Basic Parameters, it is also necessary to indicate the cursor location during entry of the User Identification. This position is indicated on the screen by a bright @U and can be moved by placing the cursor in the desired position and pressing [CTRL][U].
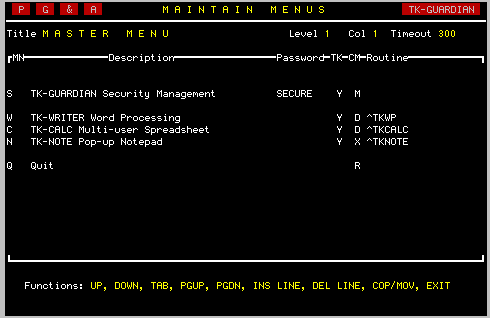
This is the TK-GUARDIAN Menu Editor. It provides a variety of approaches to constructing a menu system that is as simple or as complex as your application (or applications) demand.
As you compare the example shown above to your screen, you will quickly notice that for the purpose of this introduction, we have added several options in addition to Security Maintenance.
To understand how the Menu Editor works, it is helpful to gain some insight into the menu structure which underlies the system.
The first thing to learn is that TK-GUARDIAN makes use of a tree structured design. In other words, there is one master menu from which all menus can be accessed.
Tree Structured Menu System (O] FONT 10800; MRP 2.5,0; BOX 1,.6; MRP .27,.24; TEXT "Master"; MRP .05,.2; TEXT "Menu"; MRP .18,.16; DRP 0,.2; DRP 2,0; MRP -2,0; DRP-2,0; DRP 0,.2; MRP -.5,0; BOX 1,.6; MRP .35,.24; TEXT "User"; MRP -.23,.2; TEXT "Application"; MRP 2.38,-.64; DRP 0,.2; MRP -.5,0; BOX 1,.6; MRP .25,.24; TEXT "Level 2"; MRP .08,.2; TEXT "Menu"; MRP .17,.16; DRP 0,.2; MRP 2.02,-1; DRP 0,.2; MRP -.5,0; BOX 1,.6; MRP .25,.24; TEXT "Level 2"; MRP .08,.2; TEXT "Menu"; MRP .17,.16; DRP 0,.2; DRP 1,0; DRP -2,0; DRP 0,.2; MRP -.5,0; BOX 1,.6; MRP .35,.24; TEXT "User"; MRP -.23,.2; TEXT "Application"; MRP 2.39,-.64; DRP 0,.2; MRP -.5,0; BOX 1,.6; MRP .25,.24; TEXT "Level 3"; MRP .08,.2; TEXT "Menu"; MRP .17,.16; DRP 0,.2; FONT 1; EXIT;
Notice in the illustration shown above, that all applications and sub-menus are accessed through the master menu. Also, note that applications can be invoked at every level, including the master menu.
Although it is unlikely that there will ever be a need to test it, there is a theoretical limit of over two hundred levels which the tree structure will support. Since each menu can have as many as forty eight selections in it, most menu systems will never go past four or five levels.
To remedy this situation, we have added a pop-up window which tells which keys on your terminal perform the various functions. Press a ? to see this list, and press [RETURN] when ready to resume editing.
Each option on a menu may have a mnemonic which can be up to three characters in length and can be composed of only upper case alphabetic characters and numerals.
Care must be taken when assigning mnemonics to avoid having two or more options in the same menu with the same one. This of course will make identification of a selection by mnemonic difficult.
However, TK-GUARDIAN supports up to three columns of options on each menu. In some cases, the Menu Editor is forced to truncate the description to make it fit on the screen. The best way to determine maximum lengths for your options is through experimentation.
| D |
DO the routine indicated. This is the most commonly used
commandbecause it does not require the application being called to know
where to return. It must only QUIT when completed.
|
| G |
GOTO the routine indicated. Certain applications which make
use of error trapping, which destroys the partition stack, may need to use
the GOTO command. When finished they must branch to RTN^TKGU1 to return
to the menu driver.
|
| X |
Xecute the string or global indicated. Although not common, some
applications are actually stored and executed from globals. TKNOTE and
TK-PC from TOOLKIT I are examples of routines that must be called using
the Xecute command.
|
| M |
Branch to the sub-menu for this option. This command is used to
indicate to the Menu Editor and the Menu Driver that there is a sub-menu
if this selection is invoked.
|
| R |
Return to previous level. Use of this command is entirely
optional. It enables the creation of a menu option which returns to the
previous menu level, or out of the menu system entirely if at the master
menu. In all menus, the EXIT function key performs the same.
|
| T |
Title. Use of this command indicates that description is to be
displayed as a title on the menu, and therefore cannot be
|
By using horizontal scrolling, the Menu Editor provides more space in this field than is available on the screen. As a result, you can enter more than the 18 characters which the screen is able to display at one time.
Two supplemental routines, called CLR and PAU , which are internal to the Menu Driver are available for use before and after branching to your applications. CLR positions the cursor at row 1 column 1 of the screen and erases its contents. PAU forces a "Press any key to continue..." message prior to re-entering TK-GUARDIAN menus.
It is important to note, however, that these subroutines can be used only with the DO and XECUTE commands. Examples of its use are provided below:
| Command | Routine |
| D | CLR,^MYPROG |
| X | D CLRX ^MYGLOB |
| D | ^MYPROG,PAU |
| X | ^MYGLOB D PAU |
| D | CLR,^MYPROG,PAU |
| X | D CLRX,^MYGLOB D PAU |
Each title can be changed by moving to the Title field on the screen using the cursor [UP] key when in the Timeout field.
To move from one column to the next, press the [TAB] key. When the third column is on the screen, pressing the [TAB] key will return you to the first column.
Likewise, to move back from a sub-menu, use the PGUP key. Unlike using the PGDN key, the cursor does not have to be in any particular position for it to work.
Occasionally, there is a need to move selections around on a menu. This can be easily accomplished using the COP/MOV function key. To do so, position the cursor on the line of the option to be moved and press the COP/MOV function key.
Now use the [TAB], cursor [UP] and cursor [DOWN] keys to move the option to the desired location on the menu. When satisfied, simply press [RETURN].
Because of the interaction between the menu system and the security system, it is not recommended that a selection be deleted and then re-added at some other location. All security clearances would have to be re-established for the new item.
Using the COP/MOV function is quicker, and relieves you of the headache of revising system security.
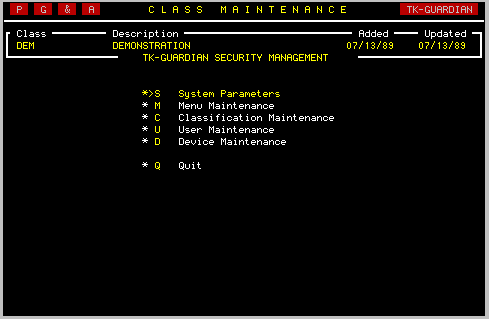
A sub-menu will be displayed. Select the option titled Add/Edit Classification.
If you press a * the current list of classifications will be displayed. You can select one of them by moving the pointer to the desired classification and pressing [RETURN]. Should the classification you're looking for not be in the list, press the EXIT key and you will be given the opportunity to search again.
If you enter several characters, such as AL , and press [RETURN], TK-GUARDIAN will display only those classifications which start with the letters 'AL' and you can choose one of them as described above.
However, if no classifications exist which begin with the letters 'AL', you will be asked if you would like to add this one. Answer with a Y if you want to add the classification you've searched for.
The default classification was assigned to the system manager when TK-GUARDIAN was initialized.
After the screen changes, you will first be given an opportunity to change the classification description. Press [RETURN] to leave it as it is, or when finished making your changes.
The screen which is displayed should appear very similar to the following example.
Although it is very easy to modify security for a classification, you'll notice that very little assistance is provided on the screen. This in a small way is to prevent unwanted tampering with the definition of security classifications.
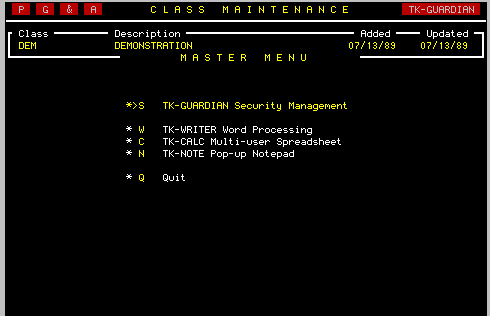
While the cursor is on the only option, type a Y . This will enable this option for users and devices assigned to this security classification. Since the cursor was on the last (and only) option of the menu when Y was pressed the maintenance program has proceeded to the next menu. A menu, much like the one shown below, should be displayed.
Beginning with the first (or master) menu, each of the available menus in the menu system will be displayed on the screen as in the example. Those menu options which have been made available for this classification are indicated by an asterisk * to the left of the option.
For each menu, there are several possible actions.
| UP |
Use the cursor [UP] key to move the pointer to the previous menu
option.
|
| DOWN | The cursor [DOWN] key works the same except in reverse.
|
| Y | Press the character Y
to enable the security for the option
which the pointer currently points to.
|
| N | Press N to disable security for the current option.
|
| EXIT | Press the EXIT key to complete the security edit for this menu. In succession, any submenus which have been enabled will be displayed for edit. Exiting the last menu will return you to the Security Maintenance Menu. |
A sub-menu will be displayed with three User Maintenance options. Select the first Add/Edit User.
It first prompts for user name. This lookup field works the same as the Classification Lookup. Press * to see a list of the currently defined users. Notice that your name (or that of the System Manager) has already been added by the Initialization program.
Select this name by again pressing [RETURN]. The full user screen will be displayed. A sample of this screen is provided here.

Notice that the cursor remains in the NAME field to enable edit of the user's name. Using [RETURN] or the cursor [DOWN] and cursor [UP] keys, the cursor can be moved to desired fields.
If additional user fields have been defined in the User Information screen, they have been added to the bottom of the screen.
Several fields on this screen have key importance to the management of system security. They are as follows:
In a two-stage logon, the password verifies the identity of the user who has already identified himself or herself.
NOTE: Some MUMPS environments allow a job's status to be changed from "tied" to "free" during a session, thus enabling Direct Mode. Others do not. If you encounter problems with this feature, please call us. We will gladly provide more specific information.
| a) |
Leave it empty. When the classification field is empty, TK-GUARDIAN
looks for user specific security clearance. (See Change User Security).
If left empty, and no user-specific security is defined, access will be
denied at login with the message "NO OPTIONS AVAILABLE".
|
| b) |
Enter 'ALL'. This is a default classification which provides
immediate access to all menus and selections.
|
| c) | Enter the name of a security classification which has been defined in the Classification Maintenance screen. |
Select the Change User Security screen from the User Maintenance menu. You will first be prompted for the user name. Enter several characters of the user's last name (or * for a list of all users) and press [RETURN]. Select the desired user by moving the pointer up or down to it and pressing [RETURN].
From this point on, this program operates just like the Classification Security maintenance program. Refer to the explanation there for further assistance.
NOTE: When a user has been given security through this program, it will not take effect until the Security Classification field in the Add/Edit User Screen is blank.
Select the Delete User screen from the User Maintenance menu. You will first be prompted for the user name. Enter several characters of the user's last name (or * for a list of all users) and press [RETURN]. Select the user to be removed from the system by moving the pointer up or down to it and pressing [RETURN].
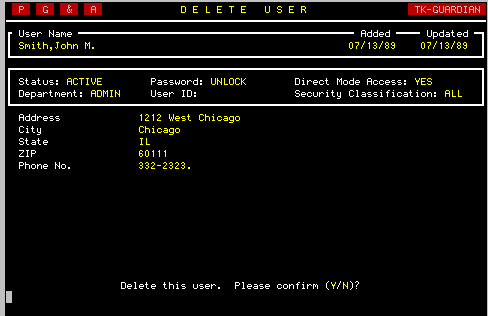
As you can see in the example above, the user's data is displayed to assist in confirming that the correct user has been selected.
If this is not the intended user, press N or the EXIT key to search again. Otherwise, press Y. The user will quickly be removed.

NOTE: Some networks, such as Ethernet, do not provide static device numbers for each terminal device. In these environments, a device named DEFAULT must be created to control security.
Most of the parameters of this screen can be applied to all terminals in a networked environment by defining a device called "DEFAULT". At the time of logon, TK-GUARDIAN first checks to see if the current device has been defined. If not, it then checks to see if a device called "DEFAULT" has been defined. If neither are available, and device security has been enabled by the Basic Parameters screen, logon is denied.
When TK-GUARDIAN was initialized, the device from which it was initialized was defined temporarily for you. The screen should be very similar to the sample shown above.
After selection of a device, and editing of the device location, you are given the opportunity to define device specific parameters. The key fields available are described below.
Possible responses are S for Secured, and U for Unsecured. When a device is unsecured, logon is no longer required, access is granted to all menus and menu options, and direct mode is enabled.
If you leave the security classification field empty, the system assumes that you either have, or will define device-specific security for this device. Refer to Change Device Security for more information.
Note however that user parameters always override device parameters in this system. As a result, if Direct Mode is not enabled, a user who has been provided Direct Mode Access will be able to enter direct mode.
In addition, a user for whom Direct Mode has been denied, logging in to a device in which Direct Mode has been disabled, will not have access to direct mode once they have logged in.
NOTE: Some MUMPS environments allow a job's status to be changed from "tied" to "free" during a session, thus enabling Direct Mode. Others do not. If you encounter problems with this feature, please call us. We will gladly provide more specific information.
Note that purging for each device is performed when a logon to that device is attempted.
Select the Change Device Security screen from the Device Maintenance menu. You will first be prompted for the device. Enter the device number (or * for a list of all devices) and press [RETURN]. Select the desired device by moving the pointer up or down to it and pressing [RETURN].
From this point on, this program operates just like the Classification Security maintenance program. Refer to the explanation there for further assistance.
NOTE: When a device has been given security through this program, it will not take effect until the Security Classification field in the Add/Edit Device screen is blank.
Select the Delete Device screen from the Device Maintenance menu. You will first be prompted for the device number. Enter the number of the desired device ($I or * for a list of all devices) and press [RETURN]. Select the device to be removed from the system by moving the pointer up or down to it and pressing [RETURN].