APPENDIX A
SYSTEM INFORMATION
The appendix consists of two sections; Section I describes the initialization process for a new terminal, including a brief explanation of the necessary responses. Section II provides information necessary to define new device types to the software.
INITIALIZATION
| 1. | The types of CRTs that will be used with the PG&A software |
| 2. | The right margin required for non-PG&A applications |
| 3. | Should Carriage Return be required in PG&A menus |
| 4. | Is a local area network making the value of $I inconsistent |
An example of the dialog is shown at the end of this section. Below is some detailed information on each step in the initialization process.
NOTE: It is best to select only the device types to be used at your site. Certain modules of the PG&A software will make changes to the text based on the number of device types. The more types you specify, the longer it will take.
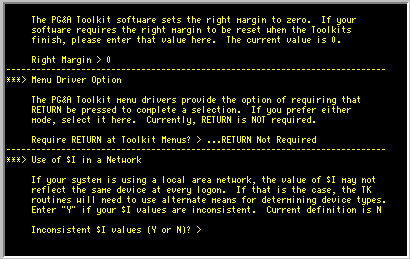
MARGIN SETUP
Upon a normal exit of the Toolkit routines, the right margin will be reinstated. If this is necessary on your system, enter the value of the desired right margin (from 0 to 255). Otherwise, just press "RETURN".
OPTION
This second method, entering the option letter, is generally preferred by advanced users. It enables quicker response and takes advantage of type-ahead if supported by your operating system. If the "RETURN" is required, then this operation becomes a two step procedure.
You will be asked whether the "RETURN" is required. Generally speaking, you may want to make the decision based on the menus your users are most accustomed. If "RETURN" is to be required respond by entering "Y" for 'yes'; otherwise "N" for 'no'.
$I VALUES
| 1. | If answer is NO. TK uses the global variable ^TK($I). This is generally setup by the TKDEV routine, but may also be defined by the user with a direct set to global. |
| 2. | If answer is YES. TK will use a process of terminal and user interrogation to try to determine the type. If the type of the terminal cannot be determined automatically, then the user will be prompted for the type from a list of available choices. |
This question has no value if there is only one device type.
INITIALIZATION
DEVICE
PARAMETERS
| 1. | Operating system independence |
| 2. | Terminal independence |
| 3. | User-friendliness |
With a properly configured system, this protocol will provide the user with a consistent, high level, full screen oriented interface with as little system overhead as possible. Although not all terminals will support all elements defined within this protocol, usually a meaningful subset can be defined which will give a close approximation to the intended result.
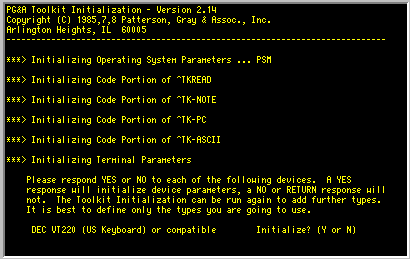
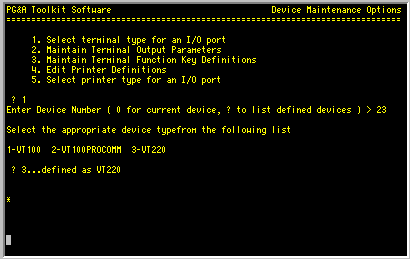
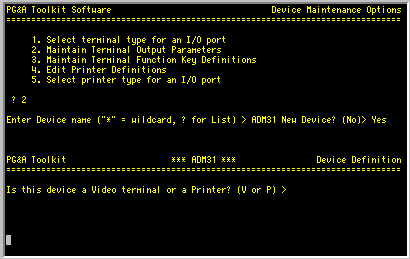
To edit an existing device type or add a new one, call the device definition program ^TKDEV as shown below:
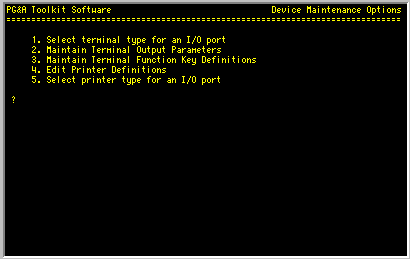
A typical dialogue might look like this...
Edit Device
Parameters
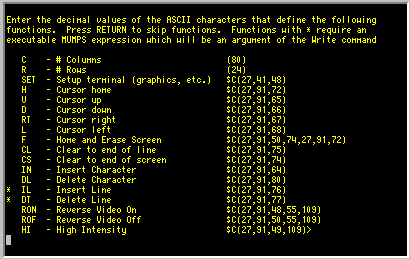
You will need to have your terminal's programming guide available should you need to modify these parameters. You will be asked for control sequences for clearing the screen, moving the cursor, inserting and deleting lines and so on.
You will also be asked to provide the line drawing character set to be used by the Toolkits when drawing boxes and other shapes. If your terminal does not support one or more of these parameters, skip it and continue on. You may find that you will be able to function quite capably without it.
There are several things to watch for when entering the values. Asterisks to the left of an item indicate that you need to enter the MUMPS code to effect the function required. This is true for cursor addressing and scroll regions. The code entered should be a valid MUMPS argument for a WRITE command.
All other items required you to enter the decimal values for the control sequence. If more than one value is necessary separate them with a comma. Do not use spaces.
For example, if the control sequence for clearing the screen is an ESC C, then you should enter...
27,67
...where the 27 is the decimal value for the ESCAPE and the 67 is the decimal value for C.
An example of the dialogue of Option 2 is illustrated in the four screens which follow.
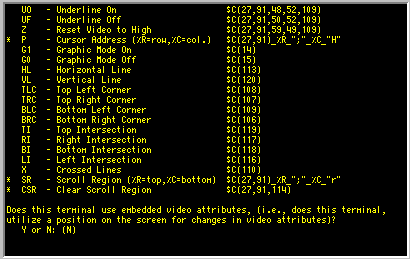
In the these examples the user entered the decimal values and the computer echoed back the values enclosed in the $CREATE function. The '$C and ')' were not entered; this is done by the program.
On asterisked items in the second and third screen, such as the item 'P' for cursor addressing, the user did enter the '$C( )' since the entire MUMPS expression is required. This is to allow for other variations in the code such as adding 31 to the row and column values as needed.
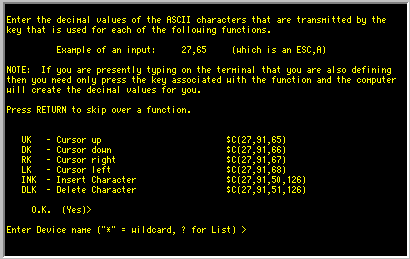
Note also that it is not necessary to look up the values for the parameters listed in the INPUT PARAMETERS section. When editing the terminal type that you are also typing on, you are permitted to press the key corresponding to the parameter you are defining.
For example, press the Cursor Up key on your terminal for the first parameter, Cursor Down key for the second and so on. When the key is pressed the program will display the decimal values received from the key. The "RETURN" key need not be pressed when entering values in this way.
If you press the appropriate key and the program does not respond, then one of the following conditions may be the problem.
| 1. | The key is not sending a control sequence to the computer because it is disabled from the terminals set-up features. You may not have used some of these keys before and they are disabled. Refer to the terminal's manual to determine how to enable them. |
| 2. | The control sequence is not being sent to the computer because it needs to be 'programmed' by the computer first. This is especially true of function keys. Some terminals require that the function keys be loaded with the control sequence from the computer before they work. You will need to enter the appropriate MUMPS code for that terminal set-up as described in Option 3 Edit Function Key Definitions. |
| 3. | The global variables ^TK("TERMST") or ^TK("TERM-ON") are not
initialized correctly for your operating system. However, if other
terminals are already working correctly with PG&A software on your system,
this may not be the problem. The ^TK("TERMST") variable sets a variable called ZF to the ASCII code sequence that was received from the function key. Most MUMPS operating systems enable the capture of this information in one way or another. Be sure that this is being done properly. The ^TK("TERM-ON") variable is the MUMPS code necessary to turn on the TERMST feature. If your operating system was named in the TKINIT utility, these two variables should be correctly defined.
|
Edit Function Key
Definitions
If the functions key are defined for your particular terminal, they may be used where applicable. If you are not using the software packages listed above, you need not be concerned with this option.
Unlike the other two options in the device utilities, this option requires that you use the terminal type that you are currently defining to make the definitions. You will be required to press the function key that corresponds to the feature that you would like it to perform. You cannot enter the decimal values directly on the screen.
A number of terminal types are already defined for you and the software will use these defaults when you run TK-NOTE, TK-FORM, TK-CALC, and TK-WRITER. If your terminal type is not defined, these packages will automatically take you to this option so that you can define it. Once defined, you can always return to this option in order to make changes.
Keep the following points in mind when you edit function key definitions:
| 1. | The changes you make will affect all the terminals of the same type that share the same ^TK global. If you change the VT220 definition, it will change it for all the users who are using VT220s. |
| 2. | The changes you make will affect the other TK software users. All the TK packages share the same definitions. |
| 3. | Function keys on some terminals can be used in conjunction with the SHIFT, ALTERNATE, and CONTROL keys. You may want to take advantage of this feature if you are short of keys or if you want to make some keys less accessable. |
| 4. | If you don't have enough keys to implement all of the functions listed, you can either use Control sequences such as CONTROL W for Jump to Next Word or you can leave the function blank in which case it will be disabled. |
| 5. | Take time to design a keyboard layout that will be user friendly. The key definitions should be made as obvious as possible, so that the beginner can find them quickly. They should also be positioned so that the often used functions are readily accessible. |
| 6. | Make templates of the unlabled keys if at all possible. It is difficult to remember twenty five functions when the keys are only numbered F1, F2, etc. |
The program will then request for MUMPS code to enter and exit the 132 column mode. Leave these two items blank if the terminal doesn't support 132 columns, otherwise enter MUMPS Xecutable code to change the terminal appropriately.
The program will then request for MUMPS code to enter and exit the INSERT CHARACTER mode. Leave these two items blank if the terminal doesn't support this mode, otherwise enter MUMPS Xecutable code to change the terminal appropriately.
Below is example of the first screen for the VT220 terminal:
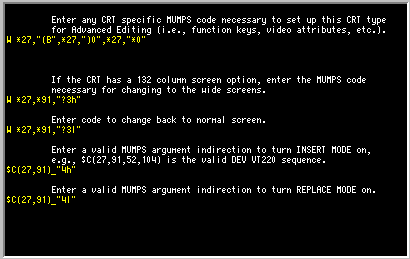
Each field provides 255 characters in which to make these entries. You can use the insert and delete characters, and cursor keys for editing.
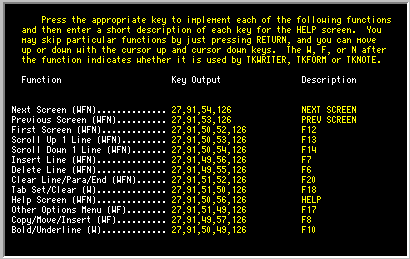
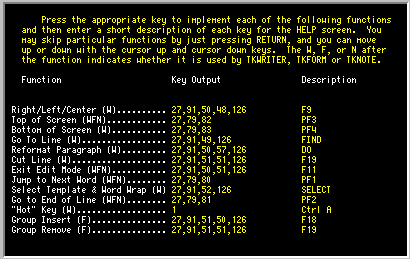
The second and third screens of Option 3 is where function keys are actually defined. Press the desired key and then enter a short description of the key you just entered. If you pressed F1, enter 'F1'. If you pressed Shift-F1, make sure you enter 'SHIFT F1'. This description is used in conjunction with the Toolkits' help screens.
The following two screen shows the function key definitions of the VT220 as they are defined by the TK initialization routines: